 |
|
 03-27-2021, 06:06 PM
|
#1381
|
|
Proud No Intent Owner
Join Date: Jul 2019
Location: Belmont, CA
Posts: 1,774
|
Quote:
Originally Posted by YGoHom

Todays project was installing the new window shades up front to cut down the heat entering da Winnie.
What a difference!!!! Immediately cooler inside.
You can still see out during the day, but cant see in. Night time that will reverse. You still have to use the pull down shade.
They say you need 2 people to install, but my wife is balance challenged so I tackled alone, with the aide of blue masking tape. It took me a while to clean the windows and remove the wax that I just put on 
The rest was pretty easy after watching the videos.
I got the front and side shades, and had them extend the length of the sides to attach to the body, rather than the sliding window. This way the windows can still be open with the screens in place. They even throw in wiper blade covers. Bu-Bye pool noodle!
The website says 5-7 week delivery time, but I received mine in 2 weeks, even with delayed shipping due to the storm passing through Texas.
Expensive, but worth it. |
Very cool indeed! Now, its time for you to try out Jumbo Rocks in June! 
|

|

|
|
03-28-2021, 01:19 PM
|
#1382
|
|
Winnebago Camper
Join Date: Mar 2021
Location: Gilbert, Az
Posts: 27
|
Clean-out angle
Hey everyone! We headed out for an overnight to Point of Rocks campground in Prescott, AZ. Interesting place. Very pretty.
Here’s my issue: we hooked up to dump black and gray. First time ever.
Anyway, I’m confused as to why my pipe outlet is angled up instead of down? Is that normal? How can I empty completely with it like that? Suggestions, comments, concerns, please? See attached pics
|
|
|
|
|
03-28-2021, 01:26 PM
|
#1383
|
|
Winnebago Camper
Join Date: Mar 2021
Location: Gilbert, Az
Posts: 27
|
Quote:
Originally Posted by bdub
Congrats! What mattress company did you go with? So far we have gotten by with a gel foam topper cut down to the off-size of the stock mattress.
|
Pics of the new mattress in my album.
It was very comfortable. Not as comfortable as home, but pretty close. We also put a padded mattress cover on it just in case.
__________________
2018 Intent 31P Plain Jane 
Upgrades: Safe-T-Plus; LED Headlights
|
|
|
|
|
03-28-2021, 01:44 PM
|
#1384
|
|
Winnebago Owner
Join Date: Jan 2019
Location: California
Posts: 242
|
Quote:
Originally Posted by RedQueenBWG
Hey everyone! We headed out for an overnight to Point of Rocks campground in Prescott, AZ. Interesting place. Very pretty.
Heres my issue: we hooked up to dump black and gray. First time ever.
Anyway, Im confused as to why my pipe outlet is angled up instead of down? Is that normal? How can I empty completely with it like that? Suggestions, comments, concerns, please?
See attached pics
|
Oh no! That middle bit, that your slinky hooks up to, pivots. Travel with it pivoted upward and the rotate down when hooking up the slinky. It points almost straight down so you can feed the slinky up through the bottom of the bay. I think the least messy approach to get out of that jam is to feed the slinky down through the hole in the bottom of the bay, leave it connected to the tanks, and rotate the middle bit downwards after feeding the slinky through that hole and resetting it on top of the dump hole. I'd probably grab a bunch of paper towel and jam it up the end of the slinky.
__________________
2018 Winnebago Intent 26M - The Willenium Falcon
RSSA Steering Stabilizer by Roadmaster
2017 Jeep Grand Cherokee Trailhawk. Go Preds!
|
|
|
|
|
03-28-2021, 02:16 PM
|
#1385
|
|
Winnebago Master
Join Date: Oct 2018
Location: Oceanside, CA
Posts: 500
|
Yup. Close drains. Rotate down as much as possible to drain the hose. Then disconnect the hose and bring in from the hole in the compartment bottom and angle the drain down to best align to the hose. Now finish dumping.
You may need to replace that clear straight pipe with a clear 45 to fit best.
Theres no need to ever rotate the center up, or remove the clear piece. Leave it where it fits best to dump and then just attach the stinky slinky. As long as the valves close properly, that center will always be dry.
Also...your fridge latch should arrive tomorrow, after your trip 
__________________
2018 INTENT 26m
Safe-T-Plus, CHF, SuperSteer rear trac bar, RoadMaster front/rear anti-sway bars, SumoSprings, 400w solar.
|
|
|
|
|
03-28-2021, 02:29 PM
|
#1386
|
|
Proud No Intent Owner
Join Date: Jul 2019
Location: Belmont, CA
Posts: 1,774
|
The whole discharge pipe rotates down. Just turn it. It’s firm, but it’ll rotate.
|
|
|
|
|
03-28-2021, 03:16 PM
|
#1387
|
|
Winnebago Camper
Join Date: Mar 2021
Location: Gilbert, Az
Posts: 27
|
Quote:
Originally Posted by Wyatt
The whole discharge pipe rotates down. Just turn it. It’s firm, but it’ll rotate.
|
Thank you! Will try now and let you all know how we fared.
|
|
|
|
|
03-28-2021, 03:17 PM
|
#1388
|
|
Winnebago Camper
Join Date: Mar 2021
Location: Gilbert, Az
Posts: 27
|
Quote:
Originally Posted by YGoHom
Yup. Close drains. Rotate down as much as possible to drain the hose. Then disconnect the hose and bring in from the hole in the compartment bottom and angle the drain down to best align to the hose. Now finish dumping.
You may need to replace that clear straight pipe with a clear 45 to fit best.
There’s no need to ever rotate the center up, or remove the clear piece. Leave it where it fits best to dump and then just attach the stinky slinky. As long as the valves close properly, that center will always be dry.
Also...your fridge latch should arrive tomorrow, after your trip |
Awesome! Thank you! Will try now and let you all know how we fared.
Don’t worry, there will be another trip! LOL I look forward to the new latch. 
|
|
|
|
|
03-28-2021, 03:19 PM
|
#1389
|
|
Winnebago Camper
Join Date: Mar 2021
Location: Gilbert, Az
Posts: 27
|
Quote:
Originally Posted by bdub
Oh no! That middle bit, that your slinky hooks up to, pivots. Travel with it pivoted upward and the rotate down when hooking up the slinky. It points almost straight down so you can feed the slinky up through the bottom of the bay. I think the least messy approach to get out of that jam is to feed the slinky down through the hole in the bottom of the bay, leave it connected to the tanks, and rotate the middle bit downwards after feeding the slinky through that hole and resetting it on top of the dump hole. I'd probably grab a bunch of paper towel and jam it up the end of the slinky.
|
We have a cap for the slinky so, maybe that will be okay? Thank you for the update. Will let you know how we do!
|
|
|
|
|
03-28-2021, 03:22 PM
|
#1390
|
|
Winnebago Camper
Join Date: Mar 2021
Location: Gilbert, Az
Posts: 27
|
Thanks
@Wyatt, @Bdub and @YgoHom - you’re all awesome. Thank you for your amazing experience and willingness to share it! 
|
|
|
|
|
03-28-2021, 03:38 PM
|
#1391
|
|
Proud No Intent Owner
Join Date: Jul 2019
Location: Belmont, CA
Posts: 1,774
|
Quote:
Originally Posted by RedQueenBWG
We have a cap for the slinky so, maybe that will be okay? Thank you for the update. Will let you know how we do!
|
Contrary to what you may hear, its always best to drain a SMALL amount of gray water first, to insure your pipes are all connected properly and have no leaks. Then, empty the black, then the gray fully.
As previously mentioned, this is a great way to see whats going on, and to backflush your tanks, IF you dont have that feature on your rig.
https://www.amazon.com/Camco-Holding...6967320&sr=8-1
|
|
|
|
|
03-28-2021, 04:28 PM
|
#1392
|
|
Winnebago Camper
Join Date: Mar 2021
Location: Gilbert, Az
Posts: 27
|
Quote:
Originally Posted by Wyatt
Contrary to what you may hear, its always best to drain a SMALL amount of gray water first, to insure your pipes are all connected properly and have no leaks. Then, empty the black, then the gray fully.
As previously mentioned, this is a great way to see whats going on, and to backflush your tanks, IF you dont have that feature on your rig.
https://www.amazon.com/Camco-Holding...6967320&sr=8-1 |
I just ordered one of those! Lol I’m on the right wavelength.
__________________
2018 Intent 31P Plain Jane
Upgrades: Safe-T-Plus; LED Headlights
|
|
|
|
|
03-28-2021, 11:42 PM
|
#1393
|
|
Proud No Intent Owner
Join Date: Jul 2019
Location: Belmont, CA
Posts: 1,774
|
Quote:
Originally Posted by RedQueenBWG
I just ordered one of those! Lol I’m on the right wavelength.
|
Ok, but also order a dedicated hose that only is used is for the backflush.
We use expanding hoses.
Also, once you’re done flushing the blank tank, add 5 gallons back. That’s what you need to cover the bottom of the tank, to keep things from sticking. Believe me, I’ve tested this.
We also use quick releases on everything, so you’d need these too, I’d you want to make things easier...
Here’s what you’ll need....
|
|
|
|
|
03-29-2021, 12:16 AM
|
#1394
|
|
Winnebago Camper
Join Date: Mar 2021
Location: Gilbert, Az
Posts: 27
|
Quote:
Originally Posted by YGoHom
Yup. Close drains. Rotate down as much as possible to drain the hose. Then disconnect the hose and bring in from the hole in the compartment bottom and angle the drain down to best align to the hose. Now finish dumping.
You may need to replace that clear straight pipe with a clear 45 to fit best.
Theres no need to ever rotate the center up, or remove the clear piece. Leave it where it fits best to dump and then just attach the stinky slinky. As long as the valves close properly, that center will always be dry.
Also...your fridge latch should arrive tomorrow, after your trip |
Got home just a bit ago, fridge latch was in the mailbox. Thank you again!
__________________
2018 Intent 31P Plain Jane
Upgrades: Safe-T-Plus; LED Headlights
|
|
|
|
|
03-29-2021, 12:24 AM
|
#1395
|
|
Winnebago Camper
Join Date: Mar 2021
Location: Gilbert, Az
Posts: 27
|
Quote:
Originally Posted by Wyatt
Ok, but also order a dedicated hose that only is used is for the backflush.
We use expanding hoses.
Also, once you’re done flushing the blank tank, add 5 gallons back. That’s what you need to cover the bottom of the tank, to keep things from sticking. Believe me, I’ve tested this.
We also use quick releases on everything, so you’d need these too, I’d you want to make things easier...
Here’s what you’ll need....
|
Got it. We ordered an expanding hose when we ordered the flush pro for only that purpose. Are you suggesting the water meter for when we add the 5 gallons back in the black tank, and I assume you mean to do that via the flush pro valve, yes?
Also will grab the quick connect kit too. Thanks!
__________________
2018 Intent 31P Plain Jane
Upgrades: Safe-T-Plus; LED Headlights
|
|
|
|
|
03-29-2021, 07:08 PM
|
#1396
|
|
Winnie-Wise
Join Date: Sep 2019
Posts: 386
|
All receptacles hot all the time
I finally drew up a small sketch schematic on how I changed the wiring so all receptacles are hot when off of shore power. It may look more complicated than it really is. In essence your abandoning the original circuit breakers #1 and 2, installing your own circuit breakers for those two circuits and powering them from the transfer relay circuit that now powers the refrigerator. So both circuits are still protected with breakers as before. So study the schematic. Lift the floor panels under the sink. Locate the gray junction box and connect a 14-3 cable to it. Run your cable to inverter breaker box. Install your new breakers wherever you want, and connect the two circuit cables to your new breakers. The whites get tied together to you new cabl as well as the grounds.
|
|
|
|
|
03-29-2021, 09:30 PM
|
#1397
|
|
Proud No Intent Owner
Join Date: Jul 2019
Location: Belmont, CA
Posts: 1,774
|
Quote:
Originally Posted by RedQueenBWG
Got it. We ordered an expanding hose when we ordered the flush pro for only that purpose. Are you suggesting the water meter for when we add the 5 gallons back in the black tank, and I assume you mean to do that via the flush pro valve, yes?
Also will grab the quick connect kit too. Thanks!
|
Exactly. No other way to know how much water youre putting back into the black tank, and you want as little as possible. But still, you need to keep the bottom covered.
The reason I have two flow meters, in different colors (models), is so I CANNOT miX them up. I like to measure the fresh water tank too, as most of the time, we camp where theres a water hook up, and I like to travel as light as possible, since Im up against my 16,000 GVWR.
|
|
|
|
|
03-30-2021, 09:07 AM
|
#1398
|
|
Winnie-Wise
Join Date: Sep 2019
Posts: 386
|
Here is the circuit breakers I used
__________________
Denny and Barb, Intent 26M, Renology 800w Solar sys.
Four 12v batteries, Sumo Springs front, RM anti-sway
RM Steering Stabilizer, Home Wisconsin and Arizona
|
|
|
|
|
04-02-2021, 07:05 AM
|
#1399
|
|
Winnebago Watcher
Join Date: Mar 2021
Posts: 4
|
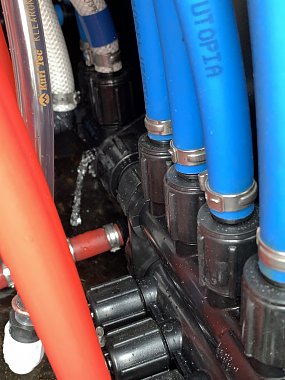
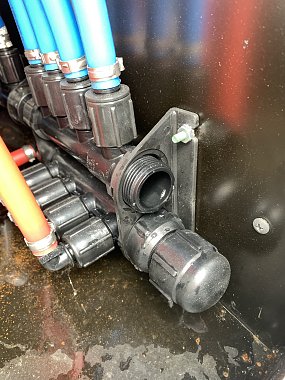
The First Outing Flop
It was finally time to take the 26M on its first outing a couple of weeks ago. Installed my cool new refrigerator latch and started prepping from the dealer winterization. Put a little water slowly into the system and this is what I found and obviously pretty apparent it was not winterized correctly and even had water in the water heater on a new unit. 
This is why I usually do my own work. The blower motor resistor was also malfunctioning so I bought one on Ebay and installed but since I took it back, I put the faulty one in and have an extra.
|
|
|
|
|
04-02-2021, 08:11 AM
|
#1400
|
|
Winnebago Vita 24P
Join Date: Oct 2019
Location: Sacramento
Posts: 327
|
Quote:
Originally Posted by PRullman
It was finally time to take the 26M on its first outing a couple of weeks ago. Installed my cool new refrigerator latch and started prepping from the dealer winterization. Put a little water slowly into the system and this is what I found and obviously pretty apparent it was not winterized correctly and even had water in the water heater on a new unit.
This is why I usually do my own work. The blower motor resistor was also malfunctioning so I bought one on Ebay and installed but since I took it back, I put the faulty one in and have an extra.
Attachment 178186
Attachment 178187 |
Looking closely at your upper picture of the manifold you have rubber hose attached with pex clamps, this is a potential leak as the pex clamps are not designed for rubber hoses. you need to replace the clamp with a worm drive screw automotive clamp on the rubber hose. We on the Vita/Porto and Navion view have been experienced water leaks with this improper clamping to the pex fittings.
__________________
2020 Winnebago Vita 24P
|
|
|
|
|
|
|
Currently Active Users Viewing This Thread: 1 (0 members and 1 guests)
|
|
|
 Posting Rules
|
You may not post new threads
You may not post replies
You may not post attachments
You may not edit your posts
HTML code is Off
|
|
|
|
 » Recent Discussions
 |
|
|
|
|
|
|
|
|
|
|
|
|
|
|
|
|
|
|
|
|
|
|
|
|
|


 Linear Mode

