 |
|
 12-18-2021, 05:07 PM
|
#41
|
|
Winnebago Master
Join Date: Apr 2018
Location: Tucson, AZ
Posts: 1,216
|
Quote:
Originally Posted by Morich

Yes, I think they proved that part on post 27 if I am reading what they are doing??
|
Yes what I meant was make it a permanent fix.
__________________
Brian
2011 Winnebago Via 25Q on 2010 Sprinter Chassis
|

|

|
|
01-03-2022, 08:44 AM
|
#42
|
|
Winnebago Owner
Join Date: Oct 2021
Location: Chesterton Indiana
Posts: 50
|
Our issue has still not been resolved. Still trying to find natural or ground wire that may be connected to bus bar..which may or may nit be underneath rv. Does anyone know where that may be.????
|
|
|
|
|
01-03-2022, 08:51 AM
|
#43
|
|
Winnebago Owner
Join Date: Oct 2021
Location: Chesterton Indiana
Posts: 50
|
Fishing a neutral or ground wire (what ever there called )through the ceiling is not an option..there is a thick foam insulation there if I start messing with that it will break apart not good for the roof.
|
|
|
|
|
01-03-2022, 08:59 AM
|
#44
|
|
Winnebago Master
Join Date: Apr 2018
Location: Tucson, AZ
Posts: 1,216
|
Quote:
Originally Posted by Esiordia
Fishing a neutral or ground wire (what ever there called )through the ceiling is not an option..there is a thick foam insulation there if I start messing with that it will break apart not good for the roof.
|
What I did was take a piece of ceiling grid wire (seismic wire) and bent a very tight blunt end on it, then I carefully pushed it through the styrofoam to the underside of the roof deck and slid it along till I reached another light where I made a small hole and grabbed the seismic wire with needle nose, then pulled it down and attached my conductors and pulled them back to the first light. This was when I added a light where my satellite control used to be. The distance was not far, only about 2 feet. You do have to be careful not to punch through any AC ducting that is just formed into the foam and if you don't make a blunt end you risk poking thru the thin Filon roof material.
I'll confess that I am a career electrician and have fished thousands of wires over the years.
__________________
Brian
2011 Winnebago Via 25Q on 2010 Sprinter Chassis
|
|
|
|
|
01-03-2022, 09:17 AM
|
#45
|
|
Winnebago Owner
Join Date: Oct 2021
Location: Chesterton Indiana
Posts: 50
|
Fishing that wire seems to much for me I am looking for the bus bar... if all fails maybe we just run wire on outside of ceiling using a strip that hides the wire..it might look a little hocky but what the heck...anyone with info of location of bus bar under rv with nuteral or ground wires please let me know...thanks for everyone's help...
|
|
|
|
|
01-03-2022, 10:01 AM
|
#46
|
|
Winnebago Master
Join Date: Nov 2018
Location: Pflugerville/Austin, Tx
Posts: 7,537
|
This may have become too confused but I think the info may be there so let me repost what I think will help.
The ground bus bar should be located as it shows in the drawing from post 29 above. It doesn't say exactly but I might assume it is a big bar bolted to the frame and with nine wires on it, it should be pretty easy to spot from underneath. They want good contact with the frame of the RV, so often bolt it right on the frame!
When the bar is found, it should be verified that it is the correct bar by looking at the codes on the wires and they should match what is shown in the drawing on post 21. If you locate this bus bar and find the correct labels on the wires there, then make sure the wire labeled NE is connected, clean and tight to put a good ground on that wire which leads up to behind the monitor panel.
If that is good and clean, I would then move to behind the monitor panel as mentioned in post 39. I see a plug in your picture that is the correctsize and number of pins to match what you are needing, but verify that the correct wire labels are on that plug first. If that is correct, then you need to check that the ground connected on the bus bar is getting to that plug as well as actually getting through the plug.
Check for ground, not only going in but also comming out!!! These plugs have a bad habit of looking like they are connected but for some reason the wire may not actually make contact inside the plug.
So find the ground bus bar as it looks like it might be behind the batteries in the second compartment back from the door. You may see it when you look in the battery compartment?
Find it and check the wires connected good and clean and especially wire NE as the one needed.
If good there, move to the plug behind the monitor panel to make sure the ground connection is good passing through the plug.
__________________
Richard
Why no RV year, make and floorplan on MY signature as we suggest for others?
I currently DO NOT have one! 
|
|
|
|
|
01-03-2022, 11:48 AM
|
#47
|
|
Winnebago Owner
Join Date: Oct 2021
Location: Chesterton Indiana
Posts: 50
|
It is very difficult to read the diagram for the buss bar on entry 29. I need a clearer picture. We never did check the buss bar we didn't e even know what that was...just now figuring it out since we still cannot see the NE wire behind the monitor. We want to check this buss bar. Can you send clearer picture. Thanks cover so much
|
|
|
|
|
01-03-2022, 12:26 PM
|
#48
|
|
Winnebago Master
Join Date: Nov 2018
Location: Pflugerville/Austin, Tx
Posts: 7,537
|
Sorry, when I take a copy and make a picture from a picture each time gets a bit less sharp to see.
But perhaps it is not needed as I can describe what it shows?
The whole Rv has grounds that they want to be all the same and as good as possible, so they use one point near the batteries. In your RV it shows the batteries and the negative cables from both sets of batteries, coach and chassis batteries go to a ground bar that looks like it may be directly behind the batteries. So if you open the battery compartment and find the negative (-) cable on the battery, it is almost always a short cable going to the ground bus bar! It is usually a copper bar and on that bar you should find a big cable that comes from the coach batteriesand also one that comes from the start battery and then it looks like a group of the wires you want and they may have a cover of some type making it look like a cable but it is really a bunch of small wires with maybe several wires in connectors that are then bolted to the bar.
The thing I would look for on that set of smaller wires is whether it looks like any of the small wires in the group may have rusted or gone bad or maybe broken off some way.
EDIT:
small point to mention is that there may be two big cables or three as FORD does one way and Chevy the other but the smaller group of wires is what you want to look at for problems. The big starter cables runn too many things and if they were not good, the engine and lots of other stuff would not work!
__________________
Richard
Why no RV year, make and floorplan on MY signature as we suggest for others?
I currently DO NOT have one!
|
|
|
|
|
03-18-2023, 07:30 AM
|
#49
|
|
Winnebago Owner
Join Date: Oct 2021
Location: Chesterton Indiana
Posts: 50
|
Sorry this is so late..we just were not able to figure this out ..we used the rv but did so without using those peticular lights. But a year later it still bugs me...every now and then I would try to flip the switch to see if the lights would work...and a couple of times they went on...last time was sept..just out of the blue..they worked..turn them on and off..then next day nothing..we weren't camping ..or doing anything special..so it's wierd...I have to figure this out.
|
|
|
|
|
03-18-2023, 10:20 AM
|
#50
|
|
Winnebago Master
Join Date: Nov 2018
Location: Pflugerville/Austin, Tx
Posts: 7,537
|
Quote:
Originally Posted by Esiordia
Sorry this is so late..we just were not able to figure this out ..we used the rv but did so without using those peticular lights. But a year later it still bugs me...every now and then I would try to flip the switch to see if the lights would work...and a couple of times they went on...last time was sept..just out of the blue..they worked..turn them on and off..then next day nothing..we weren't camping ..or doing anything special..so it's wierd...I have to figure this out.
|
This is one of those things that may take some luck! But it is possible that it is giving you some clues.
When turning it on /off at a switch makes it act weird, my first thought is that you are moving something when you move the switch!
There are several things that "might" be a clue on that. When you move the switch, it has several small parts inside the switch and some of them may be worn or loose, so that they are not making contact when they should. But there are also places where the wires that connect the switch may be loose and as you touch or move the switch just a small amount, it may move just enough to make contact and change how it works.
If touching the switch changes things, I would look very carefully at that switch as it may be the problem. Maybe a bad switch or loose wire at that switch? 
__________________
Richard
Why no RV year, make and floorplan on MY signature as we suggest for others?
I currently DO NOT have one!
|
|
|
|
|
03-18-2023, 12:26 PM
|
#51
|
|
Winnebago Owner
Join Date: Oct 2021
Location: Chesterton Indiana
Posts: 50
|
Morich...thanks for keeping up with this light issue with me.. I think we can check the switch since yes sometimes it works ..not alot but that is definitely worth checking. There is 2 switches at that area the other one workes fine. But definitely worth checking.tks so much this light thing is driving me crazy... picture of switch and picture in Sept with all lights working
|
|
|
|
|
03-18-2023, 01:47 PM
|
#52
|
|
Winnebago Master
Join Date: Nov 2018
Location: Pflugerville/Austin, Tx
Posts: 7,537
|
How about we do a refresh on what's up with the lights as I'm seeing some things that make me wonder!!
I'm not real sure I'm looking at the right drawings or if there have been some changes made on your RV.
Do you have a 2003 Suncruiser and is it a 33V model? That should be on a plate next to the driver if not sure?
Then if that is correct, I see two sets of switches that look like what you have in the picture but not quite right???
Wonder if you can check if I'm looking right and something has been changed or built different or what's up?
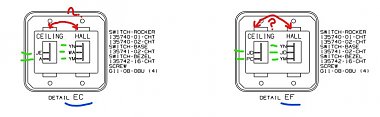
This is a drawing of where I think these switches might be. Can you spot if they are like detail EC or is it the ones like in detail EF?
Click this snip for a better view but it shows the drivers side with the front to the right.
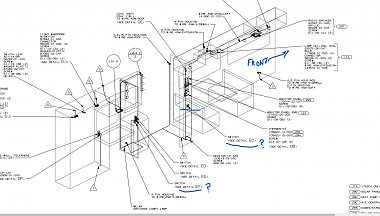
What this will do is let us sort out which circuit these switches control. With the correct circuit ID, we can get a better idea of where the wires might go and what they do.
The problem is that the drawings show the switches different than your picture shows???
So am I looked the wrong place or have them been worked on and changed at some point??
It looks like your switches and what the drawing shows is reveresed, so trying to get straight on that.
Then your picture shows on as being pushed down or does it mean pushed up for on? I think of pushing the switch up for on, so does it mean it has been turned over at some point? That might mean somebody has done some work on them and we might need to watch closer for that.
__________________
Richard
Why no RV year, make and floorplan on MY signature as we suggest for others?
I currently DO NOT have one!
|
|
|
|
|
03-18-2023, 03:03 PM
|
#53
|
|
Winnebago Owner
Join Date: Oct 2021
Location: Chesterton Indiana
Posts: 50
|
Yes model is correct... EC is the correct switch EF is on a different wall. The double switch by the control panel EC operates the hall ceiling light (that works) and the 2 galley ceiling lights ,those Ceiling lights are the ones that aren't working. EF is a double switch that operates the bedroom ceiling light and the hall ceiling light they both work. There is another double switch that operates the ceiling light in the front which does not work either and the courtesy lights which do work in the stair well ...now when I think about it..both of those switches worked for the 3 ceiling lights in sept.i tried them both and they both turned on the lights . 2 lights are in galley operated by EC by the control panel switch and the front ceiling light operated by stairwell switch...I hope I have not confused you to much....so it appears that both of those switches may be bad or have a loose wire...all 3 of those lights are shared by the same neuteral..tks for all your help this is driving me crazy...lol
|
|
|
|
|
03-18-2023, 07:12 PM
|
#54
|
|
Winnebago Owner
Join Date: Oct 2021
Location: Chesterton Indiana
Posts: 50
|
The picture I sent is the switch by the control panel..it is different than both the ones you sent EC and EF...hall is on left ceiling is on right on my switch...I wrote on ...on the switch that tells me the switch is on..I wrote the word off on the top of the toggle so if I see off that means it's Off.. sorry if that is confusing but I needed to have the words on the switch to help me ...to if I push switch up it is on and I don't see the word off. I know it's crazy..so is this flipen issue...lol..I took off switch cover and tried to juggled connected wires..no luck...it looks like the wires are crimped on the switch..not sure how to remove them. See photo
|
|
|
|
|
03-18-2023, 07:40 PM
|
#55
|
|
Winnebago Owner
Join Date: Oct 2021
Location: Chesterton Indiana
Posts: 50
|
Lights
Picture or switch off wall by control panel
|
|
|
|
|
03-18-2023, 08:02 PM
|
#56
|
|
Winnebago Master
Join Date: Nov 2018
Location: Pflugerville/Austin, Tx
Posts: 7,537
|
Looking at the drawings, I don't see too much in common for those but I might make some suggestions to see if it sounds right for you to do some testing?
Do you have a meter to test for voltage and ground on wires at different points?
If you have a meter I would first like to find out if it is the power or the ground not getting to where it needs to meet. Not knowing how much experience you may have, I may be telling you things you already know, so just ignore me if you already knew what I'm saying!!
It akes a full circuit or circle for power to get from the batteries to whatever we want to work like the lights and it also has to have a path to get back to the ground. The way we get them to go off is when we open the circle at the switch!
But if they don't work when we flip the switch on, it is because there is a "hole in the road" somewhere in that circle.
One of the easier places to try to find out which direction that hole is, can often be the light as it is often easy to slip the cover off to get to the contacts where the bulb sets. Sometimes it is hard to get the switch out of the wall or get to plugs that are under or behind cabinets. So I like to start where it is easier!
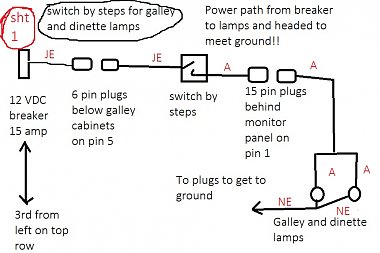
This is the way the power comes from the breaker, through plugs and the switch next to the steps before it gets to the lamps at the galley and dinette. From the lamps, it then has to have a good path back through different plugs and finally to ground.
The tricky part can be that we can't find that hole if the lights are working at that time! We have to have it broken before we can find what we need to fix!!! Come and go stuff is hard to find at times.
What I would want to do is pull the cover off one of the lamps when it is not working and find the two contacts where the bulb fits. If they are the type that fits into a small holder with one contact at the bottom of the bulb and the other being the metal at the sides of the bulb base, the bottom one way down in there is usually the hot/power side. With the switch turned on, the meter should show 12VDC power on one contact and ground on the other contact.
To begin to sort out what is going wrong, we need to figure out if it is on the power side or the ground side.
When the lights are working, you should see battery on one and ground on the other but when they are not working, are you missing battery or ground, is the big question!
When we know that, we can begin to chase the problem back toward the breaker or further on toward the ground!!
I'm game to chase it but does it make sense to you for doing the real work on your end? 
__________________
Richard
Why no RV year, make and floorplan on MY signature as we suggest for others?
I currently DO NOT have one!
|
|
|
|
|
03-18-2023, 08:10 PM
|
#57
|
|
Winnebago Master
Join Date: Nov 2018
Location: Pflugerville/Austin, Tx
Posts: 7,537
|
Okay, I took so long drawing, I see you got more info and I might see some things. If you know how to get the switch out of the wall that's a big start on some!!
Those blue things look like snap on connectors that just plug onto studs sticking out of the sawitch back. That are made to be tight, so they hang on pretty good but you can often get to the metal without taking the contacts off!
To get them off, you can pull straight out with something like needle nose pliers and they should just pop right off. But word of warning!! When pulling with pliers to get them off, don't pull toward anything like your face because they come off suddenly and you can split your lip!!
See the red letters on my drawing? Those are the wire IDF and each wire should have it stamped on the side.
This chart for ID of the wire code:
https://www.winnebago.com/Files/File...ical_guide.pdf
__________________
Richard
Why no RV year, make and floorplan on MY signature as we suggest for others?
I currently DO NOT have one!
|
|
|
|
|
03-18-2023, 08:13 PM
|
#58
|
|
Winnebago Master
Join Date: Nov 2018
Location: Pflugerville/Austin, Tx
Posts: 7,537
|
I remember which way to flip the switch this way!
Lights going up or lights going down!
Bad memory folks have to use tricks!
__________________
Richard
Why no RV year, make and floorplan on MY signature as we suggest for others?
I currently DO NOT have one!
|
|
|
|
|
03-19-2023, 06:32 AM
|
#59
|
|
Winnebago Owner
Join Date: Oct 2021
Location: Chesterton Indiana
Posts: 50
|
We already know the ground wire is were the hole is..if you can go back through these posts you will see we tested the power wire and ground..we also hooked up a ground wire from the hall celing light that works to the power wire of the 3 celing lights that don't work individually and they worked..we searched for those 3 ground wires for those ceiling lights from the diagrams we have same as yours..we could not find those exact wires...sooooo long story short we got frustrated and stopped the search back in 2022..but since than like I said I periodically would flip the light switch of the lights that do not work and twice the lights came on and off last time was in sept...which made me think it might not be the neuteral.....please take the time to go back and read the posts...the only thing we have not found is those 3 neuteral wires..we looked everywhere..behind the control box..under step..under stove...maybe you can help with that. Also like you pointed out it might be the switch...we need to check that..I just was afraid to take off the wires they looked crimped on the switch.
|
|
|
|
|
03-19-2023, 09:07 AM
|
#60
|
|
Winnebago Owner
Join Date: Oct 2021
Location: Chesterton Indiana
Posts: 50
|
Your details on the switch diagram shows them from the backside,not the front…that’s why the names on the switch are reversed…We know that the nuetrual wire we have not found is NE that is the nuteral wire in the galley , dinette and lounge lights that does not work.
|
|
|
|
|
|
|
Currently Active Users Viewing This Thread: 1 (0 members and 1 guests)
|
|
|
 Posting Rules
|
You may not post new threads
You may not post replies
You may not post attachments
You may not edit your posts
HTML code is Off
|
|
|
|
 » Recent Discussions
 |
|
|
|
|
|
|
|
|
|
|
|
|
|
|
|
|
|
|
|
|
|
|
|
|
|


 Linear Mode

