 |
|
 05-29-2021, 10:38 AM
|
#21
|
|
Winnebago Owner
Join Date: Sep 2020
Location: Nyack, NY
Posts: 14
|
Update: Took our 2017 View 24G out for a 2-day shake-out trip prior to leaving next week on a 5-week x-country trip. As it happens, while fixing the fresh water level sensor issue, the techs at Camping World in Kingston, NY broke the grey water and black water sensors, which now constantly read "E" when they are actually full. There will not be time to fix the issue before we leave in four days, so we'll need to be extra vigilant about our dumping schedule.
Camping World . . .
__________________
2017 View 24G on a 2016 Sprinter chassis
|

|

|
|
05-29-2021, 11:03 AM
|
#22
|
|
Winnebago Owner
Join Date: Oct 2020
Location: Asheville, NC
Posts: 1,671
|
Camping World techs?
More like Camping World hacks?
RV repair of last resort in my area. Maybe not everywhere.
__________________
Jim. Former, 2021b Micro Minnie 2108DS
Medically grounded, but still lurking the Micro Minnie Discussions
|
|
|
|
|
05-29-2021, 12:39 PM
|
#23
|
|
Winnebago Master
Join Date: May 2020
Location: Sugar Land, TX
Posts: 673
|
One possibility is a loose wire on the One Place panel.
It shouldn't be too difficult to pull that panel from the wall and verify all of the wires are connected on the back of the panel.
If that doesn't work, then the problem could be more serious. If the gray/black tank sensors aren't working - it could be that those signal wires have been damaged (cut)...
We've discussed replacing the stock sensors/One Place panel with a SeeLevel II panel and sensors - that provides % of tank capacity - not E, 1/3, 2/3, F... The upgrade doesn't look too difficult - with the most complicated step getting access to the fresh water tank side.
|
|
|
|
|
05-29-2021, 01:29 PM
|
#24
|
|
Winnebago Owner
Join Date: Sep 2020
Location: Nyack, NY
Posts: 14
|
Thanks for the info. I will investigate the control panel. Incidentally, I read somewhere else on the Forum that the SeeLevel II is out of stock right now, but I don't know where the writer tried to buy it.
__________________
2017 View 24G on a 2016 Sprinter chassis
|
|
|
|
|
05-29-2021, 02:24 PM
|
#25
|
|
Winnebago Master
Join Date: May 2020
Location: Sugar Land, TX
Posts: 673
|
Seems almost everything is out of stock right now...
We're getting ready for a 16 night road trip - and can't imagine doing the trip without all of the tank sensors (even as poorly as they measure)...
|
|
|
|
|
12-30-2021, 05:47 PM
|
#26
|
|
Winnebago Master
Join Date: May 2020
Location: Sugar Land, TX
Posts: 673
|
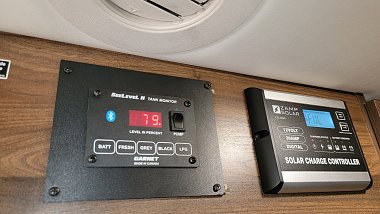
We decided to give ourselves a SeeLevel II monitoring system for a Christmas present. We ordered the 3 tank with Bluetooth panel - so we can monitor the state of the fresh water tank outside while filling the tank.
Unfortunately we haven't been able to find anyone who could do the installation for us before February - so we'll make an attempt to install this ourselves (next week).
We ordered 3 16" sensors - which Crah stated should work on the 24D tanks. Also ordered the filler plate, so we'll be able to install the panel over the hole for the One Place.
The wiring doesn't look too difficult. I'm planning to use the existing wiring from each of the tanks, and then combine the sensor signal wires at the panel (rather than trying to do this underneath the RV by the tanks).
The biggest unknown (for us) is accessing the fresh water tank. Unfortunately, because I've twice worked on the black water tank valve (our first valve failed), I'm not too worried about getting access to the black and gray tanks. But I haven't looked at the fresh water tank or seen where the sensors and existing wiring are located.
If Lichtsinn had offered this as an option when we picked up our View 18 months ago, we would probably have purchased the upgraded panel... It'll be nice to get more accurate readings on our tanks - and not have to guess whether E means empty or 1/3 full... (or 2/3 means almost full or only 2/3...).
|
|
|
|
|
12-30-2021, 06:43 PM
|
#27
|
|
Winnebago Owner
Join Date: Sep 2020
Location: Nyack, NY
Posts: 14
|
Thanks for the info. Good luck with the install. Please let me know how it goes.
__________________
2017 View 24G on a 2016 Sprinter chassis
|
|
|
|
|
12-30-2021, 07:59 PM
|
#28
|
|
Winnie-Wise
Join Date: Dec 2019
Posts: 259
|
Quote:
Originally Posted by rprochnow

We decided to give ourselves a SeeLevel II monitoring system for a Christmas present. We ordered the 3 tank with Bluetooth panel - so we can monitor the state of the fresh water tank outside while filling the tank.
Unfortunately we haven't been able to find anyone who could do the installation for us before February - so we'll make an attempt to install this ourselves (next week).
We ordered 3 16" sensors - which Crah stated should work on the 24D tanks. Also ordered the filler plate, so we'll be able to install the panel over the hole for the One Place.
The wiring doesn't look too difficult. I'm planning to use the existing wiring from each of the tanks, and then combine the sensor signal wires at the panel (rather than trying to do this underneath the RV by the tanks).
The biggest unknown (for us) is accessing the fresh water tank. Unfortunately, because I've twice worked on the black water tank valve (our first valve failed), I'm not too worried about getting access to the black and gray tanks. But I haven't looked at the fresh water tank or seen where the sensors and existing wiring are located.
If Lichtsinn had offered this as an option when we picked up our View 18 months ago, we would probably have purchased the upgraded panel... It'll be nice to get more accurate readings on our tanks - and not have to guess whether E means empty or 1/3 full... (or 2/3 means almost full or only 2/3...).
|
The fresh water tank is not that bad to do. Remove the murphy bed mattress, and then the wood slats will be exposed. I removed a few of the wood slats so I could have plenty if room. The sensor is on the right hand side when facing the headboard and all the wires are right there. Let me know if you have any other questions. The black tank took extra wiring (I used part of the wires from the gray tank tank I removed to extend to the black tank.
With the sensor strip, I mounted them closer to the top on the black and gray tank and closer to the bottom of the fresh water tank as thr tanks are slightly larger than the strip.
|
|
|
|
|
01-03-2022, 11:04 AM
|
#29
|
|
Winnebago Master
Join Date: May 2020
Location: Sugar Land, TX
Posts: 673
|
Quote:
Originally Posted by crah
The fresh water tank is not that bad to do. Remove the murphy bed mattress, and then the wood slats will be exposed. I removed a few of the wood slats so I could have plenty if room. The sensor is on the right hand side when facing the headboard and all the wires are right there. Let me know if you have any other questions. The black tank took extra wiring (I used part of the wires from the gray tank tank I removed to extend to the black tank.
With the sensor strip, I mounted them closer to the top on the black and gray tank and closer to the bottom of the fresh water tank as thr tanks are slightly larger than the strip.
|
I plan to take pictures as I attempt the installation this week - and if it works, will post pictures and notes to help anyone else who decides to do the install.
Would like to get this working before our next long trip - would help considerably to know what the real levels are in each tank (and not does E mean empty or 1/3 tank?) and have the ability to look at the fresh tank level while I'm outside (and cut down on spewing out so much water from the overflow!).
|
|
|
|
|
01-04-2022, 11:36 AM
|
#30
|
|
Winnebago Master
Join Date: May 2020
Location: Sugar Land, TX
Posts: 673
|
Well... We started working on the SeeLevel II installation and didn't get very far.
First, we were unable to get the murphy bed to come down (solution in a separate thread).
Once we got the murphy bed down, we were able to locate the original sensors and wiring and confirm that we should be able to cut the existing wires and install the new sensor on the tank.
We thought that would be the difficult hurdle - and then we went underneath to look at the black and gray tanks.
The sensors on those tanks are not in easily accessible locations - and the wiring is located at the top of the tanks, extremely difficult to reach - let alone cut and splice the wires.
So unless we can figure out how to attach the new sensors to the existing wiring, looks like we're stuck.
If we can figure out to access the black and gray tank wiring, we'll proceed with the installation - taking pictures and posting notes on the forum, for anyone else interested in doing this upgrade.
|
|
|
|
|
01-04-2022, 04:09 PM
|
#31
|
|
Winnie-Wise
Join Date: Dec 2019
Posts: 259
|
Quote:
Originally Posted by rprochnow
Well... We started working on the SeeLevel II installation and didn't get very far.
First, we were unable to get the murphy bed to come down (solution in a separate thread).
Once we got the murphy bed down, we were able to locate the original sensors and wiring and confirm that we should be able to cut the existing wires and install the new sensor on the tank.
We thought that would be the difficult hurdle - and then we went underneath to look at the black and gray tanks.
The sensors on those tanks are not in easily accessible locations - and the wiring is located at the top of the tanks, extremely difficult to reach - let alone cut and splice the wires.
So unless we can figure out how to attach the new sensors to the existing wiring, looks like we're stuck.
If we can figure out to access the black and gray tank wiring, we'll proceed with the installation - taking pictures and posting notes on the forum, for anyone else interested in doing this upgrade.
|
I just sent you a PM but having some technical difficulties so not sure if you got it. The gray tank is easy. The body panel at the gray tank location has hinges. Winnebago just didn't put a handle on the panel and screwed them to the frame below with 2 screws on each side. Remove the screws and the entire body panel swings up just like your other baggage doors, and the sensors will be right in front of you. I kept mine propped up with a 2x4 while working on the wires.
For the black tank, I actually mounted my new sensor on the passenger side of the tank, almost in the middle position of the tank. It is a narrow opening, but enough room to get your hand in there and mount the new sensor. I don't recall if I had to connect the wires before mounting that sensor due to the limited space or not. At the old sensor location, I cut the wires, and kept as much of the old wires that I could. Then I extended those wires to the side where the new sensors are. Hope that all makes sense.
__________________
2020 Winnebago View 24D
|
|
|
|
|
01-04-2022, 07:02 PM
|
#32
|
|
Winnebago Master
Join Date: May 2020
Location: Sugar Land, TX
Posts: 673
|
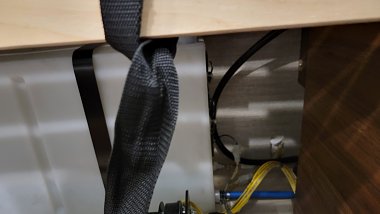
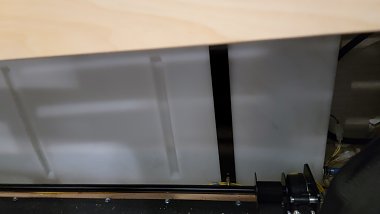
For anyone interested in pursuing this, here are a few pictures of the fresh water tank under the murphy bed.
Accessing the fresh water tank wasn't too difficult.
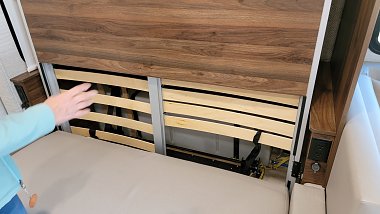
First, remove the sofa seat backs. Then lower the murphy bed. Unbuckle the mattress from the frame (there are 4 straps located near the corners of the mattress).
You should now see the large white fresh water tank near the outer wall underneath the murphy bed.
Next to make access to the water tank easier, you'll need to move several slats in the bedframe.
In our 2021 View 24D, the slats are secured with a series of gray plastic holders along a track on either side of the frame. Rather than trying to remove the slats, we were able to slide 4 of the slats towards the other end of the frame (away from the tank) by unscrewing the ends of each slat - and then pushing the four loosened slats.
That creates an opening that should make it easier to access the tank, with the bed in the lowered or up position.
The wiring for the old sensors are on the right side of the tank, with a short amount of wire to a connector. The wires are labelled black and black with white stripe. NOTE that the wires going from the connector back to the panel are a different color.
If I can figure out the gray and black tanks, I'll post an explanation (with pictures) on how to access them. And then do the same for the One Place panel and the original wiring. And if I get that far, post pictures and description for mounting the sensors, connecting the wires and mounting the SeeLevel II panel.


|
|
|
|
|
01-05-2022, 09:46 PM
|
#33
|
|
Winnebago Master
Join Date: May 2020
Location: Sugar Land, TX
Posts: 673
|
Success! With Crah's assistance, we were able to solve access to our gray and black tanks and have almost completed the installation of our Bluetooth SeeLevel II 3 tank monitoring system.
I'll post photos in subsequent messages.
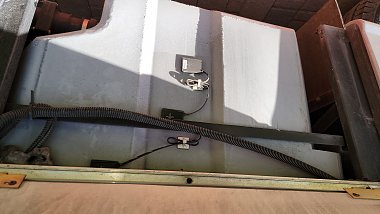
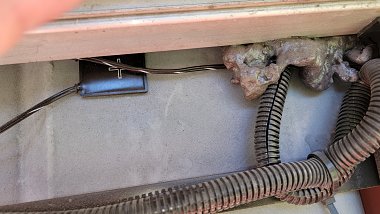
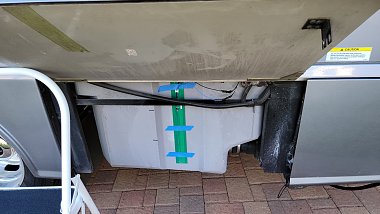
For the black tank, I located the tank sensor wire running from the tank towards the spare tire and found a place with a long enough section where I could cut those wires and reconnect them to the new tank sensor. This location is on the corner of the black tank that is towards the front of the vehicle and on the driver's side of the tank. This is a two conductor wire - with a black (ground) and black with white stripe (sensor) wire.
The only reasonable position to locate the sensor is on the passenger side of the tank, though that is a pretty tight area between the tank and the bottom of the black closet/storage compartment.
The gray tank was more easy to access. Left of the water/electrical compartment is a fixed panel. This panel can be opened by removing four philips head screws. Due to the presence of the gray tank, access to the screws was a little challenging (requiring several lengths of screw drivers) - plus a couple of the screw required more torque because the screws had been sitting for almost 2 years since the factory.
Once opened, you can see the 3 One Place tank sensors. The best location for the new sensor is in the center of the tank - which requires removing two of the original sensors plus two wire organizers. The place where we decided to cut into the wiring is at the 3rd sensor located more to the top and right side of the tank (the FULL sensor). We pried all 3 sensors from the tank and then cut the two signal wires which we reattached to our new sensor.
For the fresh tank, we decided to cut the yellow (signal) and white (ground) wires going to the connector in the previous post. And then place the new sensor in the middle of the tank (facing the refrigerator).
The supplies we purchased for this project from Home Depot: crimping/stripping tool, butt connectors for 16 and 18 gauge wire, 4 port pushin connectors (for combining wires at the monitor panel), and two small pools of 16 gauge blue (signal) and black (ground) wires for connecting the sensors to the original wires.
We pulled the One Place panel from the wall and using the One Place documentation, identified all of the wires - and then using our label maker labelled each wire before doing any cutting.
We then cut the wires from the One Place connectors, with the exception of the chassis (engine) battery wire - which we left on the connector and pushed back into the cabinet.
The new panel has fewer wires - and following the instructions, we connected the coach battery to 12V, and the LPG sensor to the LPG wire. The One Place ground wire actually had a split into two separate ground wires that went into the One Place connector. We kept this split and pushed these wires into two 4 pin port connectors - which will use the shared ground to connect the two connectors together. The ground wires for the LPG and 3 tank sensors went into the two 4 pin port connectors - along with the ground wire for the new panel.
For the tank sensors - we placed the 3 water tank sensors into another 4 pin port connector along with the sensor wire for the panel.
NOTE that all of this was done with the 12V breaker pulled for this circuit (see picture in subsequent post).
Mounting the panel proved a little more challenging - the filler plate we purchased for the new panel is a little smaller than the One Place. I drilled holes to match two of the holes used by the old panel on the left side of the new panel and then drilled two new holes on the right side as close as I could to the top and bottom - and then used the screws from the old panel to make new holes on the right side. This leaves the two holes on the right from the old panel, which I'll fill at some point and then color to reduce visual impact.
At this point, the tank monitoring is working. The sensors are placed with painters tape - with a lot of slack for the connecting wires. The tank areas where the sensors were placed were sanded/filed and cleaned with a combination of GooGone and acetone.
Tomorrow we'll do the final stage - permanently taping the sensors to the tanks, and then covering the black and gray sensors with duct tape to provide them some protection. And then using zip ties to secure the wires.
The only unresolved issue is the pump switch. The panel comes with a 3 way switch - which won't work in our Views - that have 2 additional pump switches. We've been told by the SeeLevel folks and also based on an internet post on another forum that we need a "momentary switch" - which I've ordered from Amazon. I plan to install that next week to complete this project.
I've taken many photos - and will post them in the next day or two after I've organized the photos.
We spent about 4 hours today doing the installation - which was longer than needed, because we took extra time to label the existing wires, and to methodically (and slowly) go through the installation steps - since once we started cutting wires, we were pretty committed to stop using the One Place and rely entirely on the new system.
If we don't have any snags tomorrow, we should be able to complete the installation (including putting the bed back together) in about an hour.
NOTE that before disabling the old panel, you should fill all 3 tanks to at least 1/3 (using the old panel) so there is fluid in each tank to test the new sensors. Plus after we complete installation tomorrow, we'll fill up the propane - and then calibrate that sensor (which will read 100% when the tank is "full" while the outside gauge and One Place would show 3/4).
Overall, (especially with Crah's advice), the project went smoother than we expected. Because we could reuse the existing sensor wiring, there isn't any major wiring required. And other some stretching to access the black tank wiring and side where we're mounting the new sensor - the rest of the project was relatively easy.
Please send a PM if you have any questions...
[Also, we loaded their SeeLevel RV app and can now read the tank levels over Bluetooth outside of the RV - which will make filling the fresh water tank much easier!]
|
|
|
|
|
01-05-2022, 10:35 PM
|
#34
|
|
Winnie-Wise
Join Date: Dec 2019
Posts: 259
|
Awesome job. It should have come from the Winnebago factory with this as standard. I can't believe they sell those crappy old sensors still. A lot of first time buyers wouldn't know.
__________________
2020 Winnebago View 24D
|
|
|
|
|
01-06-2022, 07:21 AM
|
#35
|
|
Winnebago Camper
Join Date: Apr 2019
Posts: 18
|
Great writeup. My new sensors arrive today. I will use your guide to install the system.
What momentary switch did you order from Amazon?
|
|
|
|
|
01-06-2022, 09:12 PM
|
#36
|
|
Winnebago Master
Join Date: May 2020
Location: Sugar Land, TX
Posts: 673
|
Quote:
Originally Posted by barney
Great writeup. My new sensors arrive today. I will use your guide to install the system.
What momentary switch did you order from Amazon?
|
I ordered this switch from Amazon: https://www.amazon.com/gp/product/B0...?ie=UTF8&psc=1
The RV Upgrades website also has some momentary switches available. I sent them a note that they really need to update the descriptions of the SeeLevel II panels to mention momentary switches - plus a link to the switches they have on their website. It also looks like they will swap the switches if you notify them you want a momentary switch with your panel instead of the 3 way switch.
Of course, because the panel documentation and none of the websites mentioned this - we found out the hard way - and now have to do the switch swap ourselves (next week).
|
|
|
|
|
01-06-2022, 09:29 PM
|
#37
|
|
Winnebago Master
Join Date: May 2020
Location: Sugar Land, TX
Posts: 673
|
In the next few posts, I'll add pictures showing what we did.
Today, it took us about an hour to permanently mount the sensors to the 3 tanks and clean up the tank wiring.
To ensure we kept the sensors in the locations where we had them taped with painters tape, we removed the tape from the bottom of each sensor and started peeling the back from the bottom of the sensor, peeling only a few inches of the backing at a time - and then as we moved up the sensor, removed the tape holding the next section - until we had all of the sensor fastened to the tank. Doing it this way ensured the sensor stayed in the same position where we had taped it temporarily - and that it would be straight.
Then we used duct tape to cover the sensor and seal the around the sensor, to keep moisture and dirt from seeping underneath the sensor. The signal wires were then zip tied in place and some duct tape used to keep the wires at the top of the sensor from flopping around and risking damage to the sensor.
For the LPG sensor, we filled up the propane tank (the outside gauge read 3/4 - as much as they could fill with the propane pump). And then following the instructions, calibrated the sensor to read 100%, so now we should get a reading of how much of the USABLE tank space is filled, while the outside gauge shows how much of the tank is filled, including the portion that is unusable.
When filling the fresh water tank, I found (using the app and bluetooth outside) that after the fresh tank hit 100%, the water ran about 80 seconds more before the tank overflowed. Because we positioned the sensors with a gap at the top and bottom of the tanks (as recommended in the instructions), we expect to see some capacity above and below the 0% and 100% readings - and that's OK.
We ordered our system from rvupgrades.com - 709-BTP3 (bluetooth 3 tank monitor - panel only), 3 16" sensors, and the filler plate. We had to remove the bottom 2" from the sensors for the black and gray tanks (to provide the recommended gap at the top and bottom). The fresh tank is taller (even though it has less capacity...) and we were able to use the 16" sensor on that tank.
We're looking forward to testing the system out on our next road trip - and not have to guess on how much is in each tank...
|
|
|
|
|
01-06-2022, 09:38 PM
|
#38
|
|
Winnebago Master
Join Date: May 2020
Location: Sugar Land, TX
Posts: 673
|
The first set of pictures are for the panel.
#1: back of the original One Place Panel. There are two connectors. We were able to download the pinout documentation from the Precision Circuits website.
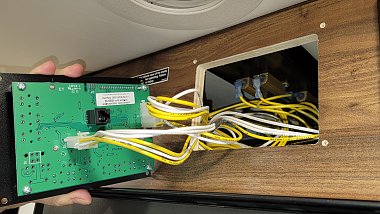
#2: before working on the panel, we pulled the fuse for the circuit powering the panel (#15 - USB/Lamps). We also pulled the fuse for the pump.
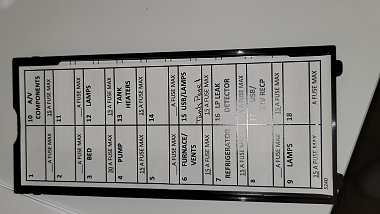
#3: we detached the cables from the One Place panel and then labelled each of the wires - before doing any cutting.
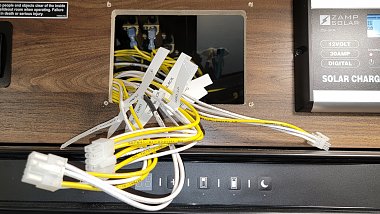
#4: I then cut the wires we needed from the One Place connectors and connected them to the new panel. The only open issue is what to do with the switch - which will wait until we get the momentary switch next week. I drilled the two holes on the left of the filler plate with the One Place panel placed upside down on the filler plate, so the holes would line up with the screw holes in the cabinet. Since the filler plate is narrower than the One Place, I then manually placed holes at the other end, as close to top as possible (since the cabinet hole is very large). This leaves the two right side holes open in the cabinet from the One Place panel - which I'll fill and color later.
|
|
|
|
|
01-06-2022, 09:51 PM
|
#39
|
|
Winnebago Master
Join Date: May 2020
Location: Sugar Land, TX
Posts: 673
|
Next - the fresh tank.
Once we removed the sofa back cushions, mattress and moved 4 of the slats, we had easy access to the fresh tank.
#1,2: the tank sensors are located on the right side of the tank, with wires black (ground) and black/white (signal) wires going to a connector. On the other side of the connector, the wires are yellow (signal) and white (ground). Because the black wires were pretty short, I cut the yellow and white wires and removed the connector.

#3: the wires after connecting to the new sensor
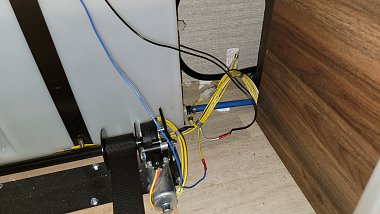
#4: the new sensor taped temporarily with painter tape. Note that we left a gap above and below the sensor - and kept the sensor away from the metal bracket on the right. The wires were secured after the sensor was permanently attached to the tank.
|
|
|
|
|
01-06-2022, 10:06 PM
|
#40
|
|
Winnebago Master
Join Date: May 2020
Location: Sugar Land, TX
Posts: 673
|
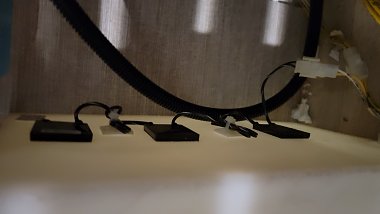
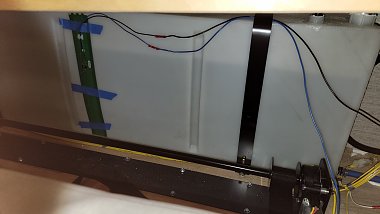
The gray tank wasn't too difficult, after removing the outside panel (4 screws).
#1: the original sensors are located in the middle and towards the top of the tank. Since the only place to put the new sensors is in the middle, the old sensors had to be removed.
#2: the black and black/white sensor wires are connected to the top sensor, with the wires appearing to go up into the coach. There isn't much wire here, since we decided to remove the old sensors (no going back now!), we removed all 3 sensors and cut the wire close to the top sensor to give us as much wire to work with as possible.
#3: the tank after the old sensors were pried off. To mount the sensor, my wife worked for a long time with GooGone and acetone plus some scraping to remove the old adhesive and then clean the area for the new sensor.
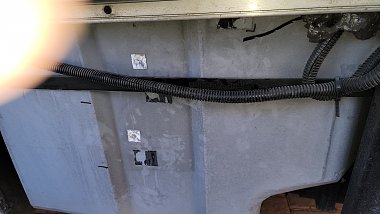
#4: the tank after we temporarily installed the sensor and attached the wires
|
|
|
|
|
|
|
Currently Active Users Viewing This Thread: 1 (0 members and 1 guests)
|
|
|
 Posting Rules
|
You may not post new threads
You may not post replies
You may not post attachments
You may not edit your posts
HTML code is Off
|
|
|
|
 » Recent Discussions
 |
|
|
|
|
|
|
|
|
|
|
|
|
|
|
|
|
|
|
|
|
|
|
|
|
|


 Linear Mode

