 |
|
 06-09-2021, 05:37 PM
|
#61
|
|
Winnebago Camper
Join Date: Jul 2019
Posts: 7
|
I would think about having someone who can weld and fabricate relocate that support. In my eyes it's fairly easy.
Your definitely not going to get the airflow across that coil that it needs to be happy any other way.
|

|

|
|
06-11-2021, 03:38 PM
|
#62
|
|
Winnebago Camper
Join Date: May 2012
Location: Canada for the summer
Posts: 29
|
46515 hanger frame
Rheine3, your hanger arrangement looks very similar to mine. If you modify the rear hanger brackets, you might have room for a rear duct. I can go 4" on top and 3" on the bottom. I plan to make a new bottom frame, with support as recommended in the install manual for the 46515. Then I need to cut and weld the rear hangers as shown on the attached drawing.
My engine layout is different with the exhaust on the driver side. However, it looks as if you have a fair amount of space for a possible duct.
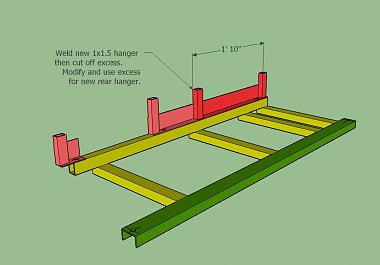
I'll be glad to send you my duct drawings if you can have any use for them.
|
|
|
|
|
07-08-2021, 07:03 AM
|
#63
|
|
Winnebago Camper
Join Date: May 2012
Posts: 9
|
Do you recall the model number of the new unit you purchased?
|
|
|
|
|
07-08-2021, 08:25 AM
|
#64
|
|
Winnebago Owner
Join Date: Oct 2019
Posts: 70
|
Quote:
Originally Posted by yworry

Do you recall the model number of the new unit you purchased?
|
My replacement unit is Airxcell 46515-811
|
|
|
|
|
07-08-2021, 09:01 AM
|
#65
|
|
Winnebago Owner
Join Date: Dec 2017
Posts: 72
|
Quote:
Originally Posted by rheine3
A look down inside the new unit. This is right after I popped the lid. You can see the fan motor shaft sticking out. Not much room to play with. The good news is the condenser is really beefy.
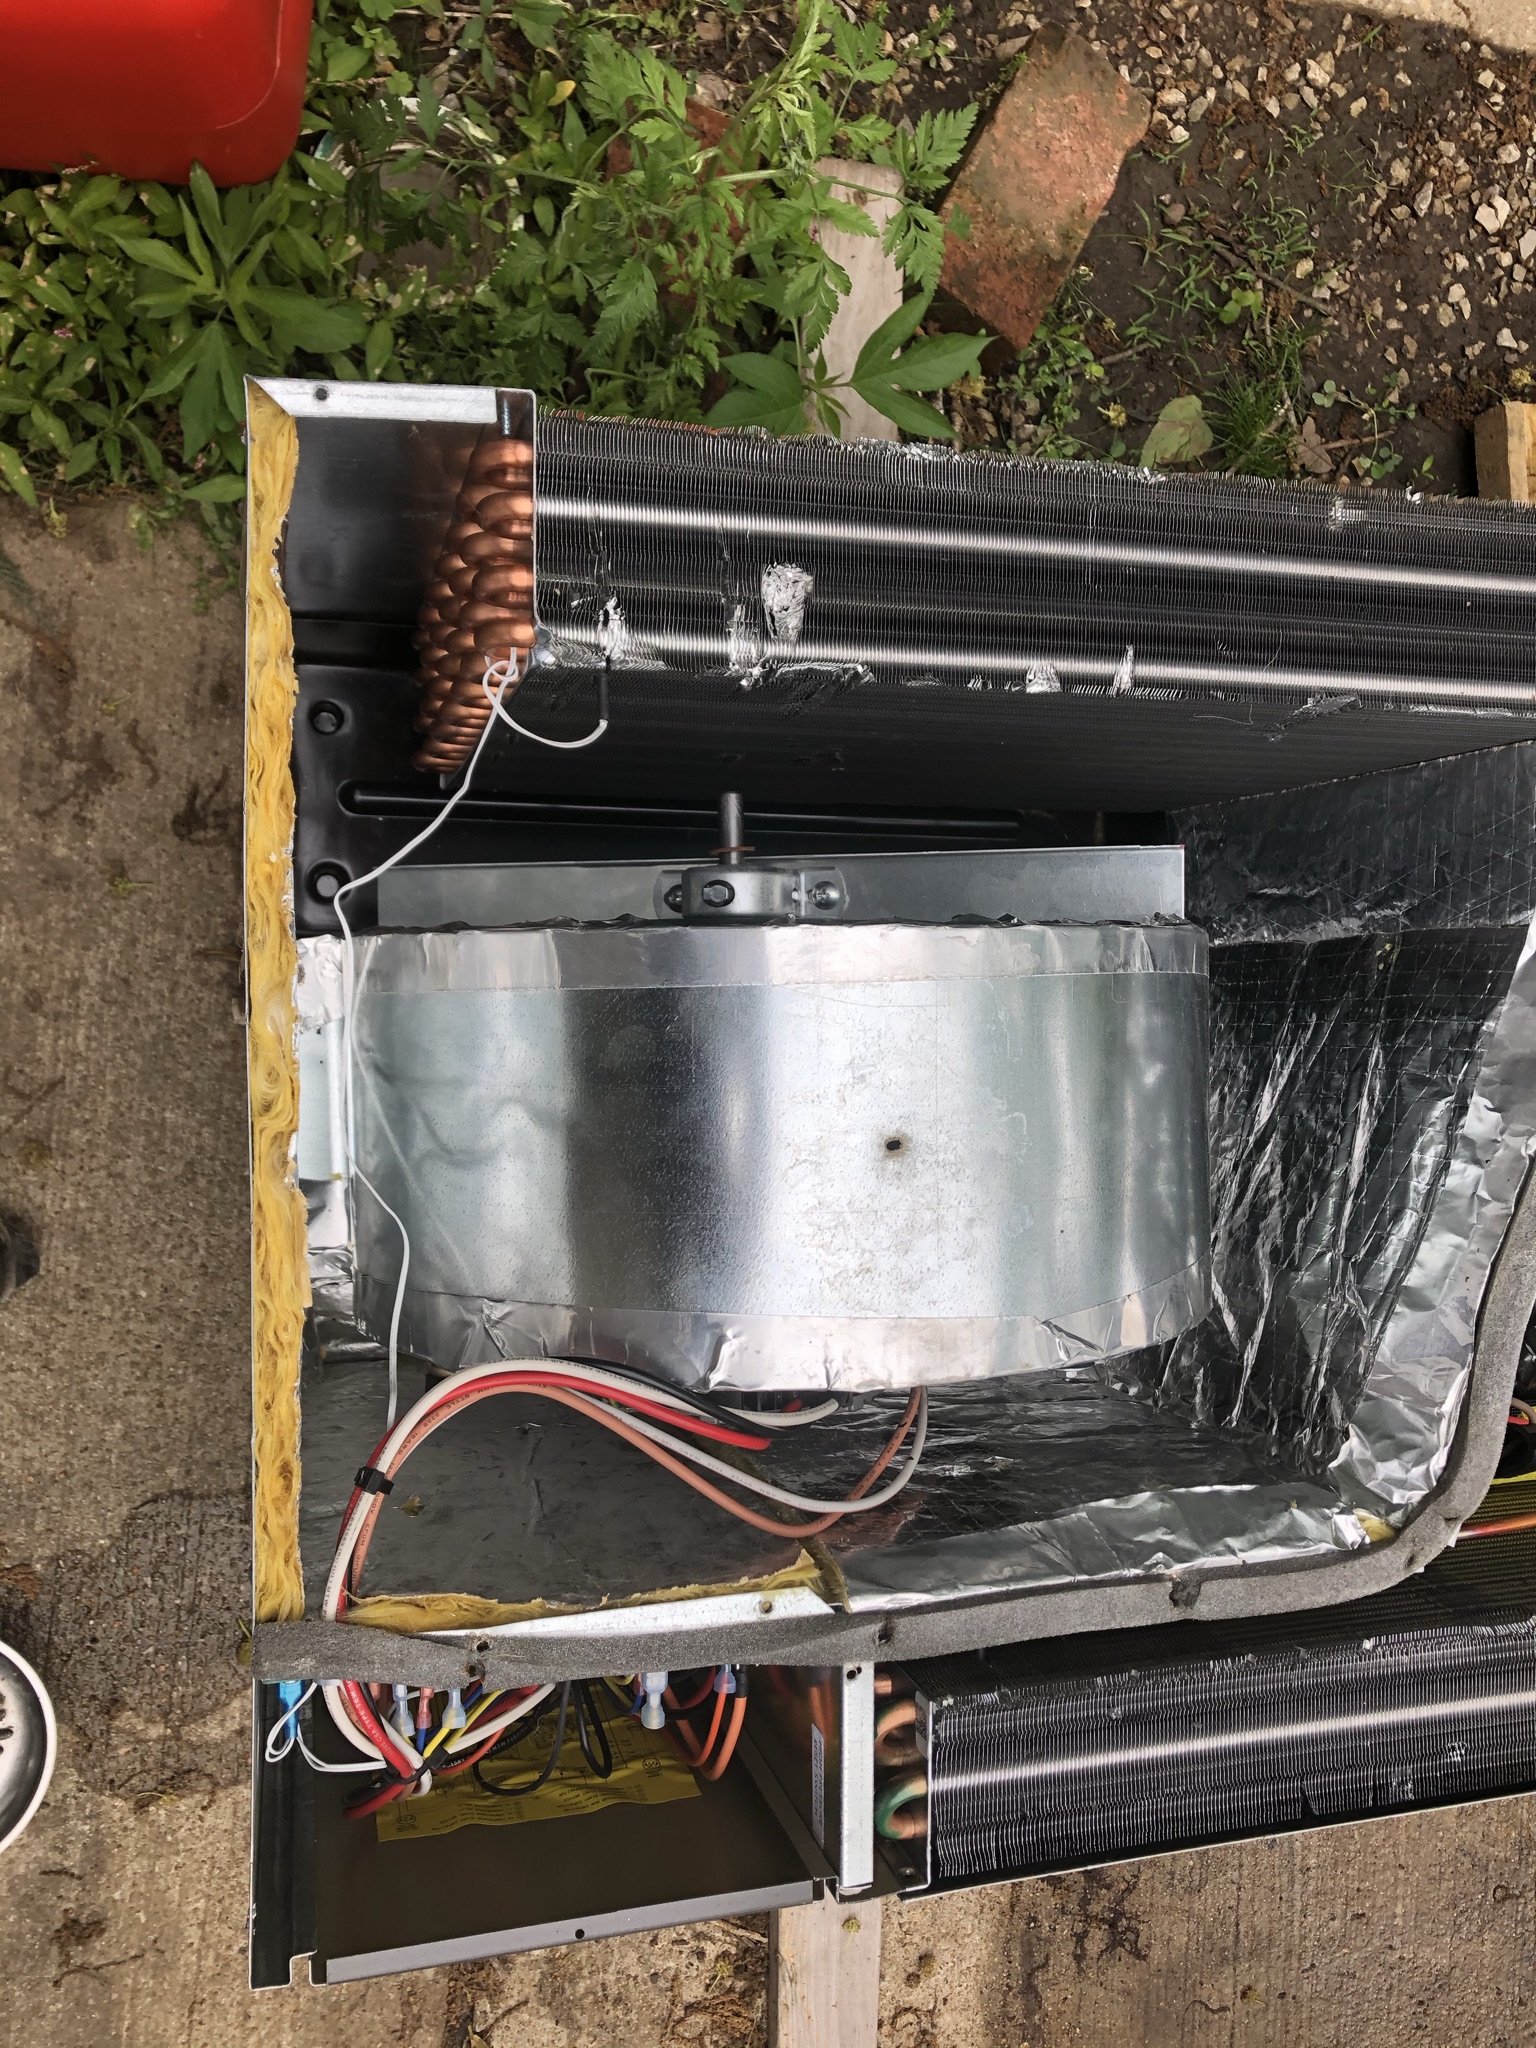 |
looking at this.could you possibly taper the outlet of the blower to move the back of the blower housing closer to the the insulation,then move the coil in towards the blower to gain a little more air flow over the evap?
|
|
|
|
|
07-08-2021, 09:21 AM
|
#66
|
|
Winnebago Master
Join Date: Oct 2017
Location: Elk Grove, CA
Posts: 3,583
|
For those of you who are wondering if you might have the top return vs. rear return issue, check out the Winnebago parts catalog for your year and model Winnebago. The drawings in the parts catalog for my 2002 Suncruiser clearly shows a rear return, while the parts catalog for the OP's Ellipse shows a top return.
Here's a link to the parts catalogs:
https://catalog3d.winnebagoind.com/menu/Parts.htm
I've found the parts catalogs to be a great resource for drawings showing details of major installations and parts.
__________________
Bob C
2002 Itasca Suncruiser 35U
Workhorse Chassis
|
|
|
|
|
07-08-2021, 10:20 AM
|
#67
|
|
Winnebago Owner
Join Date: Oct 2019
Posts: 70
|
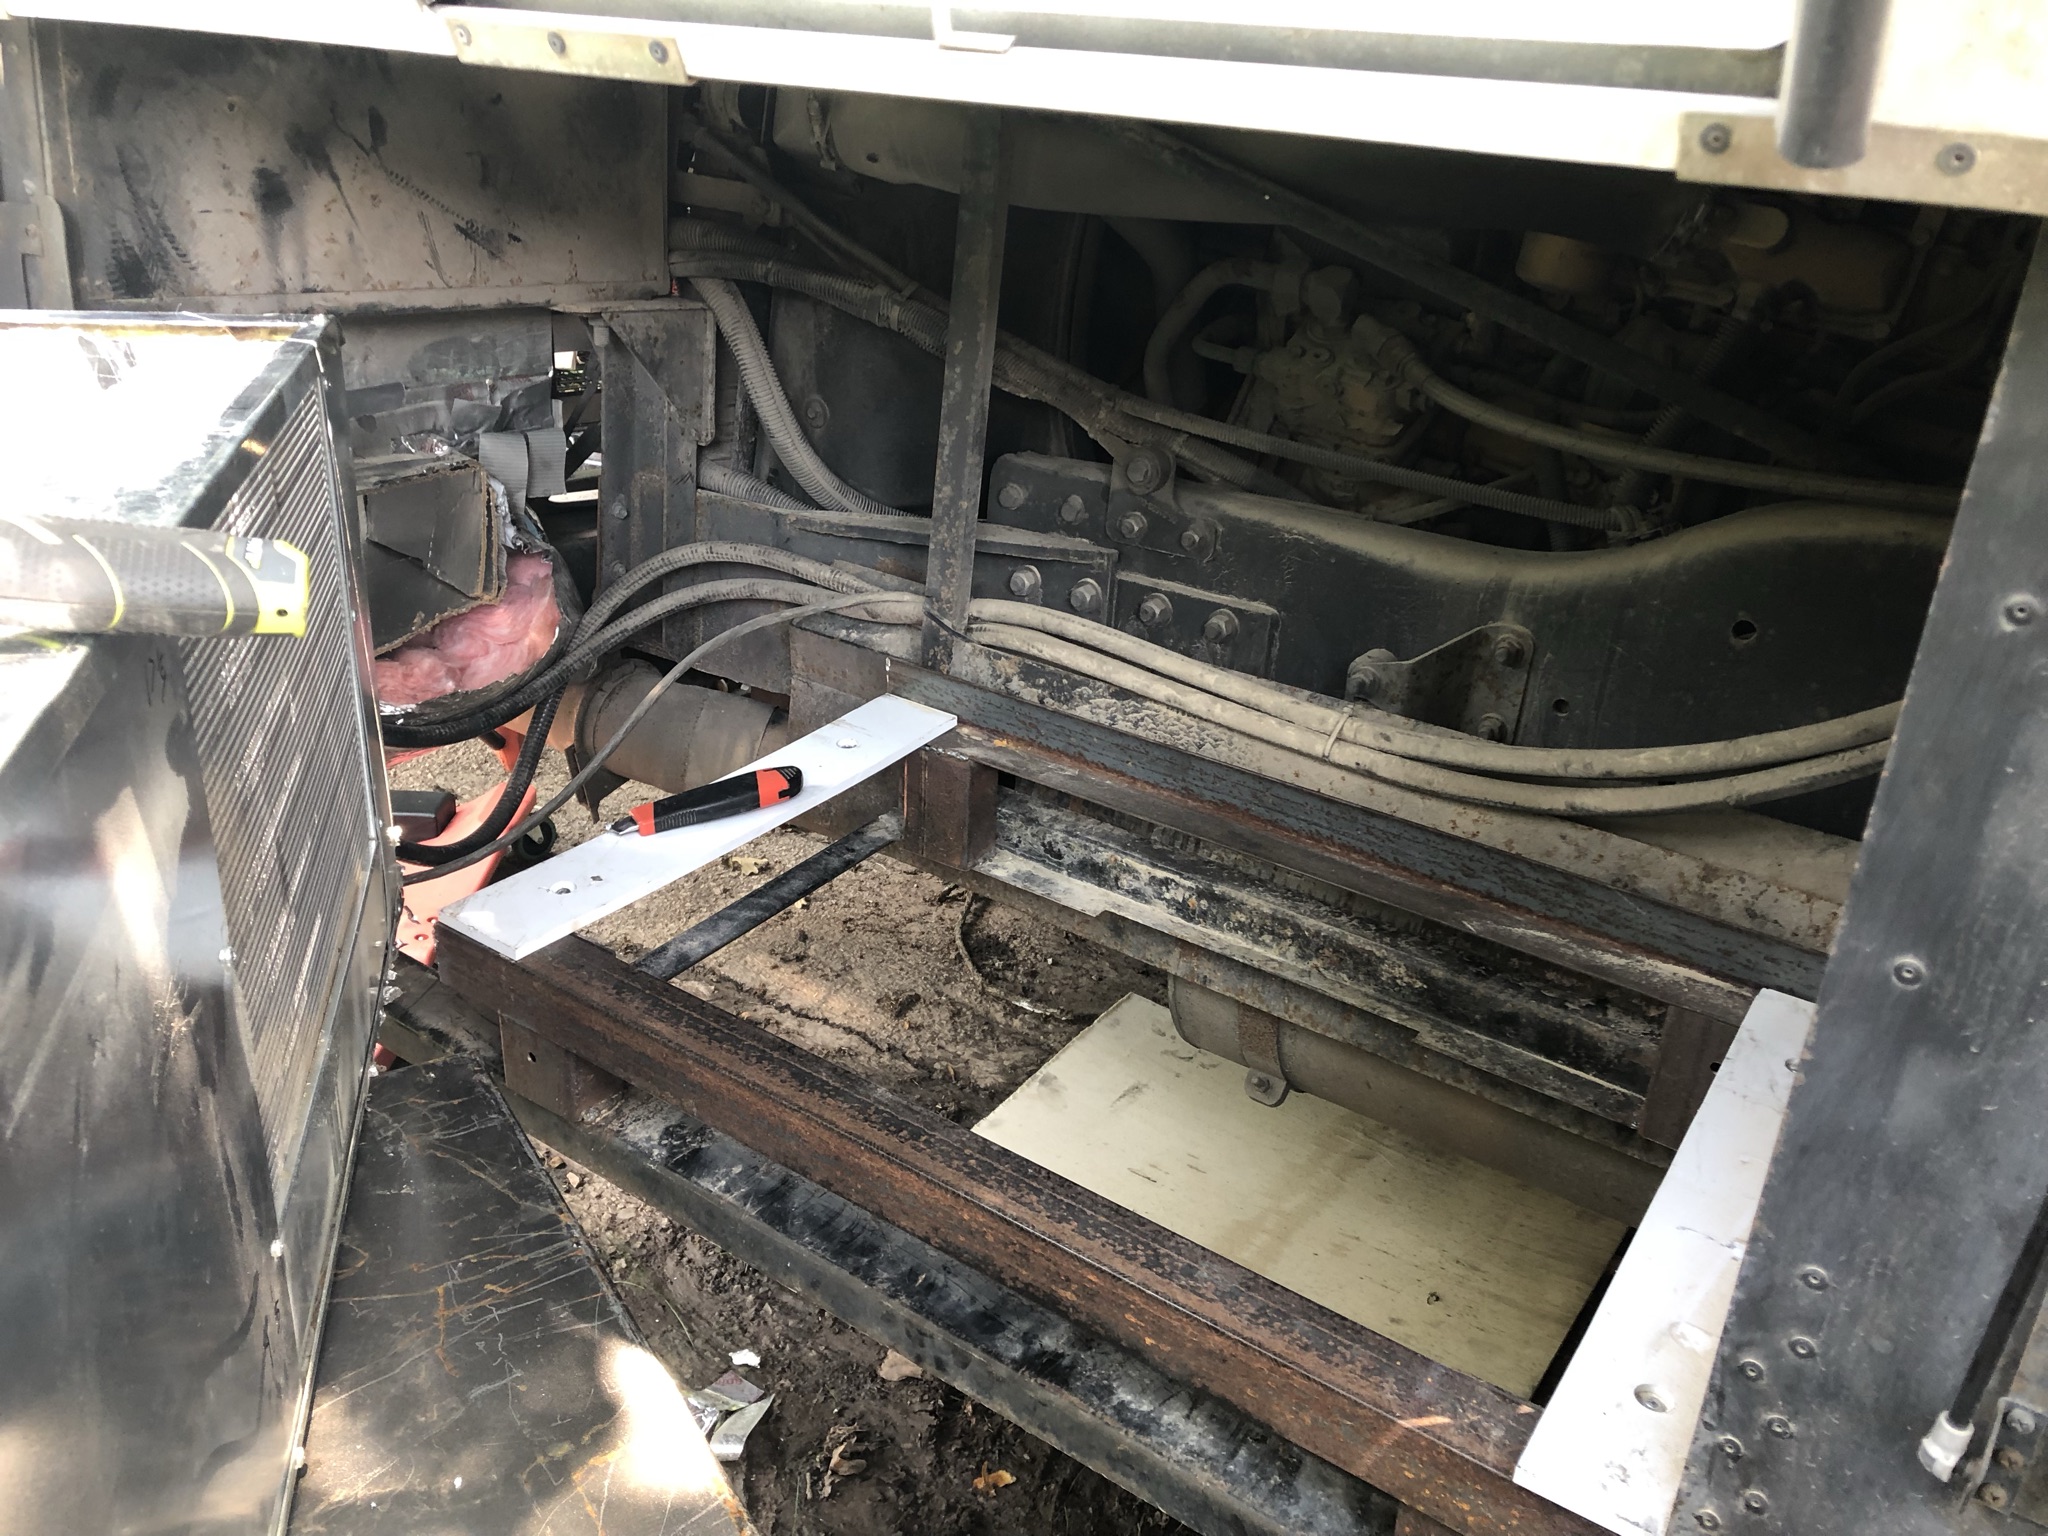
Originally, we were going to tilt the coil back and move the fan back but the coil is piped in pretty solid. It would mean cutting lines and refitting, a bit past my abilities.
|
|
|
|
|
07-08-2021, 11:26 AM
|
#68
|
|
Registered User
Join Date: Jul 2014
Posts: 1,336
|
OP: Did you come up with a different air duct for your new and different sized Coleman-Mach (2-ton) basement AC?
OTHER QUESTIONS & REASONING
If the Ellipse has the air duct on top of a taller Coleman-Mach model...
But the replacement AC box has the air duct on the side and the box is ~4" shorter...
Then... I still don't know why you can't go to a RV salvage yard and obtain and use the same air duct register that wraps around from the top to the side... like the one used in my 2004 Horizon 40AD and many other models?
See diagram and Item #2 Air Duct.
Maybe the reason is that there are obstructions in your Ellipse? Is that right?
===
I will also post a picture from a Meridian owner that may have made his own Top-To-Side Air Duct when he was faced with a similar challenge.
I also wonder if you can make your own fiberglass Top-To-Side Air Duct? ...Or pay a body shop to make you a fiberglass duct that will fix in your Ellipse frame?
|
|
|
|
|
07-11-2021, 07:28 AM
|
#69
|
|
Winnebago Camper
Join Date: May 2012
Posts: 9
|
Thanks for the info!
|
|
|
|
|
07-13-2021, 06:41 PM
|
#70
|
|
Winnebago Owner
Join Date: Oct 2019
Posts: 70
|
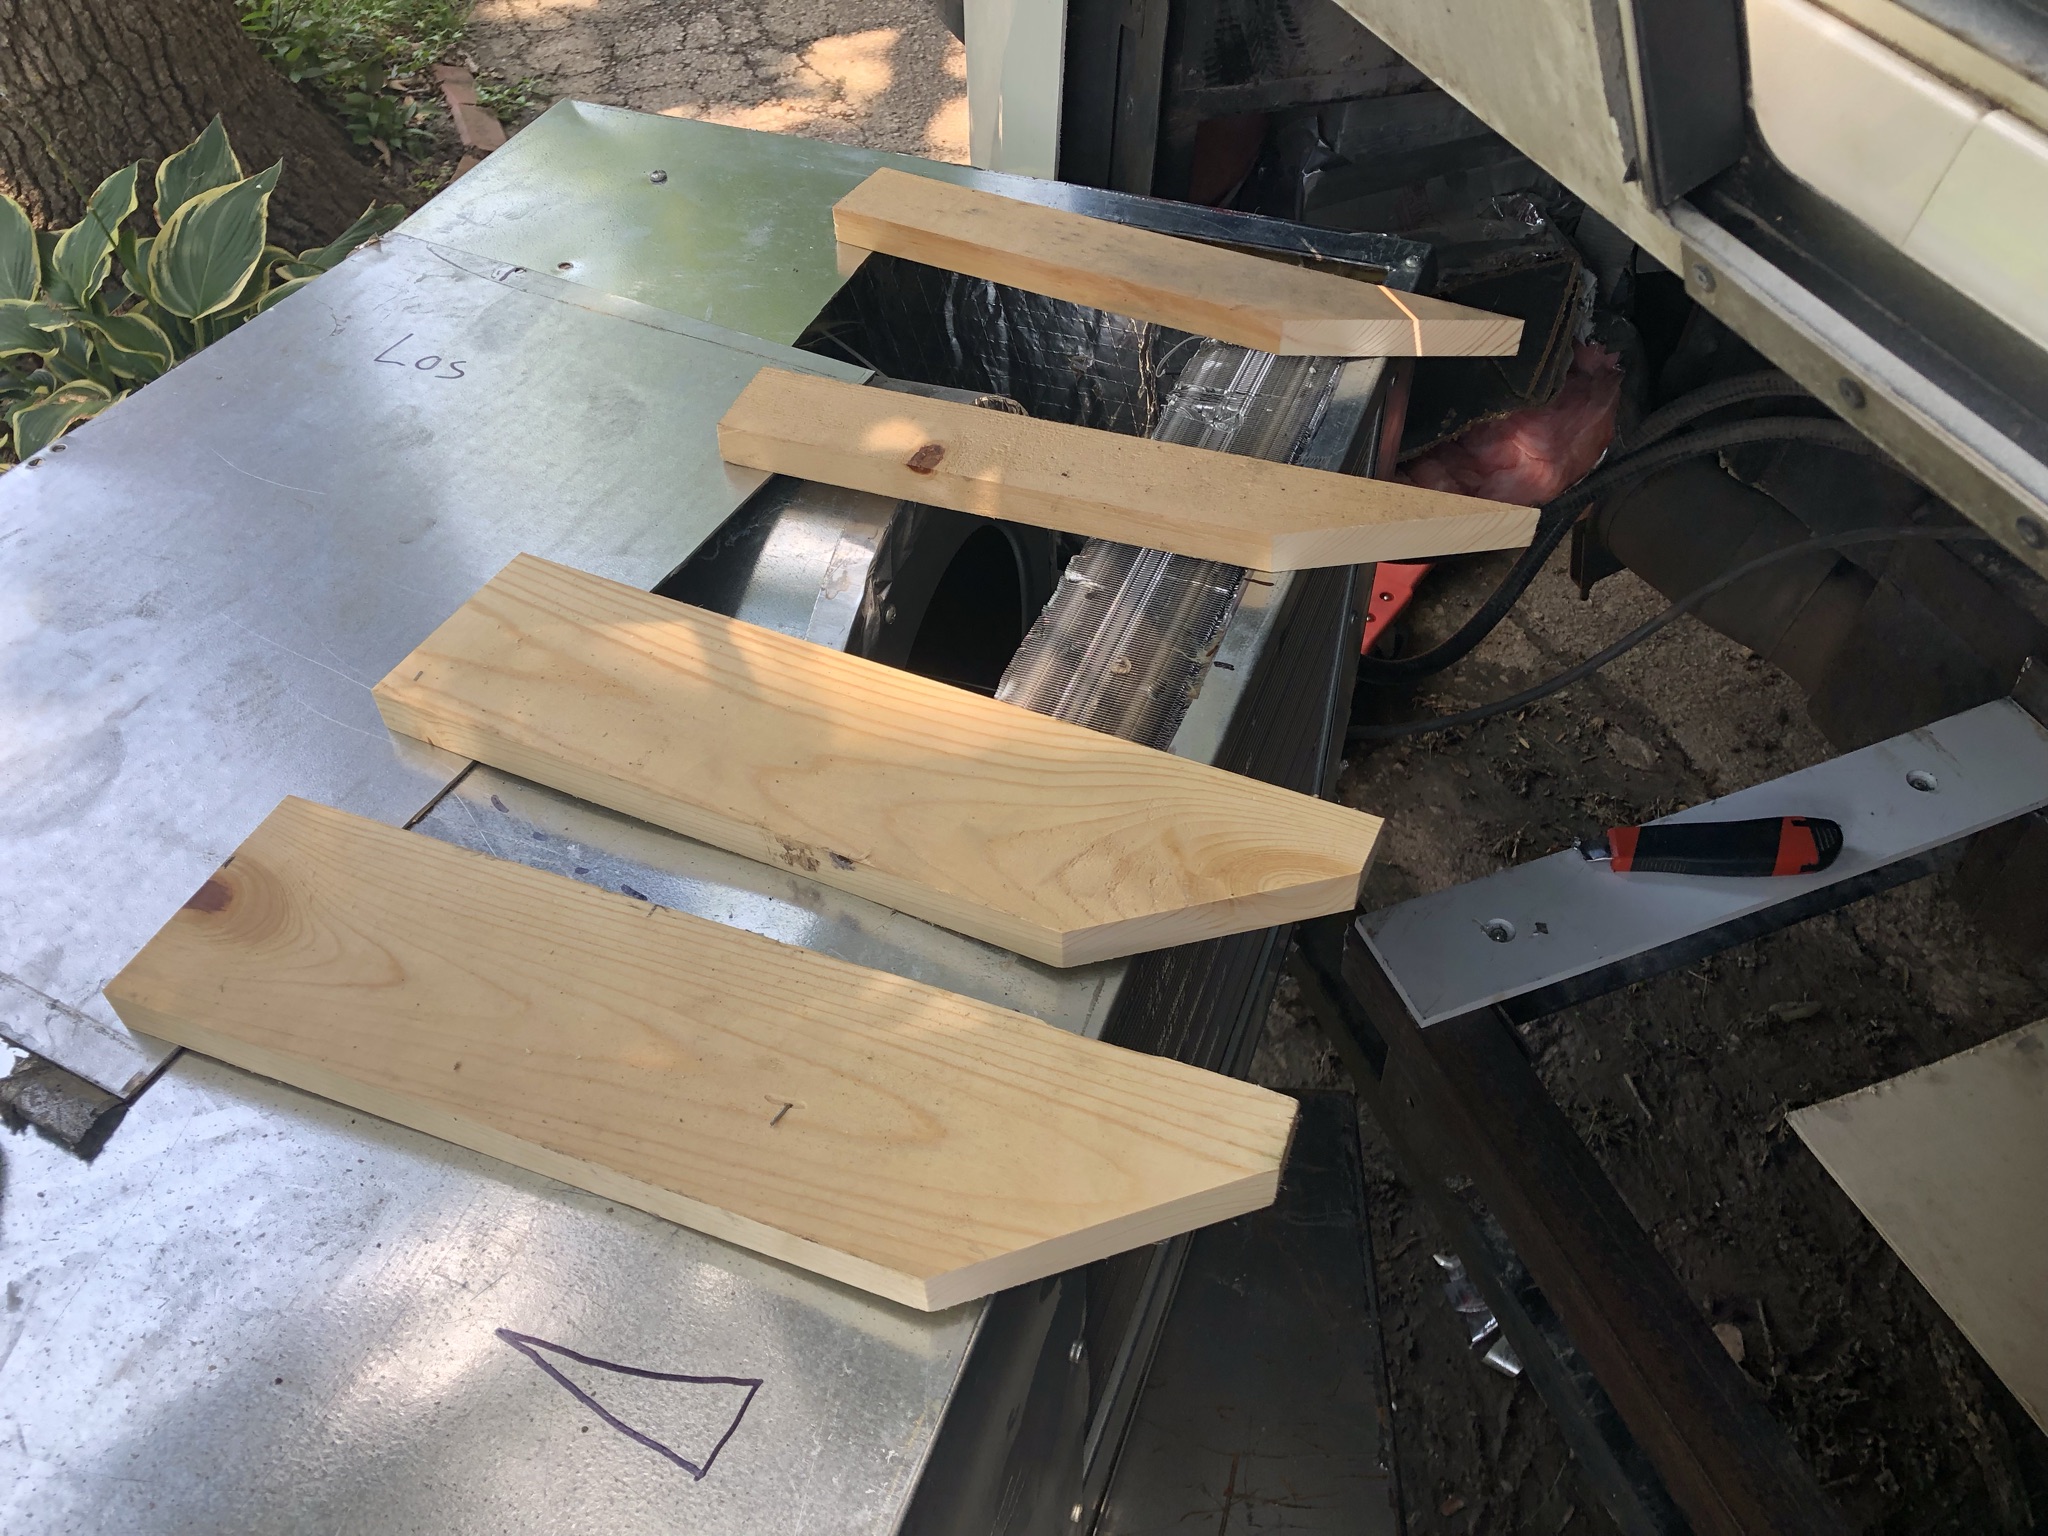
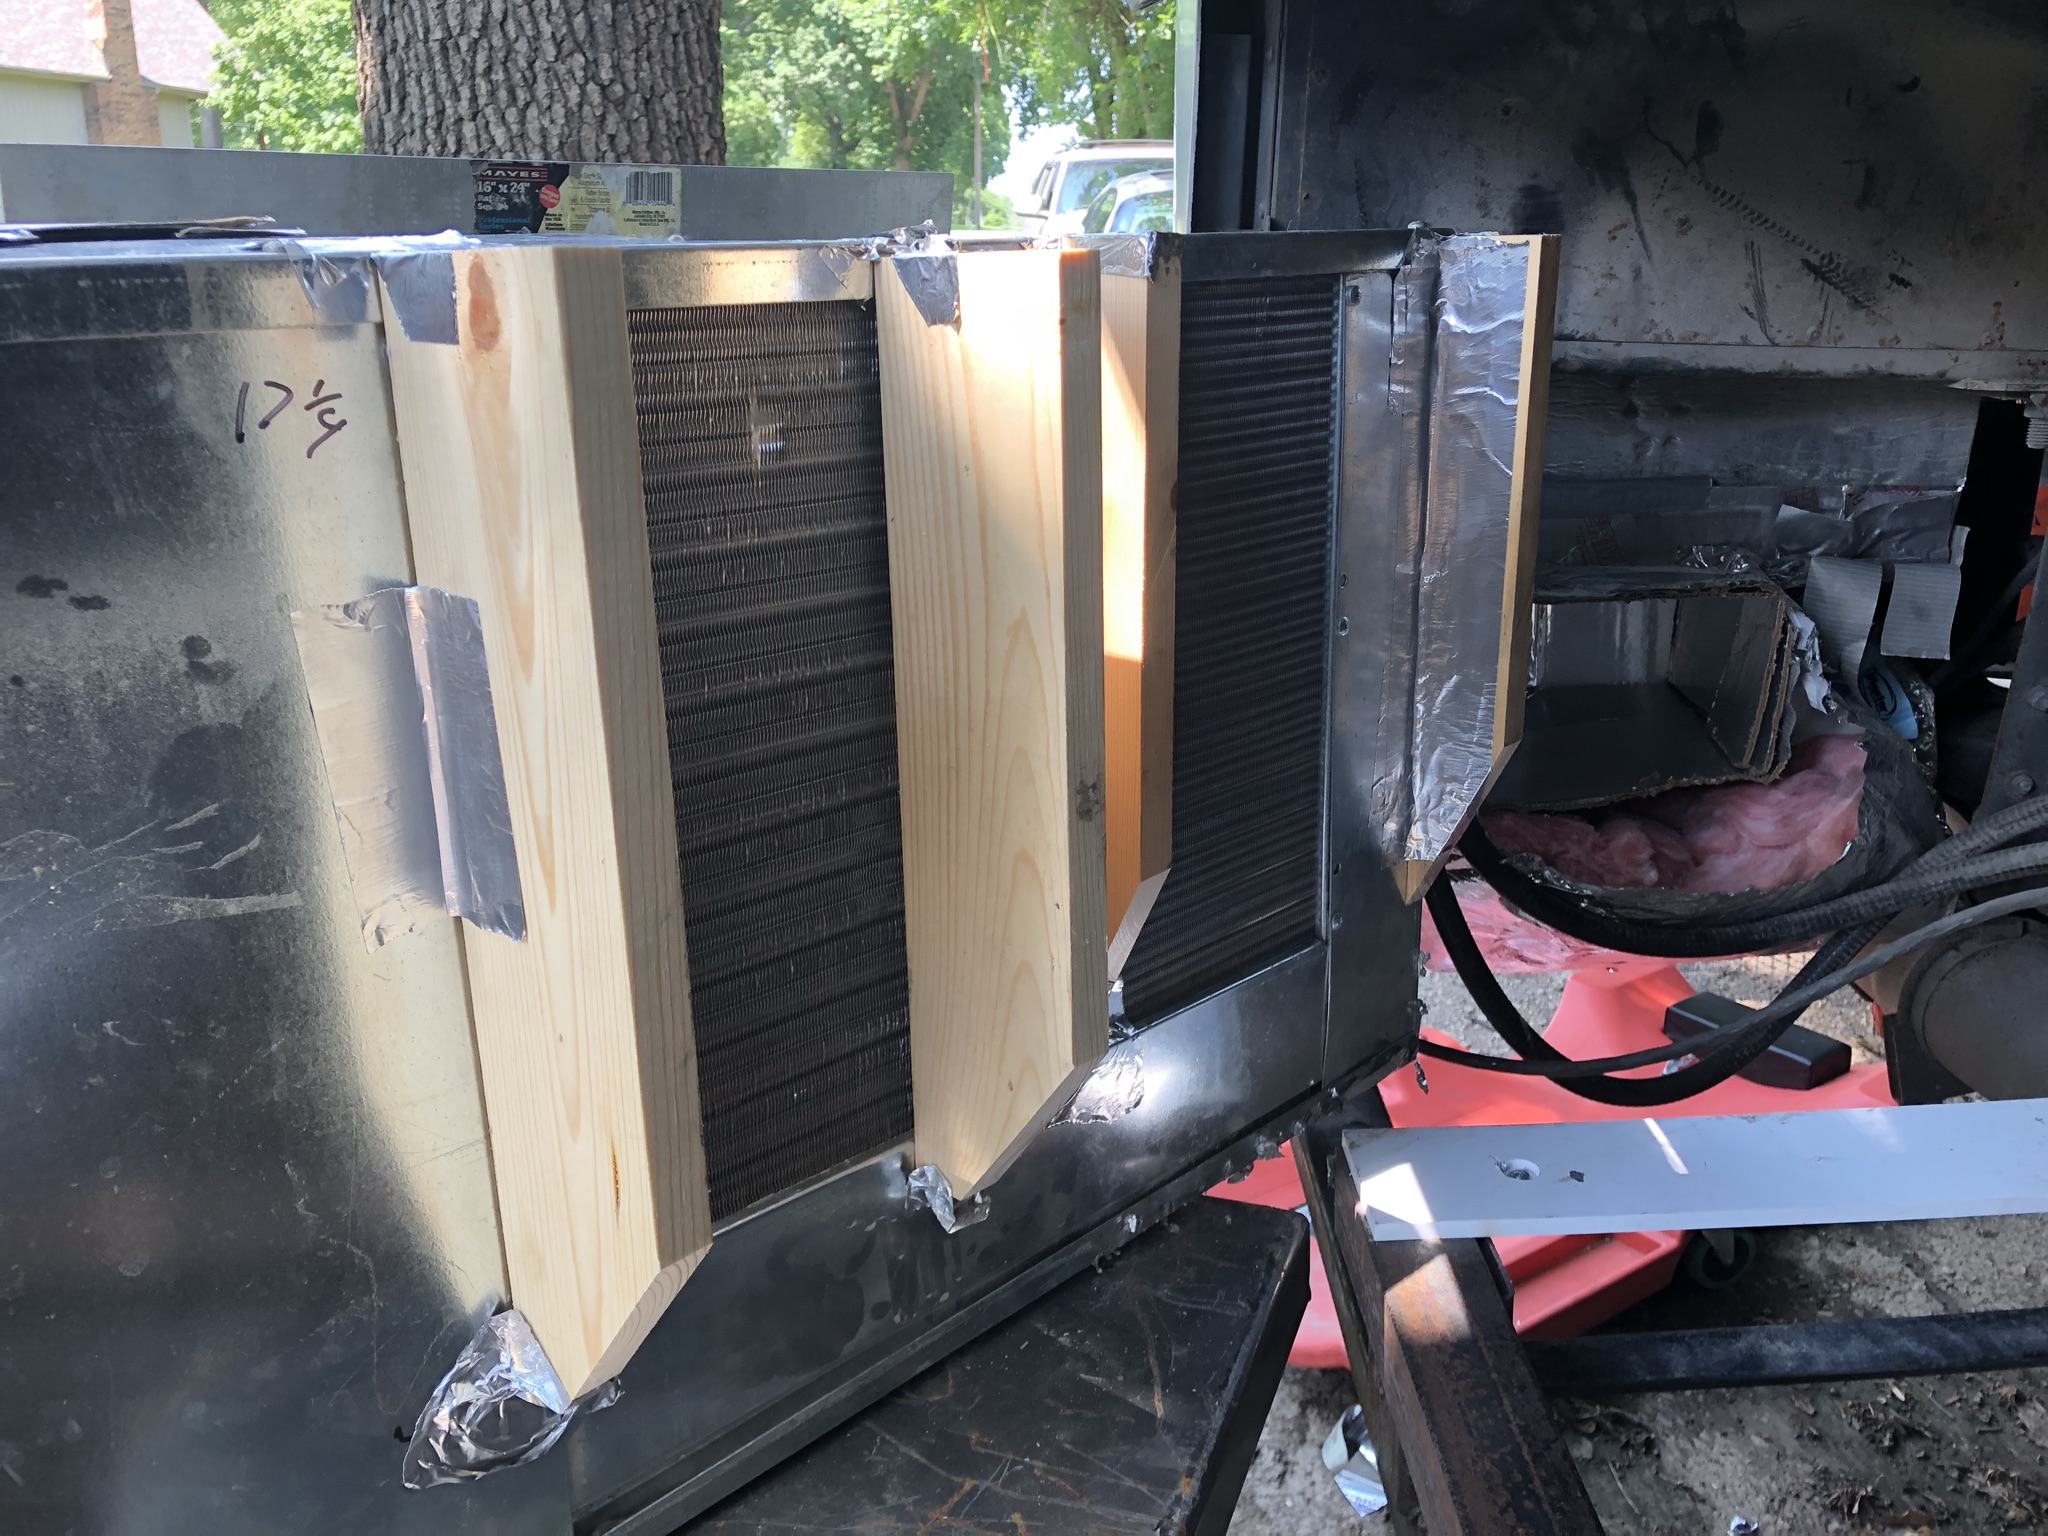
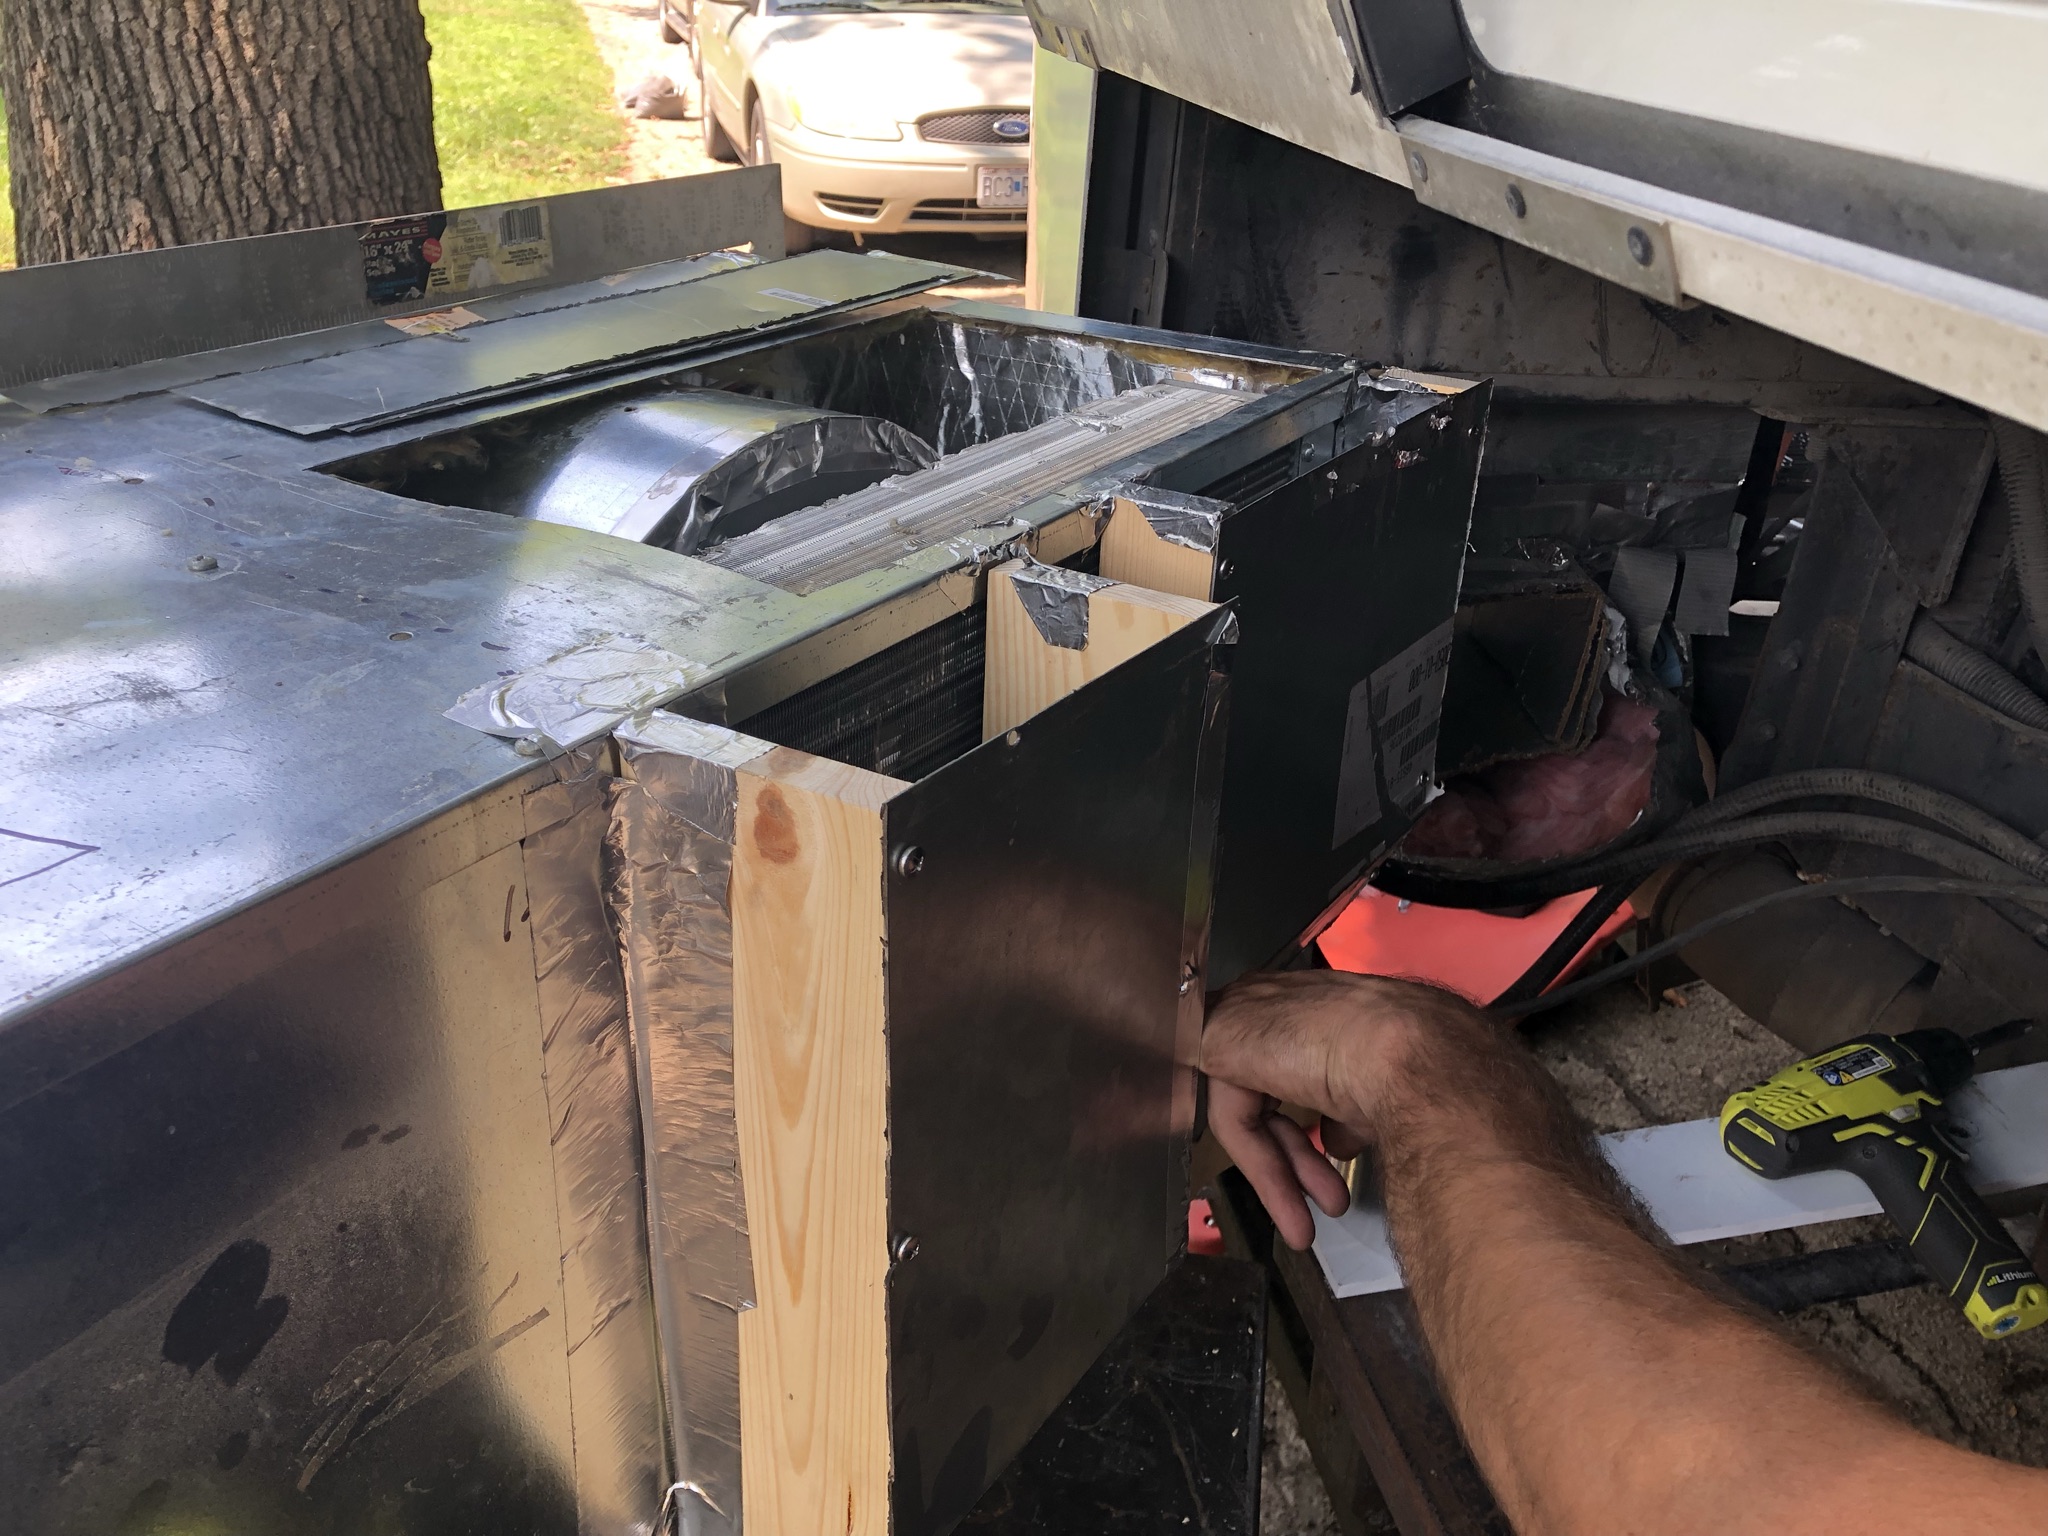
We are on round 2. Dropped the unit at noon. Power still hooked up. Took 10 minutes. Everyone should have a table lift. Those white strips are HPDE for smooth sliding. Warning this got somewhat crude as we are not sheet metal people.
Stripped all the old mod's tape and foil board off the first go round. Got to measuring and planning. The vertical frame rail in the back-left is 8" in from the corner of the unit so about in the middle of the back coil. Someone brilliantly proposed a downdraft chamber on each side of the rail That's the course I took.
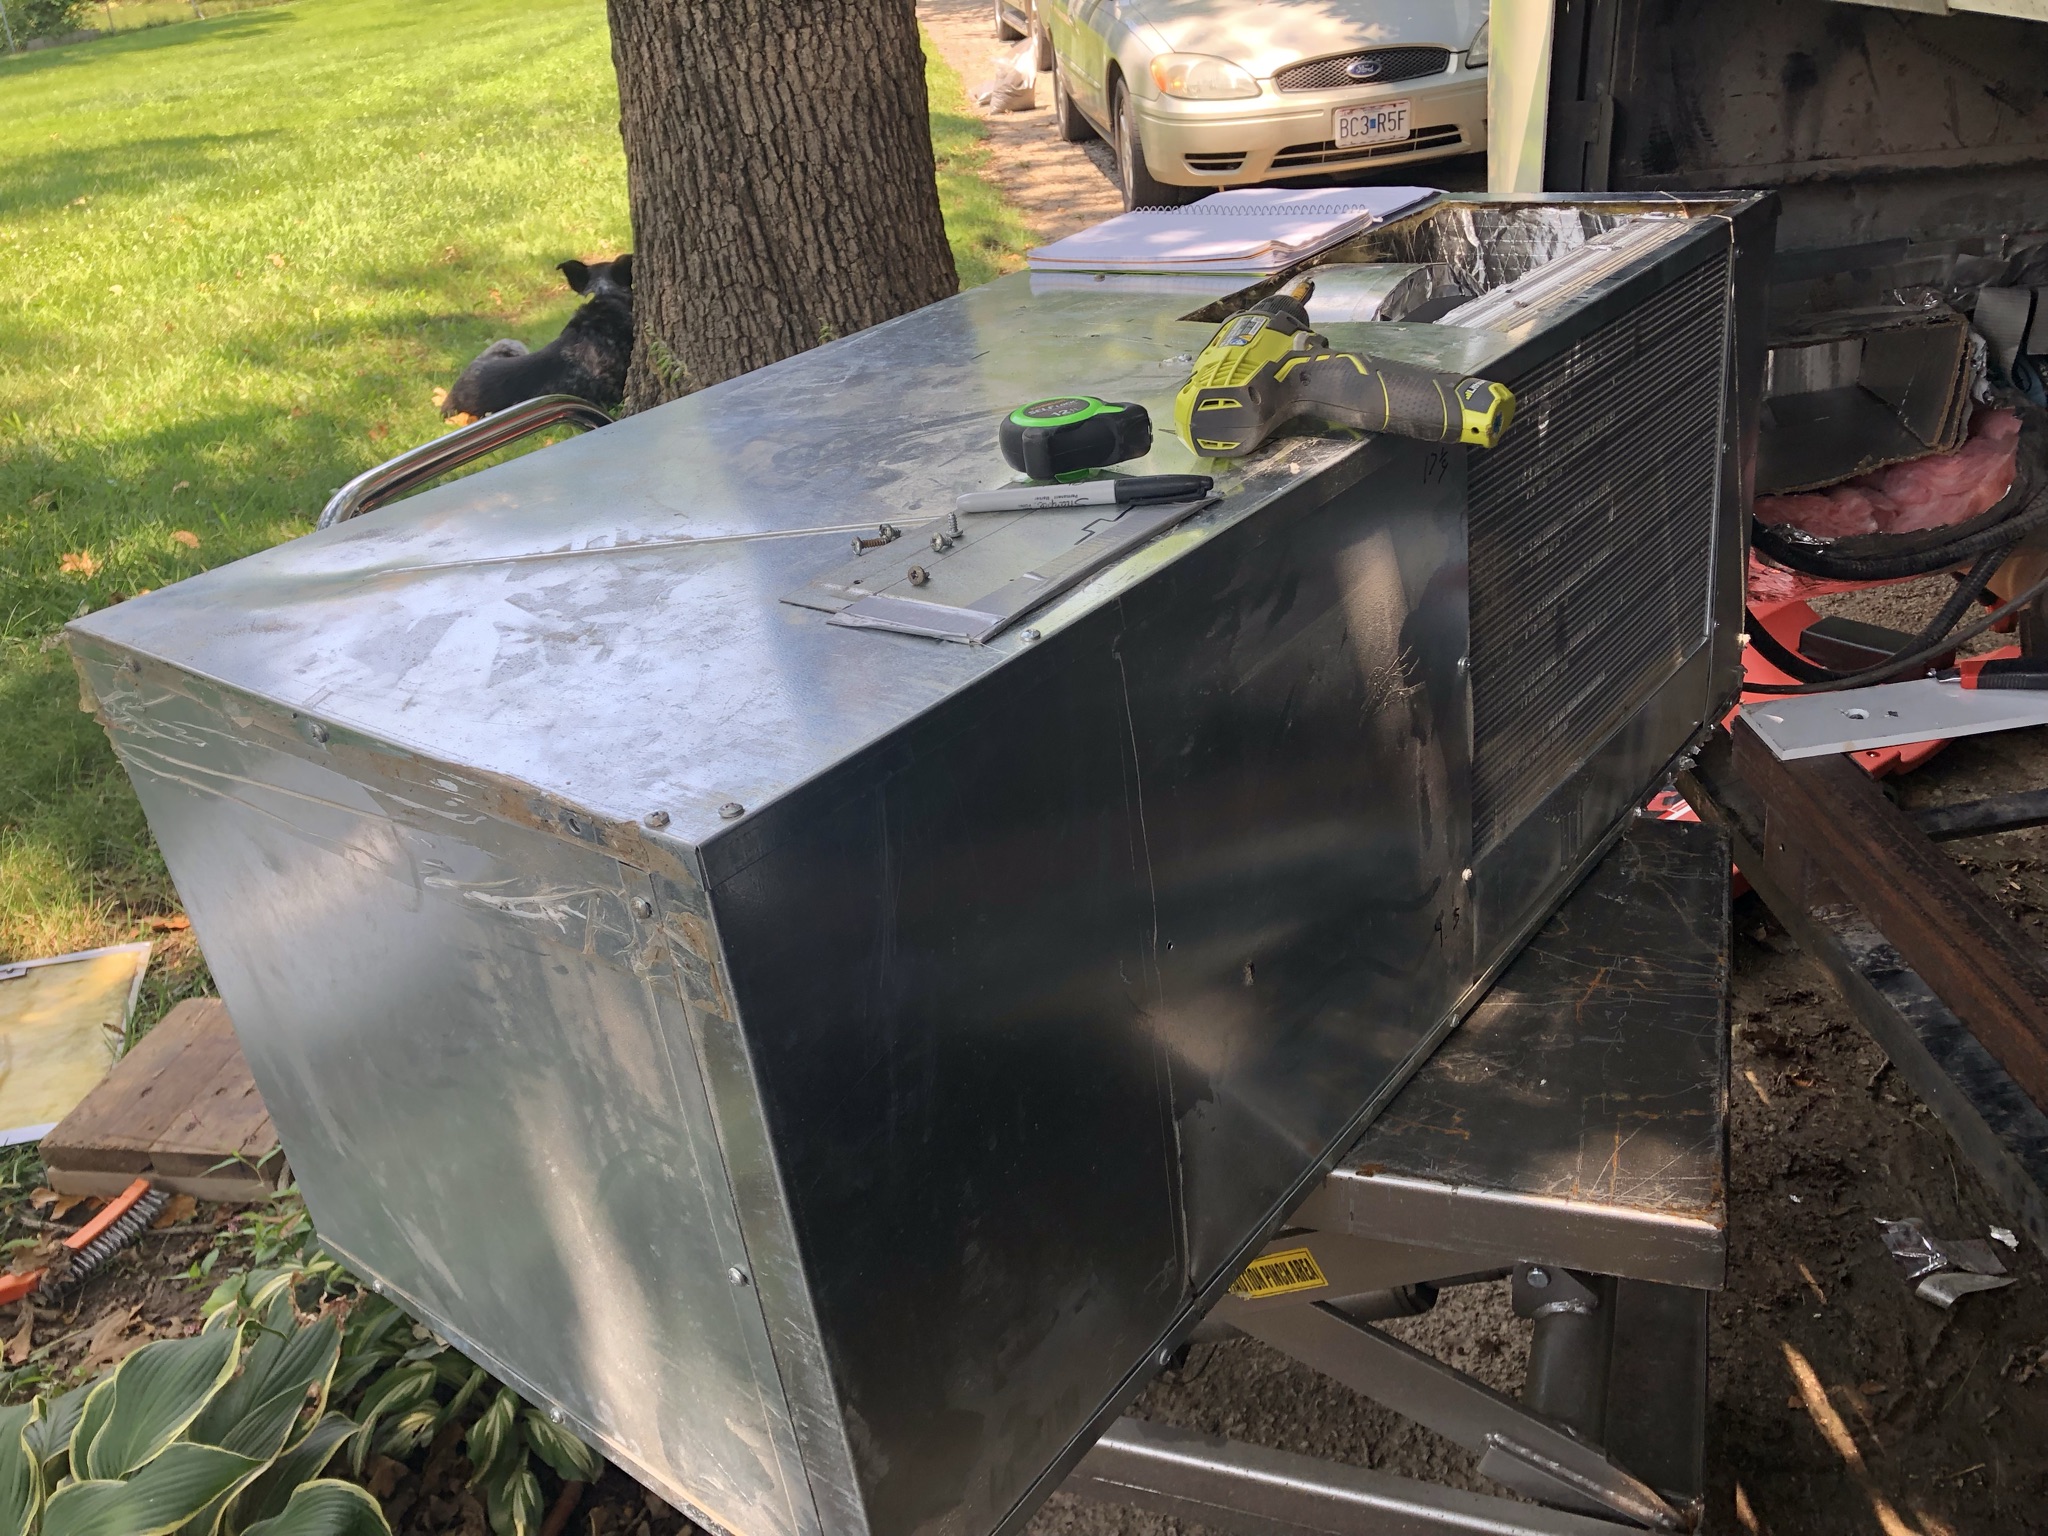
I have 2" of clearance in the back left chamber but was able to get 4" deep in the right chamber.
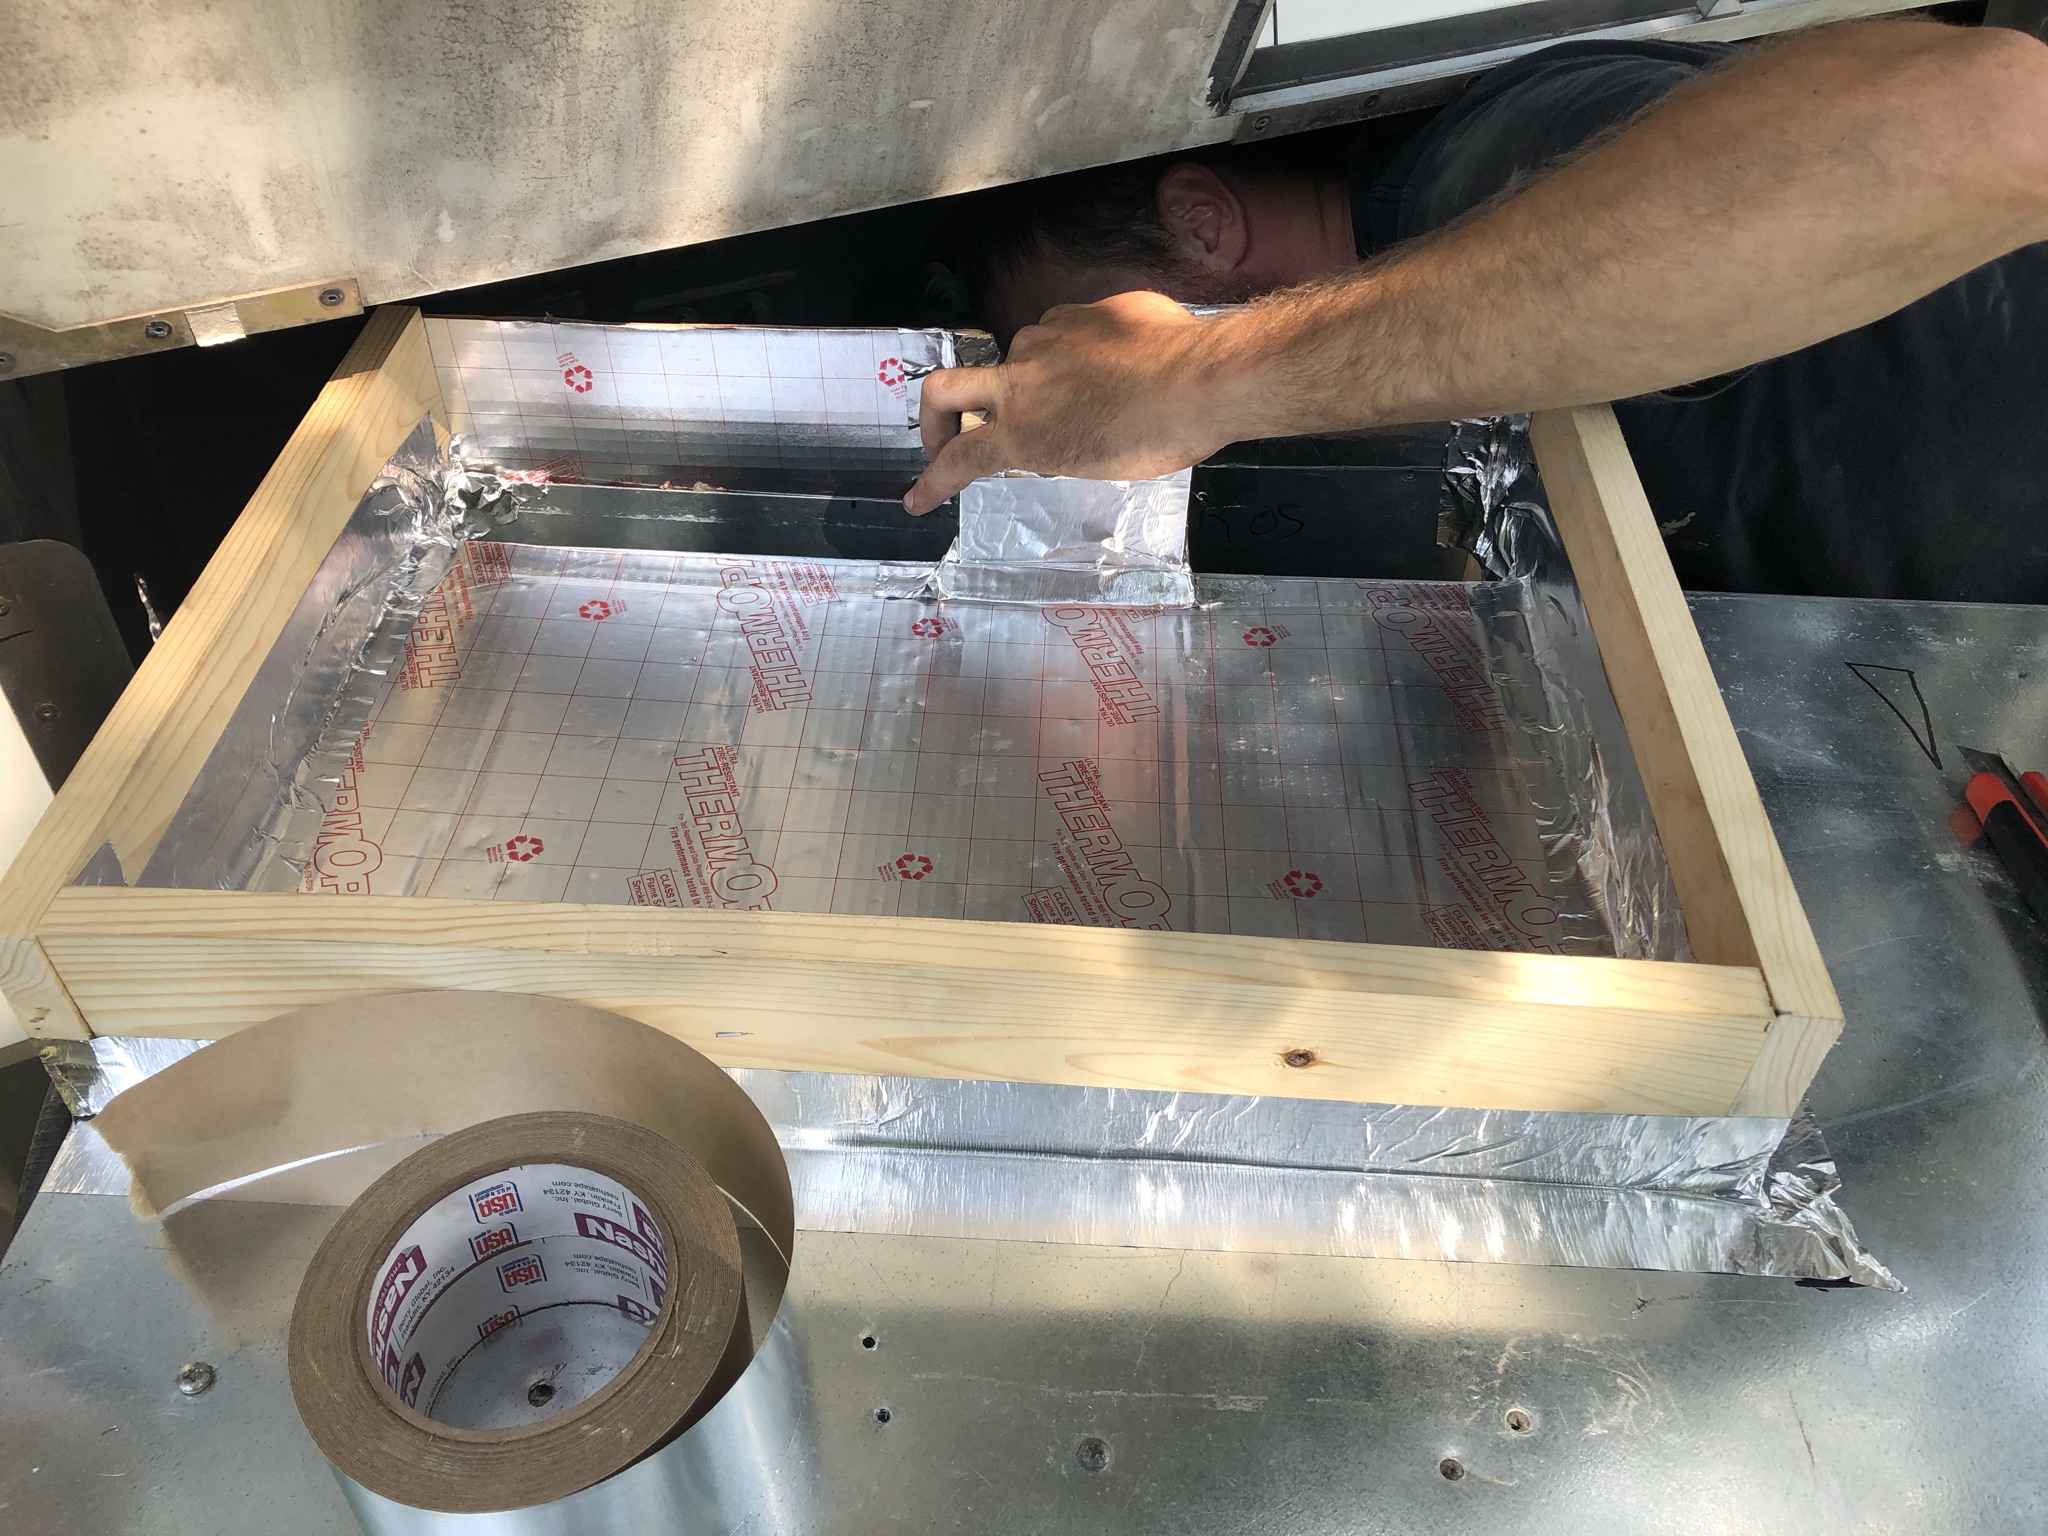
Finished at 4:40. Fired her up. It's been running about and hour and fifteen. I gained 10 degrees so far. Currently 87 out with sun beating on the top and side. My split is 22 degrees. I will give it a good four hour test. With air that cold I am not expecting coil ice.
Did I mention I put on a 15k Mach unit on the roof just for fun. I tied into the engine heater switch with surface conduit. That should allow for some southern travels if needed and a backup in case there is a problem.
The unit is super quiet. So far so good. Thanks for all the great ideas and encouragement.
R
|
|
|
|
|
07-13-2021, 07:22 PM
|
#71
|
|
Winnebago Master
Join Date: Oct 2017
Location: Elk Grove, CA
Posts: 3,583
|
I may have missed something but is the wood permanent or was this just a trial run? I'd be concerned about wood over the long term with exposure to moisture, even if it's protected by aluminum tape. Something like Starboard would be a good alternative.
I'm happy to see this is coming along. When you're finished, Winnieowners should turn this into a sticky.
__________________
Bob C
2002 Itasca Suncruiser 35U
Workhorse Chassis
|
|
|
|
|
07-13-2021, 08:37 PM
|
#72
|
|
Registered User
Join Date: Jul 2014
Posts: 1,336
|
Amazing ingenuity! Congrats!
No... I did not catch you added a roof top AC. Bravo! Can I assume you -22F out of the basement AC is without the additional roof top AC running?
I added an additional 8,000 BTUs of cooling by hiding a portable AC in the front cabin desk area and I am so much more comfortable in 100F heat. In fact, at 95F and less OAT it gets downright cold inside!
Why didn't Winnebago offer 32,000+ BTUs in all there high-end RVs? They missed a good opportunity to set a new industry standard if you ask me.
Any way, for more information on adding and hiding a portable AC in your RV, you can go to this thread:
https://www.winnieowners.com/forums/...ad-360836.html
However, adding additional AC where your roof vent exists is another option. The key is how you power it off your L2/C2 line, so you may want to read-up on this point.
|
|
|
|
|
07-14-2021, 08:08 AM
|
#73
|
|
Winnebago Owner
Join Date: Oct 2019
Posts: 70
|
-22 degrees with basement air only. I would be in an icebox with roof and basement running. We are heading back up to Idaho, Wyoming area again where temps can get pretty high.
It was late last Fall that I had to drop and service the jenny. Turned out to be pretty straight forward. Broken fan belt. Did the full service and lifted it back in. I hope that I have paid my dues for now.
|
|
|
|
|
07-14-2021, 11:04 AM
|
#74
|
|
Registered User
Join Date: Jul 2014
Posts: 1,336
|
rheine3: In your pictures I see some 4" insulation wrapped around the cold air exhaust vent. Did you add this or did your RV come that way from Winnebago?
I ask, because in my 2004 "Horizon" I took steps to use butyl tape and then I sprayed Flex Seal over that for extra insulation. And after that the cold air flow to the inside of my RV was much better, because I also sealed of some cracks in the ducting that ran up the rear cap.
Note: I can't believe Winnebago would build such a nice coach and then not spend a few dollars more to insulate bare metal from the outside heat, which then de-rated the efficiency of the basement AC. (See picture of another owner's RV with the rear cap off.)
I also found there was no barrier that would block warm air from the closet to enter the Basement AC air filter... under the washer-dryer. So I rolled up some insulation to stop this air flow and then I also insulated under the trap doors in the closet. And this too did a lot to improve the efficiency of my basement AC.
To bad the industry stopped installing these back in ~2010-2012, because I would far prefer a Basement AC vs at roof AC. And they are simple to maintain once you read how.
|
|
|
|
|
07-14-2021, 01:58 PM
|
#75
|
|
Winnebago Owner
Join Date: Oct 2019
Posts: 70
|
I did add a lot of insulation up the back but my rear cap is one piece so not ready to pull it to finish the job. With a stick you can get the insulation up fairly well. Also wadded up some for under the closet. With air that cold it's easy to find leaks on the high side. and patch.
|
|
|
|
|
08-10-2021, 01:06 PM
|
#76
|
|
Winnebago Owner
Join Date: Oct 2019
Posts: 70
|
Just returned from a 10 day trip in Wyoming. Air worked great. Want to mention that I sensed it was not at 100% capacity, flow wise, At a sunny 90 outside and 65% humuduty it barley held 75 (on the jenny). That works for us. In the park I fired up our roof unit also which quickly brought the temp to 72, three degrees below what we would normally set at. Best RVing for us is early Spring down south and Fall anywhere else.
|
|
|
|
|
|
|
Currently Active Users Viewing This Thread: 1 (0 members and 1 guests)
|
|
|
 Posting Rules
|
You may not post new threads
You may not post replies
You may not post attachments
You may not edit your posts
HTML code is Off
|
|
|
|
 » Recent Discussions
 |
|
|
|
|
|
|
|
|
|
|
|
|
|
|
|
|
|
|
|
|
|
|
|
|
|


 Linear Mode

