 |
|
 05-29-2021, 08:57 AM
|
#1
|
|
Winnebago Owner
Join Date: Oct 2019
Posts: 70
|
My Basement Heat Pump Replacement
06 Itasca Ellipse 40 pusher.
Many reading this have or will have the same problem with this generation of Winnies
I decided to replace my Coleman Mach unit. There is no longer a direct fit replacement from Coleman. I ordered a similar unit only the return air opening is in the back. My coach needs to return air down to the top. So what to do.
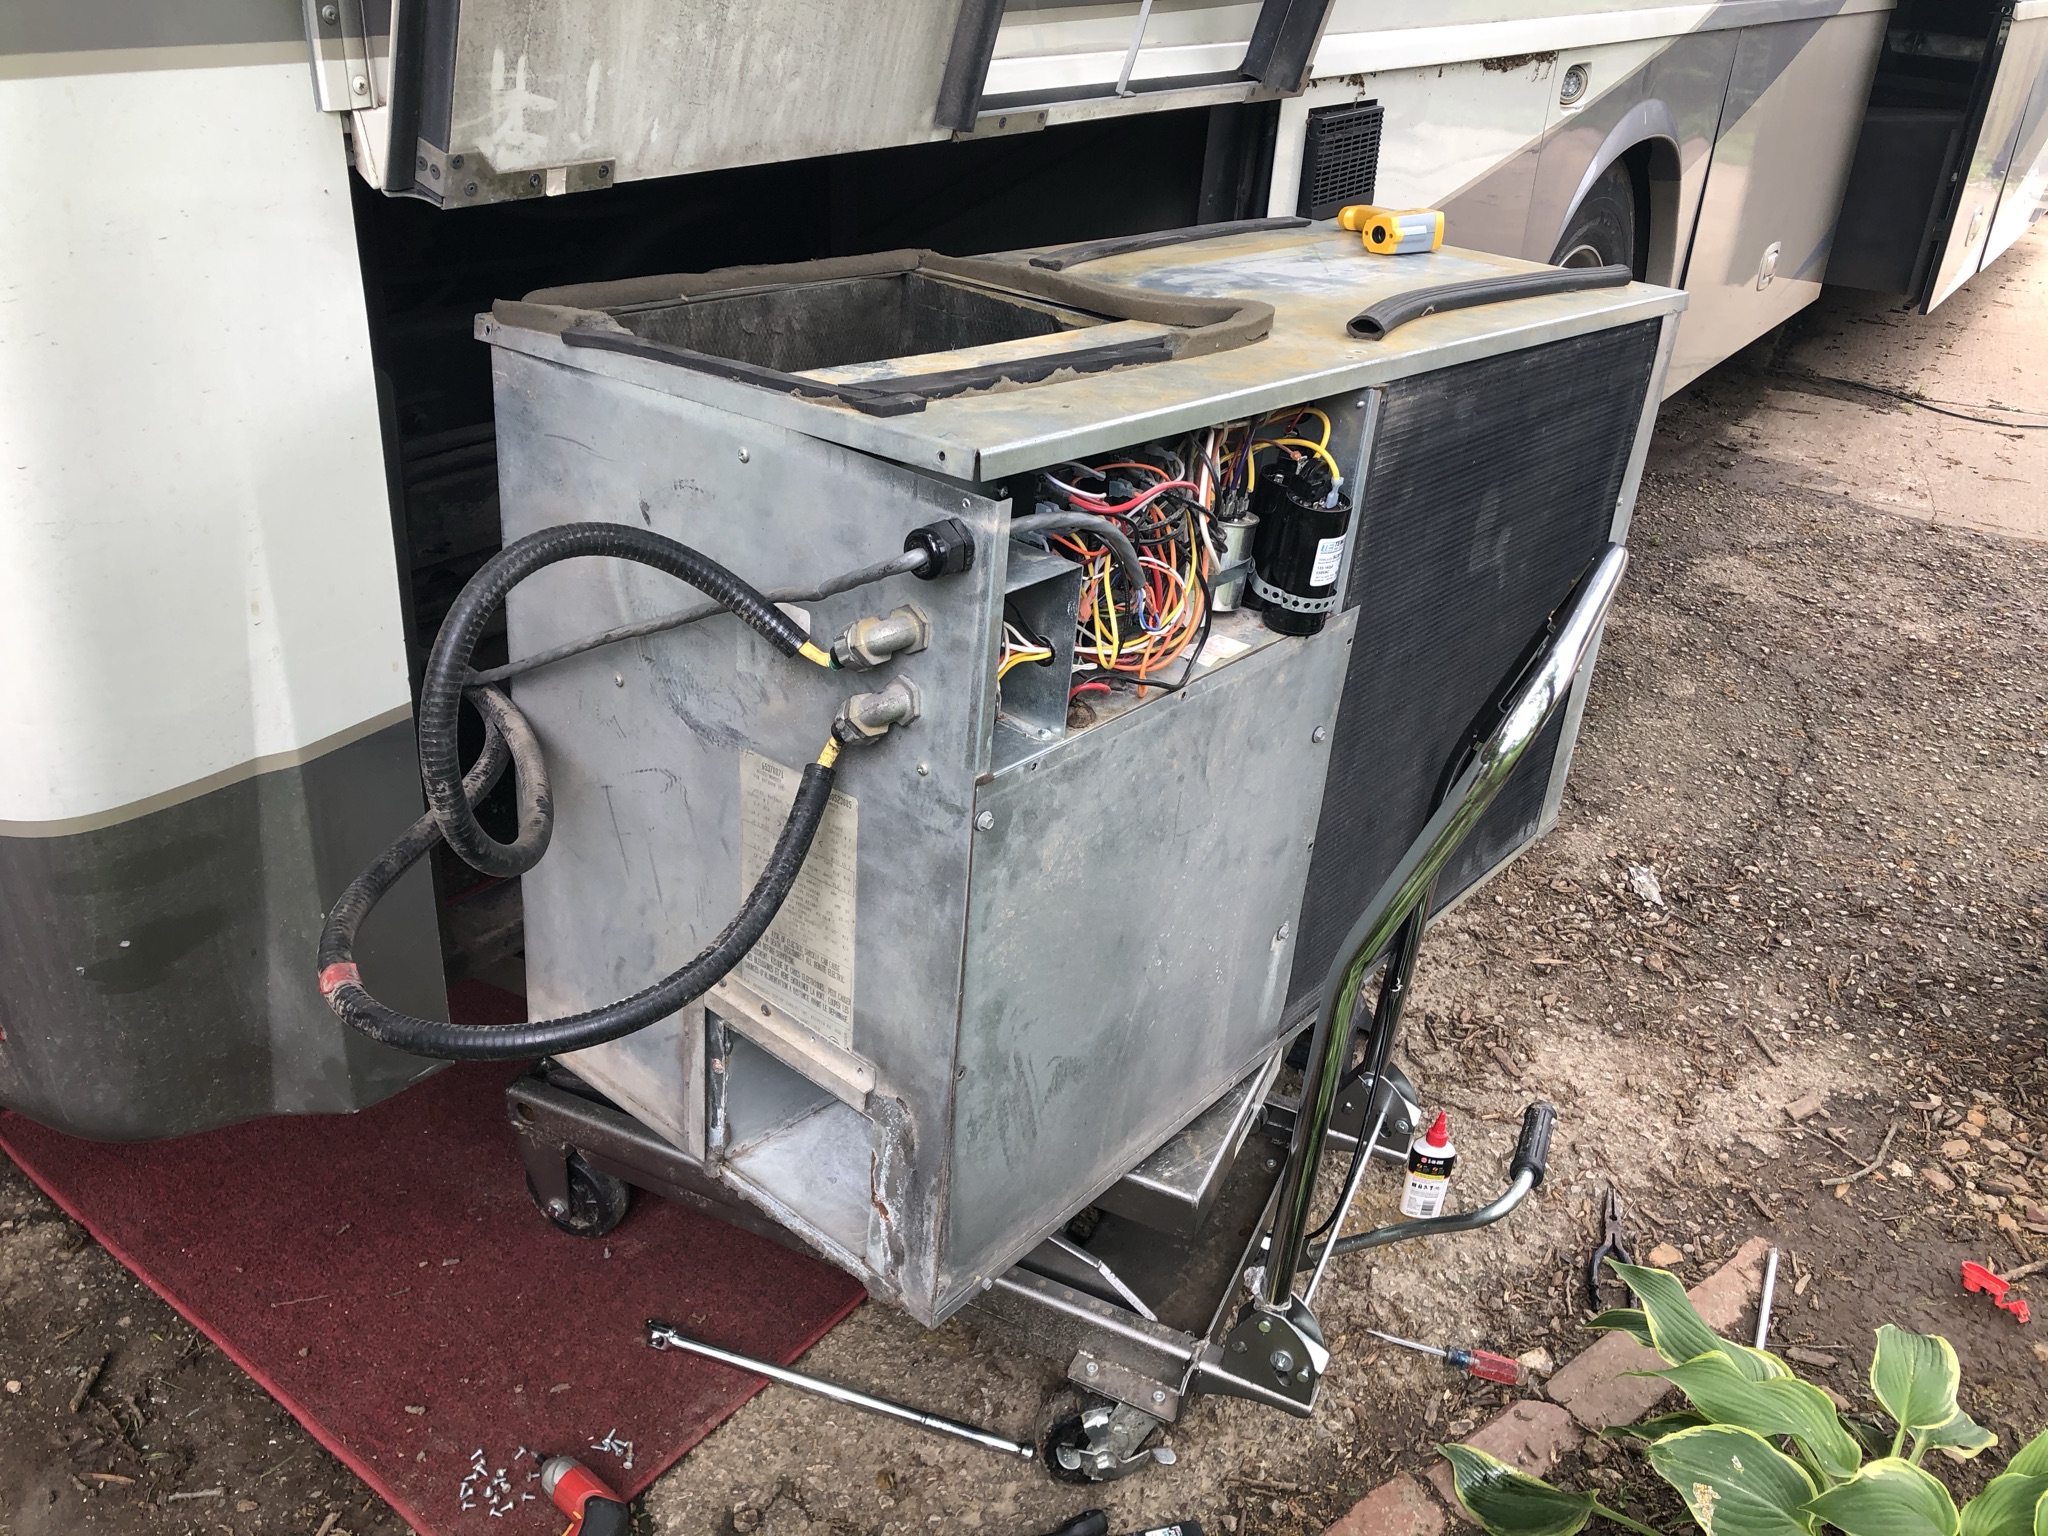
Some have ducted the from the top and down over the side. There is a kit for that somewhere, I saw the drawing. I have zero room on the back for anything but some insulation. I am going down into the top. At first I had grand plans to tilt the condenser coil back just like my old unit. Once I opened up the new box that idea evaporated.
|

|

|
|
05-29-2021, 09:08 AM
|
#2
|
|
Winnebago Owner
Join Date: Oct 2019
Posts: 70
|
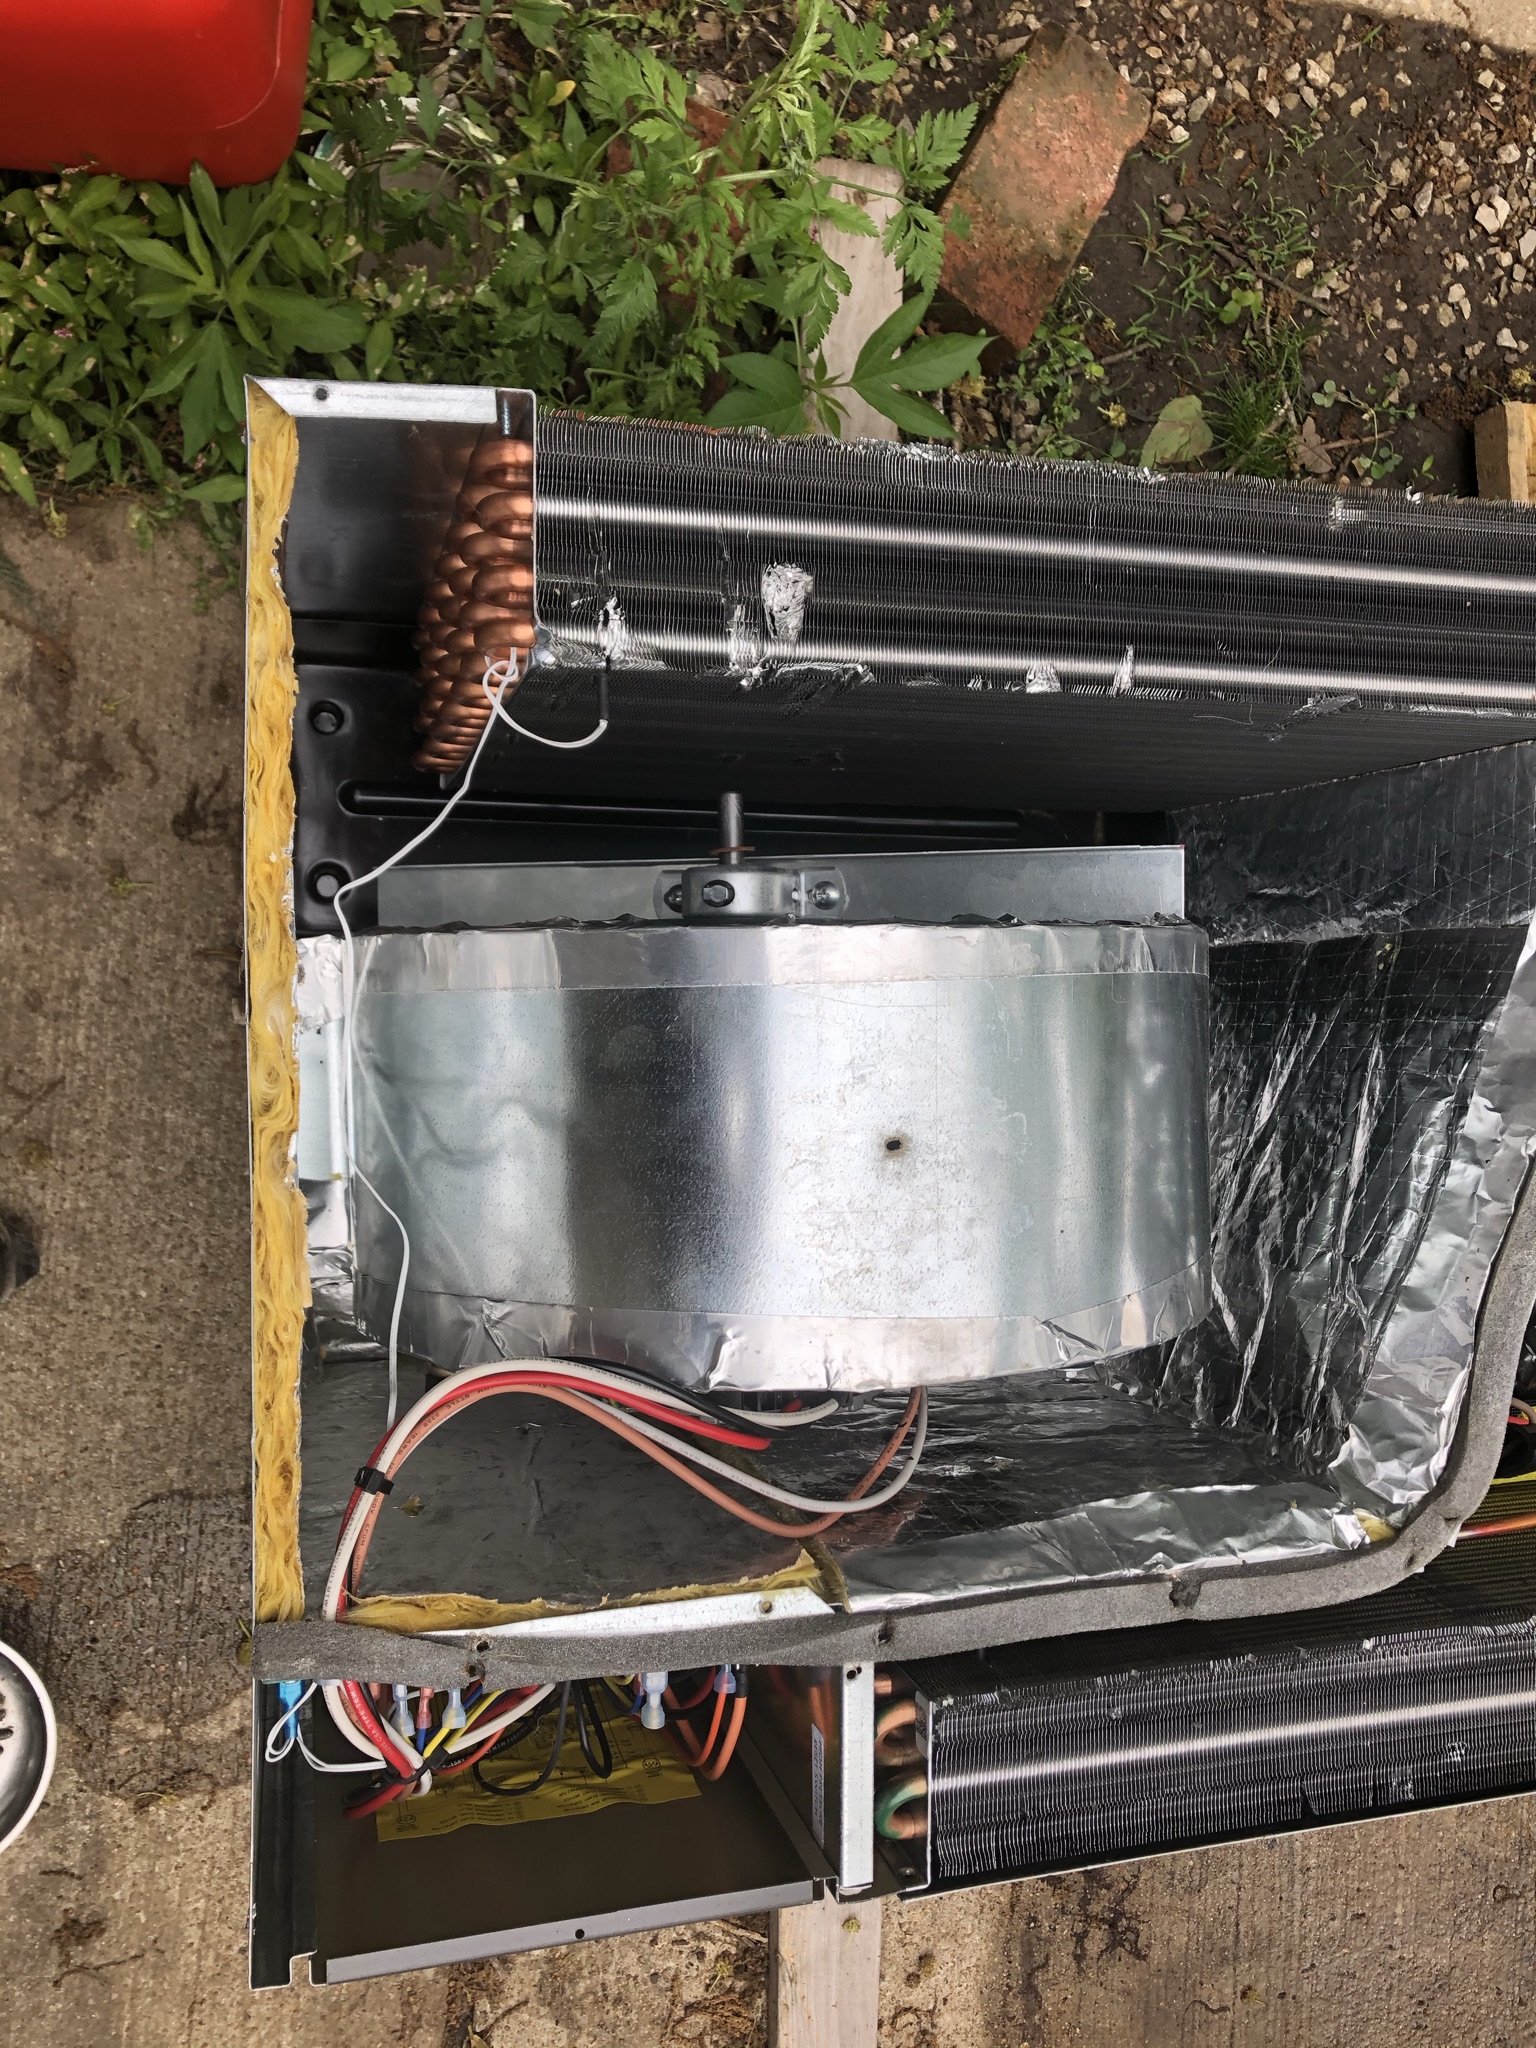
A look down inside the new unit. This is right after I popped the lid. You can see the fan motor shaft sticking out. Not much room to play with. The good news is the condenser is really beefy.
|
|
|
|
|
05-29-2021, 09:22 AM
|
#3
|
|
Winnebago Owner
Join Date: Oct 2019
Posts: 70
|
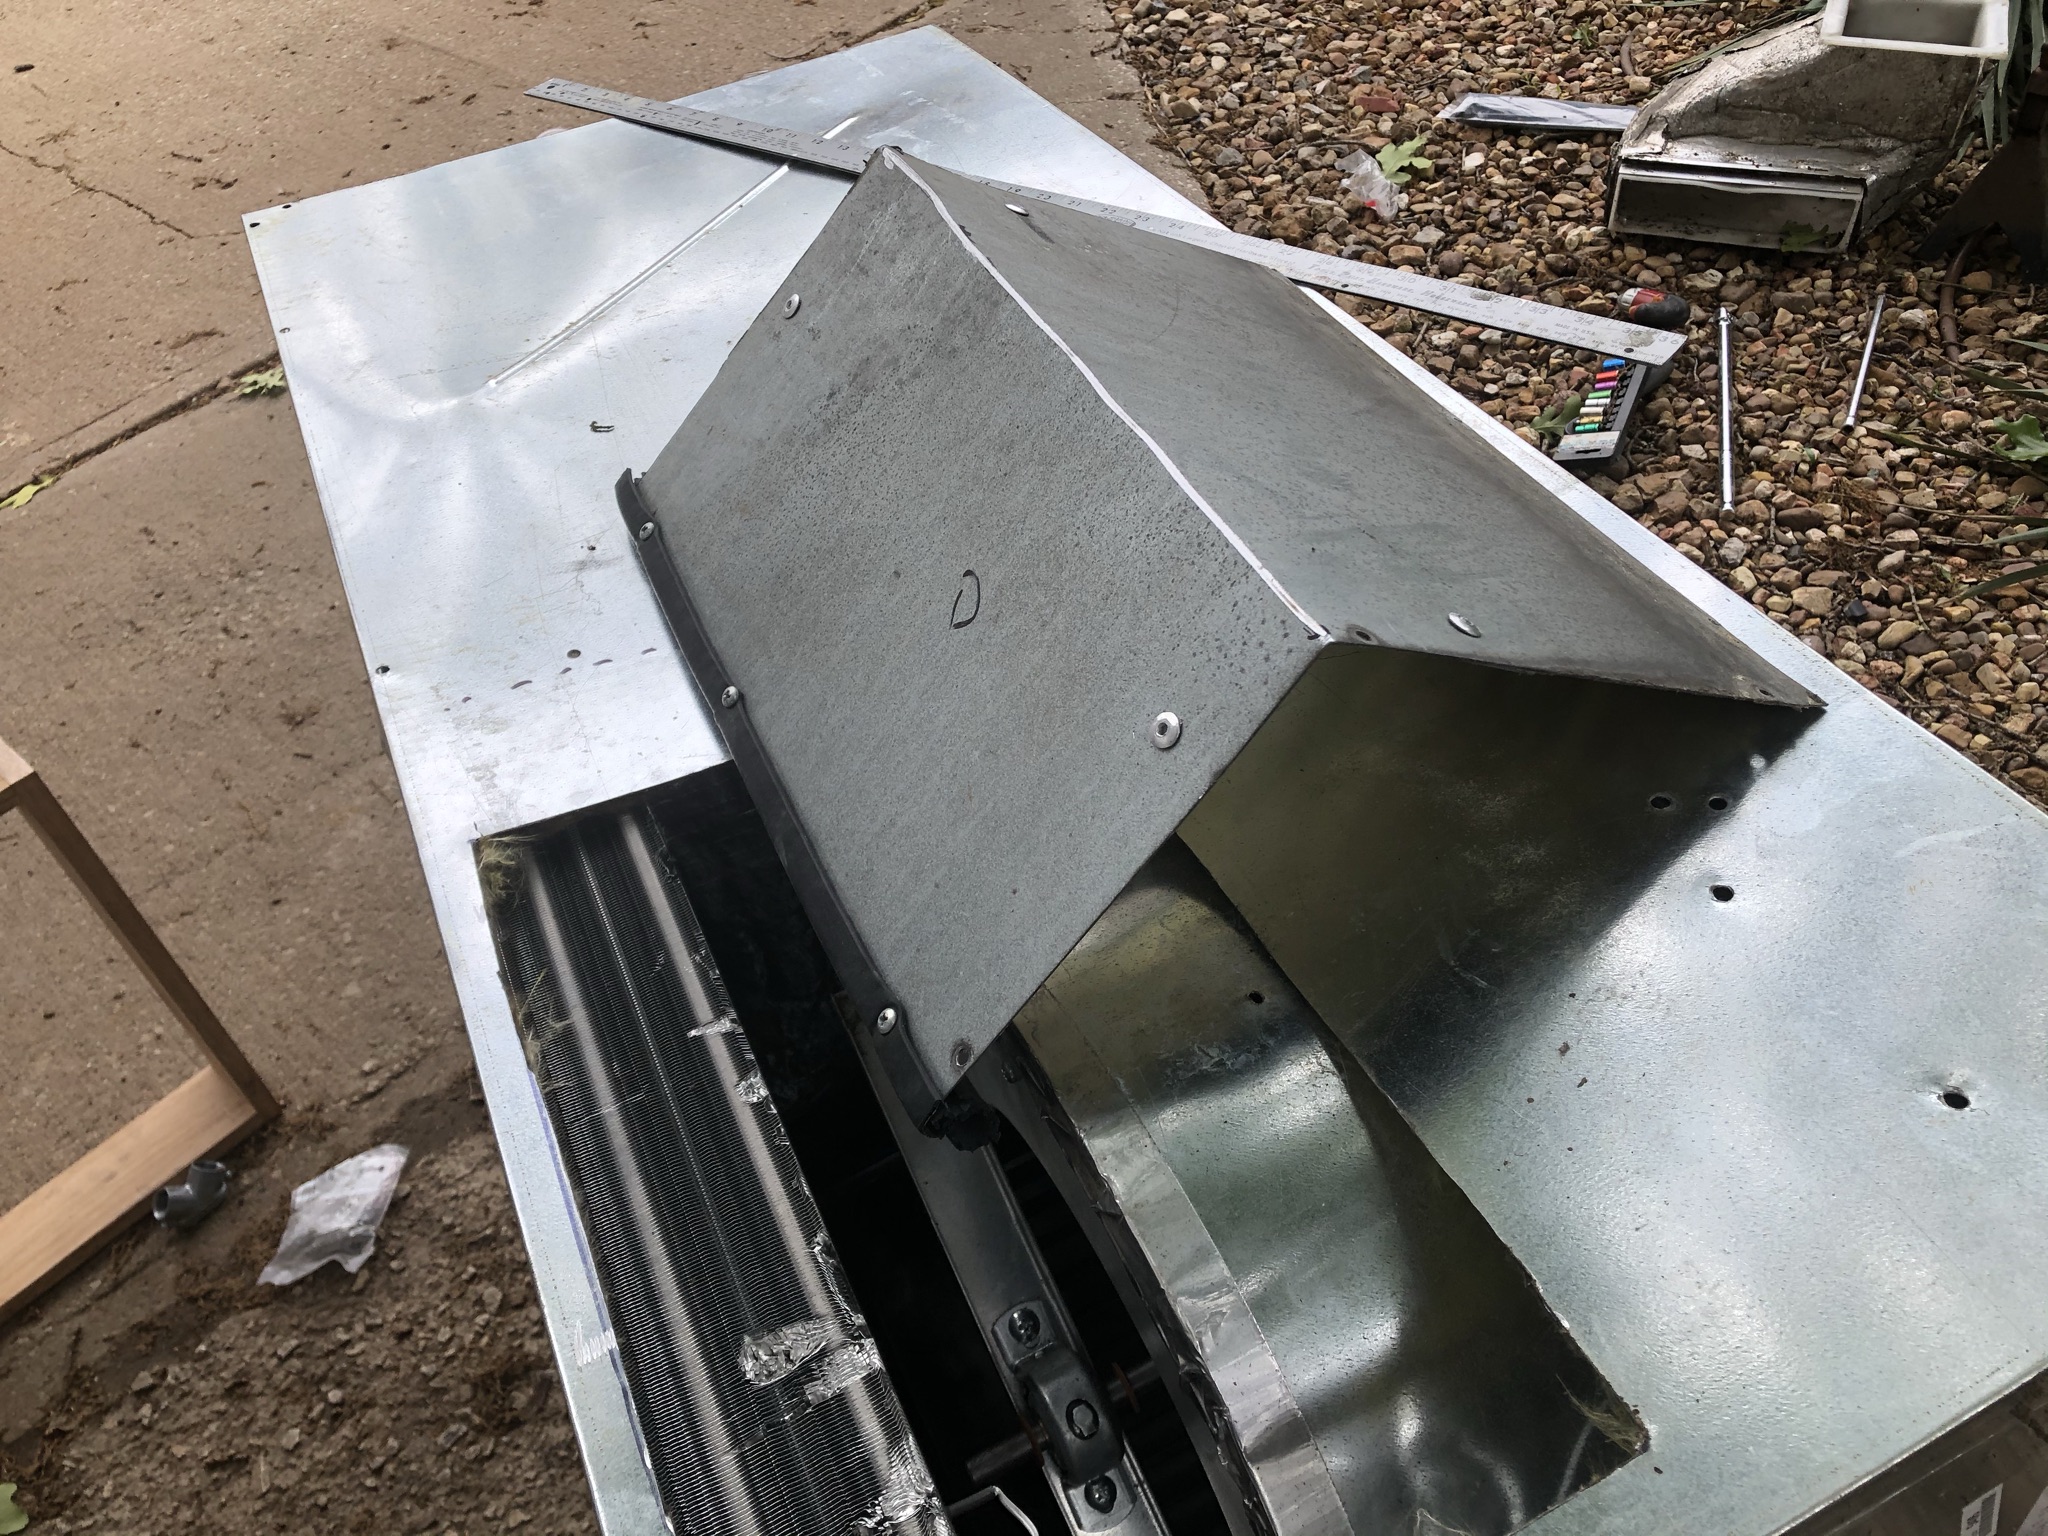
So here is what I did.

I put a ramped opening from the top of the fan halfway down and pressed up to the coil. This forces the air through the coil on the top half and back through to the fan on the bottom. I believe the coil also breathes vertically some. In either case my airflow is superb. More pics later today.
|
|
|
|
|
05-29-2021, 11:31 AM
|
#4
|
|
Winnebago Master
Join Date: Oct 2017
Location: Elk Grove, CA
Posts: 3,583
|
Quote:
Originally Posted by rheine3

A look down inside the new unit. This is right after I popped the lid. You can see the fan motor shaft sticking out. Not much room to play with. The good news is the condenser is really beefy.
|
Your image isn't showing in your post. I was able to see the link in the quote but it doesn't show in the saved version above. This link will take everyone to the photo:
http://blastmediaworld.com/Rick/rv/hp/3.jpg
__________________
Bob C
2002 Itasca Suncruiser 35U
Workhorse Chassis
|
|
|
|
|
05-29-2021, 05:08 PM
|
#5
|
|
Winnebago Owner
Join Date: Oct 2019
Posts: 70
|
There are three images I posted. I think the SSL cert has died on my media server. Could that be it? Fixing tonight.
|
|
|
|
|
05-29-2021, 06:07 PM
|
#6
|
|
Winnebago Master
Join Date: Oct 2017
Location: Elk Grove, CA
Posts: 3,583
|
Quote:
Originally Posted by rheine3
There are three images I posted. I think the SSL cert has died on my media server. Could that be it? Fixing tonight.
|
The only link I saw when I "quoted" your post was photo 3: http://blastmediaworld.com/Rick/rv/hp/3.jpg
By changing the number, I was able to see:
http://blastmediaworld.com/Rick/rv/hp/1.jpg
and http://blastmediaworld.com/Rick/rv/hp/2.jpg
I'm going to try posting a photo from the web using the picture icon:
:format(webp)/cdn.vox-cdn.com/uploads/chorus_image/image/65337101/DSC_0101.14.jpg)
Well, that worked. I don't know why your's don't.
Just for fun, I'm going to try your's again using the picture icon:
And that didn't work. If you "quote" my post you can see everything I entered.
__________________
Bob C
2002 Itasca Suncruiser 35U
Workhorse Chassis
|
|
|
|
|
05-29-2021, 07:18 PM
|
#7
|
|
Winnebago Owner
Join Date: Oct 2019
Posts: 70
|
Thank you. I can see unsecured resources in my default browser. I switched to Chrome and see the problem. Let me finish renewing the SSL cert and I think we will be good.
|
|
|
|
|
05-31-2021, 11:22 AM
|
#8
|
|
Winnebago Owner
Join Date: Oct 2019
Posts: 70
|
|
|
|
|
|
05-31-2021, 01:16 PM
|
#9
|
|
Winnebago Owner
Join Date: Oct 2019
Posts: 70
|
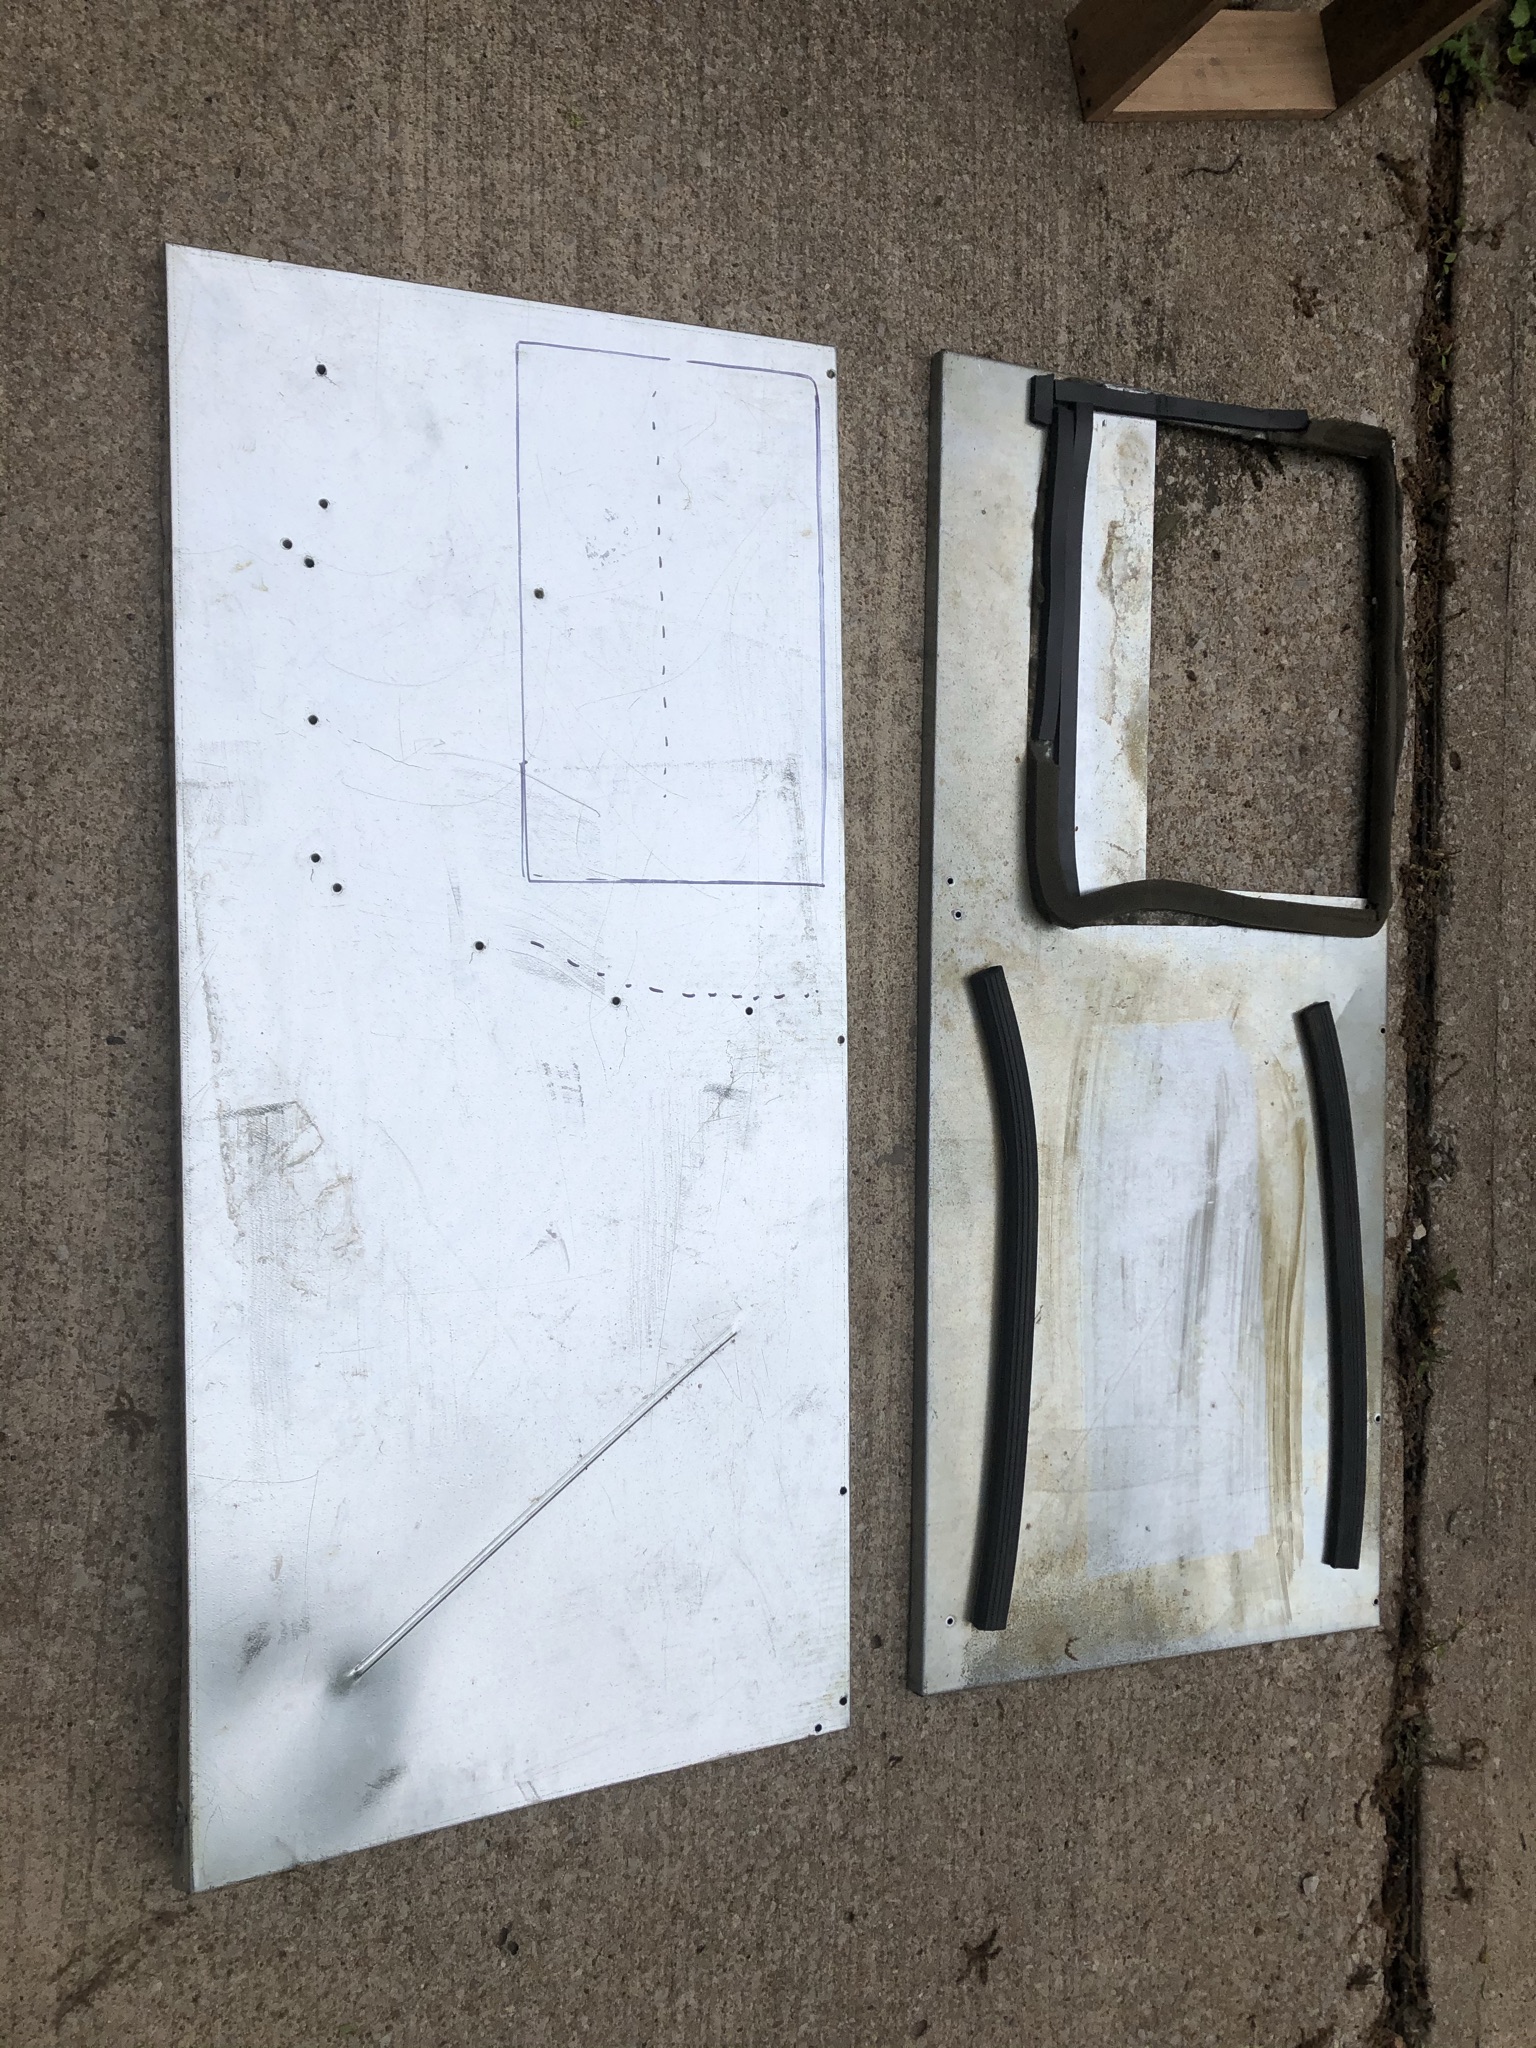
The old top and the new.
|
|
|
|
|
05-31-2021, 03:47 PM
|
#10
|
|
Winnebago Owner
Join Date: Oct 2019
Posts: 70
|
Hole cut in new top and baffle ready to install.
|
|
|
|
|
05-31-2021, 03:50 PM
|
#11
|
|
Winnebago Owner
Join Date: Oct 2019
Posts: 70
|
Here is the box to connect to the return air opening under the washer, rear of bedroom.
And insulating the cold side everywhere possible. 1" fiberglass foam foil board on the back too. There is a heavy rubber seal on that opening.
|
|
|
|
|
06-03-2021, 07:13 AM
|
#12
|
|
Winnebago Camper
Join Date: May 2012
Location: Canada for the summer
Posts: 29
|
Rheine3,
This is one really slick solution to a big problem! I have spent hours trying to figure out a good way to do this on my 04 Itasca Meridian.
A couple of questions.... Did you make any before/after air flow measurements?? Also, on my rig, the heatpump is right below the bed. How about noise?? Compared to the original design, the airflow rate must be quite a lot higher.
I have some room on the inside toward the engine and could install a slightly curved section to cover the return opening. Do you think that will help the air flow?
|
|
|
|
|
06-03-2021, 08:42 AM
|
#13
|
|
Winnebago Owner
Join Date: Sep 2020
Posts: 132
|
Quote:
Originally Posted by rheine3
At first I had grand plans to tilt the condenser coil back just like my old unit. Once I opened up the new box that idea evaporated.
|
How punny!!!
__________________
2004 Itasca Meridian
Cat 7 330hp rated
|
|
|
|
|
06-03-2021, 08:45 AM
|
#14
|
|
Winnebago Owner
Join Date: Sep 2020
Posts: 132
|
Nice writeup.
I find it interesting that there are so many owners who now have orphaned systems.
__________________
2004 Itasca Meridian
Cat 7 330hp rated
|
|
|
|
|
06-03-2021, 09:09 AM
|
#15
|
|
Winnebago Owner
Join Date: Oct 2019
Posts: 70
|
Quote:
Originally Posted by Nalle
Rheine3,
This is one really slick solution to a big problem! I have spent hours trying to figure out a good way to do this on my 04 Itasca Meridian.
A couple of questions.... Did you make any before/after air flow measurements?? Also, on my rig, the heat pump is right below the bed. How about noise?? Compared to the original design, the airflow rate must be quite a lot higher.
I have some room on the inside toward the engine and could install a slightly curved section to cover the return opening. Do you think that will help the air flow?
|
I would go for the duct creeping down the side. There is a real part for that but it should not be hard to fashion, BTW the replacement unit is 8" less in height, You have to decide where to make that up. I put a frame of 4" underneath and a duct of 4" on top. My airflow feels the same. Anecdotal evidence is the best I can do on that.
From speaking with Coleman tech support it sounds like the lack of replacements is a vindictive approach for Winnie shopping elsewhere.
|
|
|
|
|
06-03-2021, 09:19 AM
|
#16
|
|
Winnebago Master
Join Date: Oct 2017
Location: Elk Grove, CA
Posts: 3,583
|
Could you identify the two model numbers?
1. The model # of your original unit.
2. The model # of your replacement unit and where you purchased it.
__________________
Bob C
2002 Itasca Suncruiser 35U
Workhorse Chassis
|
|
|
|
|
06-03-2021, 11:23 AM
|
#18
|
|
Registered User
Join Date: Jul 2014
Posts: 1,336
|
rheine3: As I am following your thread can you confirm a few things for me:
1a) Your old Coleman-Mach is model #6537-A871
1b) And it has an air intake port "ON TOP"
1c) And it's physical dimensions are ____?____
===
2a) Your new Coleman-Mach is model # ____?_____ and you bought it because that was the only new model type available for sale. (What did it cost?)
2b) And it's physical dimensions of this new basement AC are ____?____
==> Are the dimensions of the old and new AC BOX the same?
2c) I'm guessing your 2009 Elipse bedroom downdraft to the AC did not use that curved-plastic air handler to route the air to the AC box side port as shown in the drawing above. Is that correct? ...And this leaves a 3-1/4" gap between the top of the Coleman box and the air register in the bedroom?
2d) So to make the new AC box work in your 2009 Ellipse, you cut a hole on top of the new box... and blocked the side port?
2e) Then you made a 2x4x1 box-insert, placed the wood insert on top of the new box, with a new hole cut on top, and taped it all together.
==> What is the true size of the wood insert your made?
==> Question: Since you had your old Colman lid, couldn't you have just used that? Or are you planning to get your old Coleman AC running again and plan to sell it later, so you did not want to scrap it?
Other Questions Comparing Coleman Model Numbers:
* Is the hot air exhaust to the ground in the same place? ...Does it matter if it's not?
* Is the cold air return to the air ducts that run up the outside cap all in the same place?
Thanks for answers all these questions and giving us ideas on how to modify a basement AC box if your present AC model is no longer being made.
When you get done overhauling your old Coleman Mach, please start a new thread about that.
|
|
|
|
|
06-03-2021, 11:36 AM
|
#19
|
|
Winnebago Camper
Join Date: May 2012
Location: Canada for the summer
Posts: 29
|
Quote:
Originally Posted by rheine3
I would go for the duct creeping down the side. There is a real part for that but it should not be hard to fashion, BTW the replacement unit is 8" less in height, You have to decide where to make that up. I put a frame of 4" underneath and a duct of 4" on top. My airflow feels the same. Anecdotal evidence is the best I can do on that.
From speaking with Coleman tech support it sounds like the lack of replacements is a vindictive approach for Winnie shopping elsewhere.
|
Well, The duct on the side requires cutting and welding on the old frame/hanger. Your idea eliminates all that. My only concern is the air flow and heat exchange with your design, as sleek as it is. Did you discuss your design with Coleman?? Probably the company lawyer told them not to comment. 
|
|
|
|
|
06-03-2021, 11:43 AM
|
#20
|
|
Winnebago Owner
Join Date: Oct 2019
Posts: 70
|
Old one on the face is 45 X 26 and 20 deep. Air intake on top.
New one 45 X 18 and 21 deep Air intake on the back. $3200 delivered to residence,
Air intake wood box ( 1X) 15 X 19 X 4 but the coach hole is probably 10 X 18. I made up the other 4" height difference with a steel frame underneath.
Hot side exhaust is still out the bottom
Air exit is about 3" deeper or moved toward the back. It used to use a plastic offset adapter. We fabricated a new one.
Electrical 110 and thermostat are the same.
|
|
|
|
|
|
|
Currently Active Users Viewing This Thread: 1 (0 members and 1 guests)
|
|
|
 Posting Rules
|
You may not post new threads
You may not post replies
You may not post attachments
You may not edit your posts
HTML code is Off
|
|
|
|
 » Recent Discussions
 |
|
|
|
|
|
|
|
|
|
|
|
|
|
|
|
|
|
|
|
|
|
|
|
|
|


 Linear Mode

