 |
|
 12-02-2023, 04:05 PM
|
#1
|
|
Winnebago Camper
Join Date: Nov 2023
Posts: 18
|
House Batteries not charging 2011 Via 25Q
Hi-
My 2011 Via 25Q no longer charges the coach batteries when the engine is running. I know it has been working recently because I previously checked the voltage when the engine was running. However, today I noticed the coach batteries being low and I re-checked it, and I'm not getting my previous 13.4 volts when the engine is running (it doesn't change at all). Just 12.0 volts, which is not good. I have it charging via shore power at the moment.
So, from what I have read (in another post), the solenoid and a relay are both under the passenger seat. However, the passenger chair is bolted down with star-shaped bolts (which I haven't seen before, note that I've seen plenty of bolts with star-shaped holes, just never this kind where the bolt head is a star).
Any other details/instructions/tips would be great.
thanks- Marty
2011 Via 25Q
__________________
Marty G
2011 Via 25Q
prev. 2000 Rialta QD
|

|

|
|
12-02-2023, 04:38 PM
|
#2
|
|
Winnebago Master
Join Date: Nov 2018
Location: Pflugerville/Austin, Tx
Posts: 8,492
|
Possible Tork?
https://www.homedepot.com/p/Husky-1-...13PC/206031060
But once you get there, I can give some info on where and what you may find.
First stop, maybe make sure you have pressed the coach battery disconnect, AFTER having good battery power!
This is a latching relay and it has to have 12V to move from the latched position.
If you know you have pressed it to on but when there was not 12V, it may still be OFF! It has a magnet that keeps it in the last engaged/disengage position without it using power full time! Good idea but can trick us?
https://www.winnebago.com/Files/File...ire_175477.pdf
Click this snip or go direct for the bigger picture!
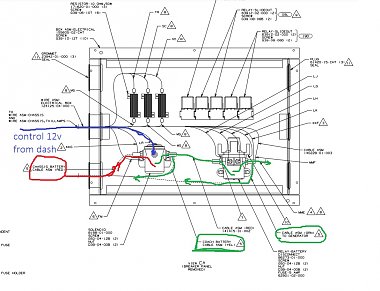
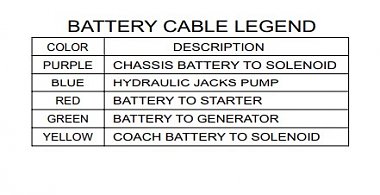
Red is chassis battery, green is coach battery. The blue wire is connection to the dash switch for boost or aux or when engine is running.
12volt on the small wire marked LR makes the solenoid close. If near it, you can often hear it thump. Moving doesn't always mean to contacts are good enough to pass power as they connect together!
When they connect, the two battery groups should jump to the same reading!
But the green line goes to the disconnect relay which is controlled by the disconnect switch. If that relay doesn't close, most of the RV items will still be dead as well as the converter will not charge the coach batteries!
generator also will not crank!
__________________
Richard
Why no RV year, make and floorplan on MY signature as we suggest for others?
I currently DO NOT have one! 
|
|
|
|
|
12-02-2023, 05:14 PM
|
#3
|
|
Winnebago Master
Join Date: Apr 2018
Location: Tucson, AZ
Posts: 1,422
|
Marty, On your 2011 Via the solenoid is not under the passenger seat, there is nothing under the passenger seat. It is in the electrical box that Richard posted above which is located in the very small outside compartment that shares a door with your DEF tank. You will have to remove the cover and then unscrew the front plate which has all your 12 volt circuit breakers. Lay the cover on the carpet and the relay you are looking for is the left one. It is a Trombetta but you would be wise to replace it with a Cole Hersee 24213 https://www.amazon.com/Cole-Hersee-2.../dp/B005K2429I which has silver tungsten contacts whereas the Trombetta has cheap copper contacts. The CH is also rated higher at 200 amps continuous . The only difference is the Cole Hersee has a coil ground terminal and the old Trombetta grounds thru the mount, I just made another jumper and added it to the mounting screw and put the other end on the coil terminal. (It does not matter which terminal you use for ground and which you use for the trigger wire, it works either way)
You will have to work one handed in that tiny space and I guarantee if you are a swearing person you will be swearing on this one.
Be absolutely sure to disconnect not only your coach batteries but also pull your chassis battery disconnect by the accelerator pedal.
I laid a small pillow on top of the backside of the circuit breaker plate to help prevent damaging all the connections on that (and to protect my elbow!), also check the screws that hold the 3 power wires onto the 12 volt busses, one of mine was loose.
__________________
Brian
2011 Winnebago Via 25Q on 2010 Sprinter Chassis
|
|
|
|
|
12-02-2023, 05:16 PM
|
#4
|
|
Site Team
Join Date: Sep 2009
Location: Spring Branch, TX
Posts: 8,314
|
When folks say the solenoids are under the passenger seat I always thought you did not have to remove the seat to get at them... that there was platform under the chair and there was a removable panel on the side (or front) of that platform. I think that I've even seen photos of the "Solenoid Inside" sticker on that panel that is visible from the open passenger door.
Is this not so???
Please know I don't have any first hand knowledge of your model. I've just seen plenty of discussions about this here. I apologize if I'm totally wrong on this.
PS. I moved your post out into the general Class A forum to make it a thread of it's own - better than making it part of page 5 of long running thread. It's ALWAYS more productive to start your very own thread to discuss your issue.
__________________
2017 Winnebago Adventurer 37F
2016 Lincoln MKX Toad
|
|
|
|
|
12-02-2023, 05:19 PM
|
#5
|
|
Winnebago Master
Join Date: Apr 2018
Location: Tucson, AZ
Posts: 1,422
|
Quote:
Originally Posted by creativepart

When folks say the solenoids are under the passenger seat I always thought you did not have to remove the seat to get at them... that there was platform under the chair and there was a removable panel on the side (or front) of that platform. I was sure that I've even seen photos of the Solenoid Inside sticker on that panel that is visible from the open passenger door.
Is this not so???
Please know I don't have any first hand knowledge of your model. I've just seen plenty of discussions about this here. I apologize if I'm totally wrong on this.
PS. I moved your post out into the general Class A forum to make it a thread of it's own - better than making it part of page 5 of long running thread. It's ALWAYS more productive to start your very own thread to discuss your issue.
|
That may be the case on the C class Sprinters because there is a passenger door and you can access under the seat from the side of the pedestal, but the Via is a class A and there is no passenger door so they put them in the junction box in the outside bay. It's so hard to access that junction box I think it would have been easier if they had put them under the seat.
__________________
Brian
2011 Winnebago Via 25Q on 2010 Sprinter Chassis
|
|
|
|
|
12-02-2023, 05:22 PM
|
#6
|
|
Site Team
Join Date: Sep 2009
Location: Spring Branch, TX
Posts: 8,314
|
Of course, that was in the Class C Sprinter... not the Class A Sprinter. I knew the Via was the the Class A, but simply spaced out on the passenger "door" thing.
But it still sounds like you don't remove the Passenger chair.
__________________
2017 Winnebago Adventurer 37F
2016 Lincoln MKX Toad
|
|
|
|
|
12-02-2023, 05:32 PM
|
#7
|
|
Winnebago Master
Join Date: Apr 2018
Location: Tucson, AZ
Posts: 1,422
|
If you think I'm exaggerating about working one handed in that compartment here is where it is. The opening is 11.5" X 14.5". I used a miniature bungee cord to hold some of those wires back out of the way, you can barely even see the solenoid and you have to take a good look then reach in there blind with your tools.
The battery isolation solenoid is just barely peeking out behind to the left and the one on the right is the battery disconnect solenoid.
Mine is open at the moment awaiting some cables for a DC-DC charger I am installing, so I will be doing more contortionist work in there next week.
__________________
Brian
2011 Winnebago Via 25Q on 2010 Sprinter Chassis
|
|
|
|
|
12-02-2023, 06:23 PM
|
#8
|
|
Winnebago Master
Join Date: Nov 2018
Location: Pflugerville/Austin, Tx
Posts: 8,492
|
Okay when things are that hard to get too and work, I look for other ways to test to make SURE I need to go there.
And there are several ways we can test the solenoid and battery disconnect before we go to all that work!
Solenoid is one that has several things we might do fairly simple to point us to avoiding the hard stuff.
It is just a switch that operates by passing 12VDC through the coil to close contacts.
When we have somebody start the engine, we may not hear the solenoid move due to engine noise. But the same wiring does the same thing if we push the dash switch and much quieter, so we can hear what the solenoid does.
Do you have a switch they label different things like Boost, aux, aux battery, etc. or any switch you've never found what it does?
Try standing near the mode solenoid and listen for a thump as it closes! If it thumps, it has closed and you are one step closer to having to dig it out. BUT if it doesn't thump, the dash switch or wires may be the real problem and maybe you miss out on digging to get to the solenoid?
If it thumps, does the coach battery voltage change as it is tied to the chassis battery, even when the engine is not started?
If it thumps and the coach battery doesn't change, are you sure the cables from the solenoid to the batteries are good, clean, and tight?
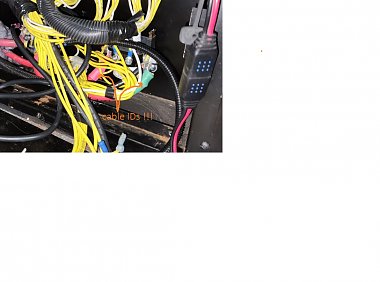
Battery cables should have come with tape markers to help ID them.
See the ID on BigB's cables? Click to get a better view!
But the disconnect relay is a place where a cable can be loose or corroded and mess with your mind, so make sure they are good as well. You can likely get one probe through the wire minefield to check voltage going in one side and make sure it's coming out the other before digging too hard to get into things! 
__________________
Richard
Why no RV year, make and floorplan on MY signature as we suggest for others?
I currently DO NOT have one!
|
|
|
|
|
12-03-2023, 01:23 AM
|
#9
|
|
Winnebago Camper
Join Date: Nov 2023
Posts: 18
|
House Batteries not charging
Hi-
Thank you to everyone for all the help. I'm so glad to hear I don't have to pull the passenger seat. Although, digging in the tight space in the cubby, doesn't sound like it's going to be fun either. I would have responded sooner, but I was checking the other thread and just found it.
I had suspected and now believe my problem to be intermittent. When I drove it (after shore charging for a while), it did charge again via the engine. I'm wondering if it's maybe dirty contacts inside the solenoid or a loose wire. I have to drive a few hours tomorrow, after which I'll have time to dig into it and see what I can do to test it more, probably by wiggling some wires to see if that makes it more consistent.
I have previously taken the panel with the 2 'handle screws' off before and found the panel of 12v breakers. But I haven't removed that to get to the solenids, as I didn't know they were there. That will be my next move tomorrow afternoon.
FYI - Previously I tried using the boost switch to see if it would connect the batteries, but even though I could hear a click, the voltages didn't match (or even nearly match) when the switch was depressed.
Thanks-
__________________
Marty G
2011 Via 25Q
prev. 2000 Rialta QD
|
|
|
|
|
12-03-2023, 05:37 AM
|
#10
|
|
Winnebago Master
Join Date: Apr 2018
Location: Tucson, AZ
Posts: 1,422
|
Mine did the same thing, it was clicking but not passing current reliably. After I replaced it I cut the old one open and the contact areas were badly pitted, they looked like they had weld spatter and craters on them.
The way it is designed the plunger is attached to a round contact plate which can rotate around and once the surfaces get uneven it can rotate to an area where complete contact cannot happen due to the high spots stuck to the surfaces.
__________________
Brian
2011 Winnebago Via 25Q on 2010 Sprinter Chassis
|
|
|
|
|
12-03-2023, 06:56 AM
|
#11
|
|
Winnebago Master
Join Date: Apr 2018
Location: Tucson, AZ
Posts: 1,422
|
If you are on the road you can run the generator to charge the batteries or just force the fridge to gas to keep it from sucking the batteries down.
__________________
Brian
2011 Winnebago Via 25Q on 2010 Sprinter Chassis
|
|
|
|
|
12-03-2023, 08:05 AM
|
#12
|
|
Winnebago Master
Join Date: Nov 2018
Location: Pflugerville/Austin, Tx
Posts: 8,492
|
Yes, the solenoid is pretty common to be intermittent as the "contact" is like a large washer and it can turn any time it is bumped, etc. That can be good as it may get to a clean spot or bad if it lands on a bad spot!
One thing that you might want to consider if on a trip is putting a temporary connection between chassis and coach?
Downside is that having them connected will run the risk of getting stuck if you run BOTH batteries down!
So some judgement is needed?
If the strap is put on when the two sets are near full charge, there isn't need for a super heavy strap as there will be little current from one full battery to another full one. If the coach is run well down and then a strap is added, it will take a bit heavier strap to avoid overheating.
Flow from the chassis side at 14 volts as the engine runs will get a lot more current running through the strap to the coach if they are at 11 volts than if they are at 12.8!
Part of the idea is that you get them both charged and add a moderate size strap like a 12-14 gauge wire with large clips that can be clipped on the battery cables at the solenoid.
Those straps often have a flat spot where the cable end is crimped onto the cable and that flat is a semi-handy place to reach through all the weeds/wires and junk to clip it on!
Small hands may help to get in there!!!
No 110 AC in that area, so not a large hazard but good idea to take off rings, watches, etc before starting to reach in.
But then it is definite that you do not want to have them strapped permanent if you are in the boonies on a cold night and might run everything down to be stranded!!!
As an easier alternate that has less chance? There may be times when you get the solenoid to move around enough to work if you can watch the voltages to see they are connecting and use the dash switch to "bump" the contacts a few times, just for luck?
If the batteries are located to make it work, a jumper cable from positive of chassis to positive of coach can be the easy temporary way? you only need the positives connected as the ground is already there.
Maybe worth looking at buying a set of jumpers cables for doing the easy? But I've not looked at where your two sets are located,so may not be a good idea?
__________________
Richard
Why no RV year, make and floorplan on MY signature as we suggest for others?
I currently DO NOT have one!
|
|
|
|
|
12-03-2023, 12:16 PM
|
#13
|
|
Winnebago Camper
Join Date: Nov 2023
Posts: 18
|
House battery charging
Understanding the physical build of the solenoid helps explain the intermittent nature of the failure - thanks. I'm ordering a new solenoid. $78 is not cheap for a solenoid, but I guess I don't want to change it again  . I should be able to change it in the next couple of days, and I suspect as BigB says, there will be a bit of swearing involved. Which won't be a first for me.
FYI
I bought my Via just under a month ago and I have fixed and played with a few things. The grey water would not empty (although it seemed to once it was 2/3 full) so I followed someone's suggestion of adding another 3" dump valve and dump port. It was pretty easy, but not quite the way he suggested. Even if the pump method worked reliably, I think I like this method of moving the hose and not having to wait for the pump to dump all the water out. I can post something on that if others are interested. (I tried adding to the thread, but it was too old to accept additions.)
I plan on adding solar, but I will start a separate thread about that later. I'm hoping to find a way of getting the wires inside without adding holes. On my previous rig, I was able to do this by using a vent. I've also seen gadgets that automatically decide when to connect the batteries based on sensing a charge voltage on either.
Thanks-
__________________
Marty G
2011 Via 25Q
prev. 2000 Rialta QD
|
|
|
|
|
12-03-2023, 01:56 PM
|
#14
|
|
Winnebago Master
Join Date: Apr 2018
Location: Tucson, AZ
Posts: 1,422
|
Quote:
Originally Posted by reckless37
Understanding the physical build of the solenoid helps explain the intermittent nature of the failure - thanks. I'm ordering a new solenoid. $78 is not cheap for a solenoid, but I guess I don't want to change it again . I should be able to change it in the next couple of days, and I suspect as BigB says, there will be a bit of swearing involved. Which won't be a first for me.
FYI
I bought my Via just under a month ago and I have fixed and played with a few things. The grey water would not empty (although it seemed to once it was 2/3 full) so I followed someone's suggestion of adding another 3" dump valve and dump port. It was pretty easy, but not quite the way he suggested. Even if the pump method worked reliably, I think I like this method of moving the hose and not having to wait for the pump to dump all the water out. I can post something on that if others are interested. (I tried adding to the thread, but it was too old to accept additions.)
I plan on adding solar, but I will start a separate thread about that later. I'm hoping to find a way of getting the wires inside without adding holes. On my previous rig, I was able to do this by using a vent. I've also seen gadgets that automatically decide when to connect the batteries based on sensing a charge voltage on either.
Thanks- |
I added a garden hose cap on my gray so we can use a graywater garden hose at a campsite and don't have to drag out the big slinky since we can go several (up to 5 days) on black. I made a sewer cap for the site with a female GHT 90 on top.
It's especially handy when we pull into a site facing the wrong way which we do often as the Via sits a bit low in front and most sites are also lower in front.
__________________
Brian
2011 Winnebago Via 25Q on 2010 Sprinter Chassis
|
|
|
|
|
12-04-2023, 01:29 PM
|
#15
|
|
Winnebago Owner
Join Date: Jul 2011
Posts: 84
|
Check your emergency start rocker switch. My 2011 Winnebago has a 3-way switch. Up (12 O-Clock) for emergency start and when released it returns to a center position. Pushing downward (6 O-Clock) restarts engine charging on mine. I know it's weird and I'm the only one that I've found that has this unique switch. Since yours is also a 2011 ... just maybe you have the same goofy switch. Worth a check before you cut your hands all up working in the tiny space.
__________________
Dave and Holly
2011 Winnebago Sightseer 33c with a 2011 Honda CRV behind. 
|
|
|
|
|
12-04-2023, 08:53 PM
|
#16
|
|
Winnebago Camper
Join Date: Nov 2023
Posts: 18
|
House batteries not charging off engine
Hi-
Thanks for the suggestion, but my switch isn't like that (just temporarily on while pushing it), and without touching the switch, it works sometimes and doesn't others. Based on what others have experienced and how it's failing, I believe it to be a solenoid that has carbon buildup in areas.
Yesterday I ordered the new and improved solenoid off Amazon, but it must not be nearby as it won't be here till Wed. Since it works a lot of the time, I'm not going to pull the panel till I have the part. No need to start swearing ahead of time.
thanks-
__________________
Marty G
2011 Via 25Q
prev. 2000 Rialta QD
|
|
|
|
|
12-11-2023, 05:56 PM
|
#17
|
|
Winnebago Camper
Join Date: Aug 2021
Posts: 36
|
Because of where they are located, I replaced both of the solenoids while I was in there, the battery boost and the house (salesman) solenoids. Didn’t want to go through that again anytime soon! You can make a simple mod at the grey tank to change it over to a 3” dump valve without cutting anything out and it still leave you the option to use the trash pump or the drain on the plastic line.
There is a Via group on Facebook if you are interested, it provides some information on mods, problem fixes, etc. if your on social media.
__________________
2011 Winnebago Via 25Q
|
|
|
|
|
12-13-2023, 04:03 PM
|
#18
|
|
Winnebago Camper
Join Date: Nov 2023
Posts: 18
|
Hi-
I finally had time/access/etc to change the solenoid. It went pretty well for what I thought was 2/3 of the job. However, getting those last few nuts on was pretty tough. Those wires are pretty stiff and the rats' nest of wiring doesn't help. However, I think it's all good. We are currently plugged into shore so I haven't done the official drive test, but I will soon. I'm not worried as I did test the solenoid before installing it. I was also surprised at how hard it was to reinstall the breaker board - those wires really didn't want to back into Pandora's box.
I also learned that you cannot turn off 12v power if you are connected to shore. I was kind of hoping that I would be able to leave the 120v power on while I was working (for the fridge's sake), but clicking the switch was useless, 12v would not be denied. Naturally, I caved and disconnected shore power.
I have actually already added the 3" waste outlet (based on someone else's old post). I was just trying to correct their description. I found that you must glue a small piece of 3" abs into the new part, as that's the way it's designed. In the description that I found, he implied that you could just use a rubber boot to connect it. Nevertheless, it's a very clever idea - using the 1 1/2" valve as the connection point avoids a whole lot of potential work/hassle. However, Brian's idea of just putting a hose bib on the current outlet is cheaper and easier.
My other small projects include
- Changing the 2 rear yellow oval LED signal lights. I found information on here to source them (vehiclelight.com Item# 9858-88).
- Changed one of the higher vertical red brake lights - found on eBay https://www.ebay.com/itm/235084902469 (perfect replacement even the connector worked!).
- Changed almost all of the small internal (and porch) lights to LED - which are just as bright, use only 2 watts vs 10 watts, and don't get hot (found on Amazon https://www.amazon.com/dp/B09D3DLCC7).
- It still had the original Propane detector, so I changed it for a combo Propane/CO one (I found on Amazon - https://www.amazon.com/dp/B0CBVY4WRY) which fit quite well.
I want to again thank everyone for their help/suggestions/reminders/hints.
__________________
Marty G
2011 Via 25Q
prev. 2000 Rialta QD
|
|
|
|
|
12-13-2023, 05:30 PM
|
#19
|
|
Winnebago Master
Join Date: Apr 2018
Location: Tucson, AZ
Posts: 1,422
|
Quote:
Originally Posted by reckless37
Hi-
I finally had time/access/etc to change the solenoid. It went pretty well for what I thought was 2/3 of the job. However, getting those last few nuts on was pretty tough. Those wires are pretty stiff and the rats' nest of wiring doesn't help. However, I think it's all good. We are currently plugged into shore so I haven't done the official drive test, but I will soon. I'm not worried as I did test the solenoid before installing it. I was also surprised at how hard it was to reinstall the breaker board - those wires really didn't want to back into Pandora's box.
I also learned that you cannot turn off 12v power if you are connected to shore. I was kind of hoping that I would be able to leave the 120v power on while I was working (for the fridge's sake), but clicking the switch was useless, 12v would not be denied. Naturally, I caved and disconnected shore power.
I have actually already added the 3" waste outlet (based on someone else's old post). I was just trying to correct their description. I found that you must glue a small piece of 3" abs into the new part, as that's the way it's designed. In the description that I found, he implied that you could just use a rubber boot to connect it. Nevertheless, it's a very clever idea - using the 1 1/2" valve as the connection point avoids a whole lot of potential work/hassle. However, Brian's idea of just putting a hose bib on the current outlet is cheaper and easier.
My other small projects include
- Changing the 2 rear yellow oval LED signal lights. I found information on here to source them (vehiclelight.com Item# 9858-88).
- Changed one of the higher vertical red brake lights - found on eBay https://www.ebay.com/itm/235084902469 (perfect replacement even the connector worked!).
- Changed almost all of the small internal (and porch) lights to LED - which are just as bright, use only 2 watts vs 10 watts, and don't get hot (found on Amazon https://www.amazon.com/dp/B09D3DLCC7).
- It still had the original Propane detector, so I changed it for a combo Propane/CO one (I found on Amazon - https://www.amazon.com/dp/B0CBVY4WRY) which fit quite well.
I want to again thank everyone for their help/suggestions/reminders/hints. |
Glad you got it done. As far as the 12V power, when you are plugged in the converter is supplying it regardless if the battery switch is on or off. Unfortunately with the converter and fridge on the same breaker you can't shut the converter off and run the fridge on electric. (which is why I replaced my load center, so I could have additional breaker space) Even if you could, the fridge still has to have 12 volts to operate in any mode as the control board works on 12 volts.
When I did my graywater mod I used a street tee which I did clamp directly into the tank, but later someone found that an Airstream part works and is a lot simpler to install. I ordered the Airstream part and it is sitting on the shelf. I have the hose connection on the 3" cap so I can drain either way and I still have the pump if I want to use that, which is a real pain. I'm thinking of routing the pump line into the black tank so I can use it for flushing or for transferring some gray when the gray tank gets too full since the black goes a lot longer.
Was that propane/CO detector easy to replace and did it fit the hole?
Also now I have to go look at those vertical lights, I never knew they were brake lights! I thought they were just reflectors!
__________________
Brian
2011 Winnebago Via 25Q on 2010 Sprinter Chassis
|
|
|
|
|
12-13-2023, 10:18 PM
|
#20
|
|
Winnebago Camper
Join Date: Nov 2023
Posts: 18
|
Hi-
Your mentioning the fridge reminded me that you previously posted that you made some modifications to the fridge that involved fan(s). I was wondering if you could elaborate on that. Where did you place the fans? How big/CFM? I am assuming 12v. Did you have to pull the fridge out, or did you add them from the outside?
I like the idea of using the pump to transfer some grey to black. I may have to consider that. I will be interested to hear if you do it and how it works out.
The Propane/CO detector fits great. The screw width was off by a tiny amount, but I was still able to use the same holes. One screw had to be forced a little.
For the grey water mod... I thought you replaced the 1 1/2" plug with 1 1/2" to 3/4" or 1/2" female pipe thread and then put a male pipe to hose bib. However, that might hang down a bit more than one would like.
I may have to change more brake lights at some point. After changing the one, during testing I found both of the passenger side brake lights were missing (not lighting up) some LEDs. The place that sells the amber signal lights also sells a red version that would be a replacement for the lower brake light.
Fresh water level:
I can see the sensors that the grey/black tanks use to determine their volume. However, I don't see anything for the fresh water. Mine never reads 1/4 tank (which is the one I would find most useful). I suspect there is something internal, which means it might be very difficult to fix. Does anyone know the specifics of the fresh water tank?
__________________
Marty G
2011 Via 25Q
prev. 2000 Rialta QD
|
|
|
|
|
|
|
Currently Active Users Viewing This Thread: 1 (0 members and 1 guests)
|
|
|
 Posting Rules
|
You may not post new threads
You may not post replies
You may not post attachments
You may not edit your posts
HTML code is Off
|
|
|
|
 » Recent Discussions
 |
|
|
|
|
|
|
|
|
|
|
|
|
|
|
|
|
|
|
|
|
|
|
|
|
|


 Linear Mode

