Just some things that may help?
The two big cables on the BIM should be one to the chassis battery and one to the coach battery.
If the RV has set overnight or so and both batteries are stable, one is likely to read a bit different than the other. That would tell us that the BIM is not connecting the two. But if we start the RV engine, then they should connect and read the same. If somebody revs the engine, then both should go high or lower as the rev speeds up or slows! That tells us the BIM is working right and connected them!
If you have some things like lights running in the RV, you may see the coach battery reading a little lower than chassis side. If you put the meter on the chassis side, you often see it 's voltage drop way down while the engine is cranking and drawing power, but just almost instantly as the engine begins to run, that power comes right back up.
What we read is called "surface charge" on batteries. That means it is not a true reading of the chemicals all down through ALL the battery, just what is happening right at the surface!
sometimes compared to looking in the hole in a barrel of water while we add black ink to the barrel? If we look right as we put the ink in, we may think the water is really full of ink as it looks really black. But if we let the ink settle for an hour and come back, we may not see any black at all as the "surface charge" has spread out all around the barrel!
The point is that batteries are a slow chemical process and it takes 6-8 hours to get a really flat battery back to fully charged and it also takes hours for it to become stable, so that we can read the true charge all through the battery.
When we read 14 volts we can say for sure the battery has been being charged recently because the chemicals will not hold more than 12.8 on the best lead acid battery. Anything higher is just the remains of the charge voltage!
On to the relay and stabilizer items?
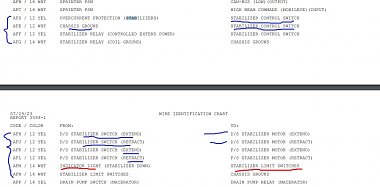
We can use the wire ID chart herein two different ways!
https://www.winnebago.com/Files/File...ical_guide.pdf
If we look at the small wires on the center relay and find an ID, we can bring up the chart, hit Ctrl and F at the same time to bring a drop down place to input search terms like the wire ID.
Put in LR and it tells us how many places it finds LR in the list and also drops to the first in the list or we can then hit the small arrows to scroll.
OR we can do it backwards at times. If we know we want info on the stabilizer wires, we can put in a few letters like "stab" and get the list for that!
It is not a perfect system as we can put some terms in and find it listed 90-100 places, so it takes some playing to sort. But it's the best I find for some searching!
Stab get me this as a start and seems like it may tell you what wire ID you might find at the switches and alarms for the stabilizer wiring.

We get a drawing that shows that relay with one wire connected to it. But logic says one wire is not going to make anything work, so it has to have more than one where they just show us a cable going out to the RV!
A look for the ID on those small wires at the relay will tell where they should come from and go to by looking at the chart.
You may find it is something with the stabilizer jacks? Or we may be guessing wrong and it has nothing to do with them?
But if you look at the dash wires where the alarm light should be, there is likely one labeled AFM!!
See how I got there?

On the battery disconnect relay, the big battery cables from coach come in on left and the green path takes power to the safety equipment fuses on the green line. If the relay is closed, power goes through to the right and on to the generator on a big cable. There is also a smaller wire going to the rest of the coach RV fuses that the relay DOES cut off on the orange path!
I did not mark it but the control wires are in the center at top. Part of them will have to go to the wall "battery disconnect switch" in the RV!