 |
 02-09-2021, 07:05 AM
|
#1
|
|
Winnebago Master
Join Date: May 2020
Location: Sugar Land, TX
Posts: 673
|
Fixing coach door gap with 2020/2021 View/Navion
Our coach door had air gaps at the top and bottom corners.
Adjusting the upper and lower u-bolts to be as close to the inside of the cabin as possible helped to reduce the gaps - but small gaps still remained (which you can see when it's bright outside and darker inside the coach).
While having service done last week, I mentioned this to the service advisor - and they were able to eliminate the remaining gaps by adjusting the rubber door gasket in the corners.
The gasket has adhesive holding it in place - it is possible to reach around the back of the lower corner gasket (there's a larger gap between the door frame and the siding panel), and pull the gasket out. And then by slowly pulling the gasket out along the edge to the top, the gasket can be moved out enough to eliminate the air gap.
The service had recommended putting some filler to prevent the gasket from returning to the original position - but because it would take hours for the filler to cure, I didn't have enough time to wait for that to be done. So if the gap returns, I'll repeat the procedure and either put the filler or something else in the corners to keep them from sliding back and re-creating the air gap.
|

|

|
|
02-25-2021, 08:40 AM
|
#2
|
|
Winnebago Master
Join Date: May 2020
Location: Sugar Land, TX
Posts: 673
|
UPDATE...
While riding out the winter storm, had to make another pass to eliminate the air gaps around the coach door - with air leaking on the top, right side (with the latches) and bottom.
I was able to eliminate the air gaps by using a different strategy for adjusting the gaskets around the door and the frame.
I used rubber weatherseal tape to eliminate the gaps. Instead of placing the strips above the rubber gaskets, I added the strips underneath the gasket on the door frame, pushing the door gaskets out further, and getting them to make better contact with the door. And if that didn't completely close the gap, I place a short strip under the gasket on the door in that area, which resolved the air gap. At least for now - there aren't any air gaps around the door.
While I was able to get the door to seal temporarily by placing the strips on top of the rubber gaskets, since those strips were exposed, they tended to peel off - especially when there was moisture. I'm more confident placing the strips under the gasket will be a more permanent solution.
After consulting with Lichtsinn service, they recommended I move the u-bolts so they are positioned in the middle of the adjustment area. While it seemed I had reduced the air gaps by moving the u-bolts all of the way towards the inside of the coach - that wasn't a real solution. The door latches have two positions - in order to get the latch to completely lock, the u-bolt should be in the middle of the adjustment space. When this happens, you'll see the latch completely wrap around the u-bolt, completely securing the door. After I installed the new weatherstrips - I confirmed that adjusting the u-bolts had no impact on getting the door to seal - only in how securely the door was being latched.
After adding the weatherstripping and moving the u-bolts, I noticed that the upper right portion of the door protrudes from the side of the door frame when the door is closed. I confirmed that the weatherstripping wasn't preventing the top corner of the door from completely seating. Instead, what I noticed was a slight bend in the portion of the frame holding the rubber gasket. That appears to be the reason why the upper corner of the door had a much larger air gap than the rest of the door.
For now, I've been able to seal the air gap - and with the u-bolt adjustments, the door is latching securely - so I'll wait until we bring the RV back to Lichtsinn in April to have them inspect the door and make final adjustments.
|
|
|
|
|
02-25-2021, 09:44 AM
|
#3
|
|
Winnie-Wise
Join Date: Dec 2019
Posts: 259
|
Quote:
Originally Posted by rprochnow

UPDATE...
While riding out the winter storm, had to make another pass to eliminate the air gaps around the coach door - with air leaking on the top, right side (with the latches) and bottom.
I was able to eliminate the air gaps by using a different strategy for adjusting the gaskets around the door and the frame.
I used rubber weatherseal tape to eliminate the gaps. Instead of placing the strips above the rubber gaskets, I added the strips underneath the gasket on the door frame, pushing the door gaskets out further, and getting them to make better contact with the door. And if that didn't completely close the gap, I place a short strip under the gasket on the door in that area, which resolved the air gap. At least for now - there aren't any air gaps around the door.
While I was able to get the door to seal temporarily by placing the strips on top of the rubber gaskets, since those strips were exposed, they tended to peel off - especially when there was moisture. I'm more confident placing the strips under the gasket will be a more permanent solution.
After consulting with Lichtsinn service, they recommended I move the u-bolts so they are positioned in the middle of the adjustment area. While it seemed I had reduced the air gaps by moving the u-bolts all of the way towards the inside of the coach - that wasn't a real solution. The door latches have two positions - in order to get the latch to completely lock, the u-bolt should be in the middle of the adjustment space. When this happens, you'll see the latch completely wrap around the u-bolt, completely securing the door. After I installed the new weatherstrips - I confirmed that adjusting the u-bolts had no impact on getting the door to seal - only in how securely the door was being latched.
After adding the weatherstripping and moving the u-bolts, I noticed that the upper right portion of the door protrudes from the side of the door frame when the door is closed. I confirmed that the weatherstripping wasn't preventing the top corner of the door from completely seating. Instead, what I noticed was a slight bend in the portion of the frame holding the rubber gasket. That appears to be the reason why the upper corner of the door had a much larger air gap than the rest of the door.
For now, I've been able to seal the air gap - and with the u-bolt adjustments, the door is latching securely - so I'll wait until we bring the RV back to Lichtsinn in April to have them inspect the door and make final adjustments.
|
Good luck at Lichtsinn. If you have the hydraulic levelers, the door will go out of square on you, at each use and gaps may appear again. I've messed with that door so many times it's irritating. In my opinion, this new style door is junk. I notice they are not using this door on the new Ekkos. On video and the marketing that door looks so great but it's the worst door I've ever had. The double latch is nice but the set up is nothing like the double latch system I had on a a Monaco RV. Marketing says it's like an aircraft door/automotive door. Practical use says otherwise.
I get my replacement door this week so hopefully this one is better but I'm not counting on it.
|
|
|
|
|
02-25-2021, 10:10 AM
|
#4
|
|
Winnebago Master
Join Date: May 2020
Location: Sugar Land, TX
Posts: 673
|
We have the HWH system.
I had to recalibrate the HWH system, since we found the coach was uneven when the system thought it was level. Once we did that, the coach is level everytime the system finishes the leveling pass.
If the coach isn't level, it's understandable the coach door might be slightly out of alignment.
Though with the additional weatherstripping, even if the door shifts a little, the gaskets are more likely to seal when the door is closed.
I noticed that if the latches weren't fully engaged, the door had some give. Once I adjusted the u-bolts to get the latches to fully engage, the door is firmly latched and doesn't give at all when closed.
The small air gaps aren't as noticable when the weather is warm. But when I was in sub-freezing temperatures for 48 hours last week - it was very obvious where the cold air was leaking into the coach.
Plus, I found it helped to hang a sheet from the overcab bunk to the floor and seal off the cab area - something that we didn't need when dealing with high temperatures outside.
|
|
|
|
|
02-25-2021, 10:30 AM
|
#5
|
|
Winnie-Wise
Join Date: Dec 2019
Posts: 259
|
The leveling I mentioned has more to do with the box being square. It will change each time it levels, and once you retract the jacks, the box changes to a different square and the gaps may appear even if you have it fixed in one of the positions. Your additional seal should help with that.
The latch is a simple double catch like a car. You have to have it latched at the second position for it to be fully closed (this door has to be slammed harder than a normal RV door to get that second position to catch even after final adjustments and this changes after use because the door itself is not very rigid and there is frame flex as well. I can see these doors being phased out after all the issues Winnebago will run into with after sale.
Unfortunately an owner shouldn't have to go through all the measures of coming up with their own fixes.
__________________
2020 Winnebago View 24D
|
|
|
|
|
03-17-2021, 09:25 AM
|
#6
|
|
Winnebago Master
Join Date: May 2020
Location: Sugar Land, TX
Posts: 673
|
While preparing our 21VD for our next trip, did a check of the coach door work I did last month, and the door is still latching correctly, without any air gaps.
Now that the u-bolts are in the "middle" of the adjustment space, and the latches reach the "second position" the door is latched solid, and doesn't make any noises while driving.
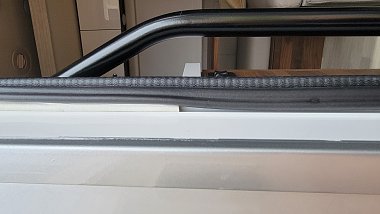
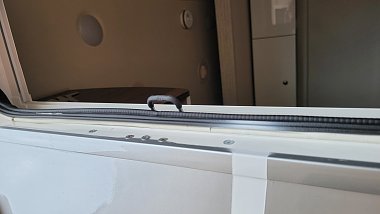
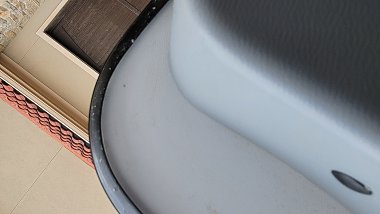
By using a roll of weatherseal strip (with a sticky back) from Home Depot, I've been able to eliminate all of the air gaps. Attached are some pictures showing what I did.
To check on the air gaps, I closed the door in daylight and looked for light gaps around the top, bottom and side of the door. Where there were light gaps - air was getting in. In those areas, I inserted weatherseal strip between the rubber door gasket and the metal frame - and this eliminated all of the air gaps, except around the upper corner of the door. In that area, I also added some weatherseal strip between the rubber gasket and the door. Adding the weatherseal pushed the rubber gaskets out far enough to close all of the air gaps.
Easy to do - and low cost. When we took our RV in for the last service, the dealer offered to "fix" the problem. They were going to remove the door gasket, and caulking around the door frame, let it cure, and then reinstall the gasket. The entire process would have taken hours. Was able to accomplish the same results using the weatherseal strip ($6.48 for 34 feet) - and only take a few minutes. And if the strip wears out - it's easy to replace...
|
|
|
|
|
|
Currently Active Users Viewing This Thread: 1 (0 members and 1 guests)
|
|
|
 Posting Rules
|
You may not post new threads
You may not post replies
You may not post attachments
You may not edit your posts
HTML code is Off
|
|
|
|
 » Recent Discussions
 |
|
|
|
|
|
|
|
|
|
|
|
|
|
|
|
|
|
|
|
|
|
|
|
|
|


 Linear Mode

