 |
 10-11-2020, 05:49 PM
|
#1
|
|
Winnie-Wise
Join Date: Jul 2019
Location: Rochester, MN
Posts: 434
|
2108DS Lithium install: replacing the WFCO charger with a PD4655LIV
It's time to replace the standard battery with Battle Born LiFePO4 batteries! I'll do my best to document this work as I'm sure there are several out there who'd like to know what's involved, how well it works, etc. I'll keep you posted via a few topics here.
I called Battle Born to ask about my existing WFCO 8955 charger to see how it might do with the lithiums. The conversation started a little awkward because a guy (yes, a real live human!) answered on the first ring! After talking a bit I learned the 8955 is substandard for these batteries as it tends to think the batteries are full based on the voltage. That's probably a rather generic statement that goes for other chargers as well. He recommended a Progressive Dynamics 4655LIV lithium converter as it's a drop in replacement for (parts of) the WFCO. My wallet got $250 lighter and the following toys arrived:
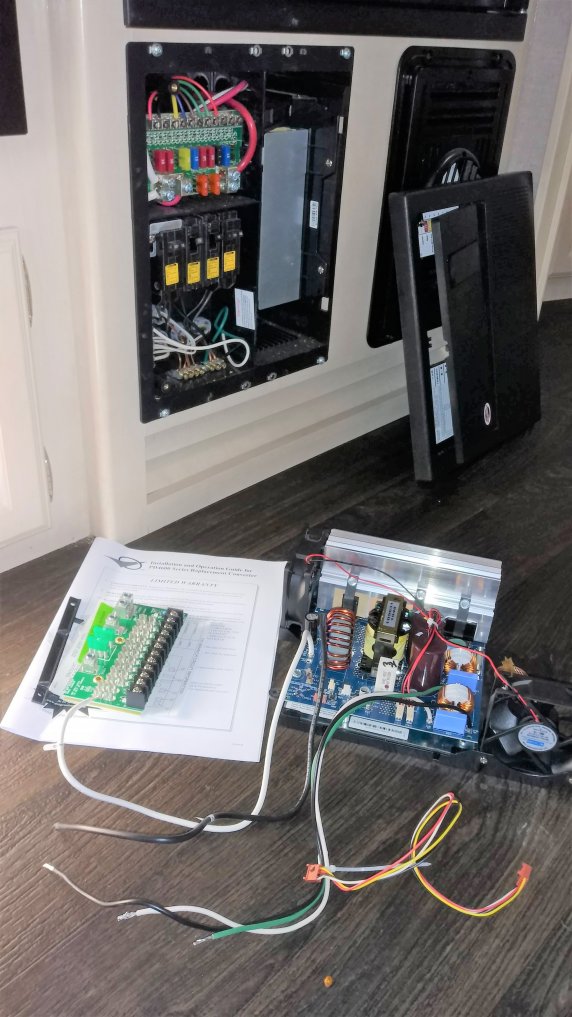
In the photo you can see I've already removed the two screws holding the WFCO plastic cover. THE SHORE POWER AND BATTERY ARE DISCONNECTED!
Sorry about yelling, but it's very important that all power be removed. I had already pulled the battery (recall I am replacing with lithium)
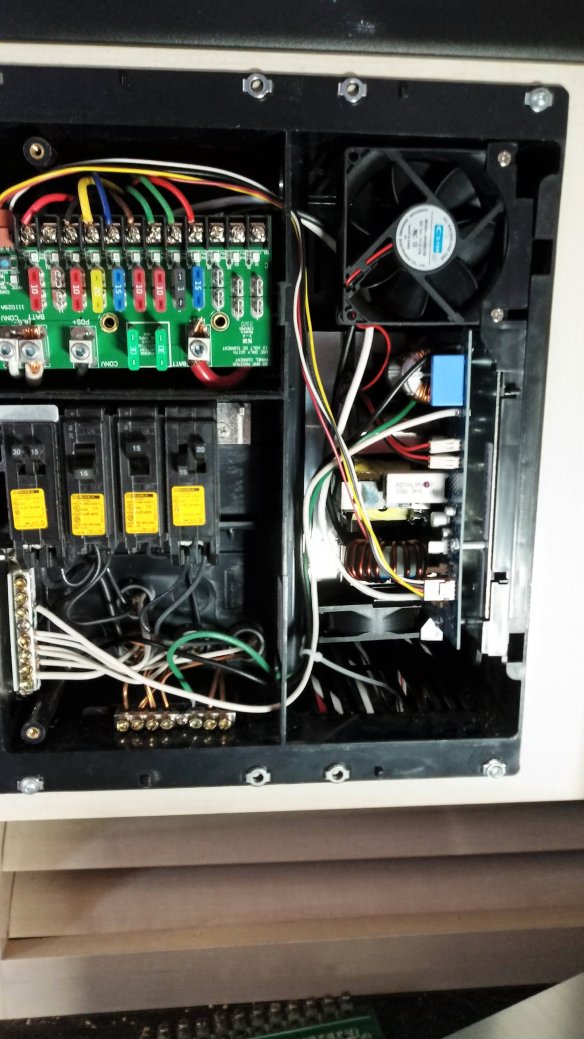
In the photo you can see the WFCO enclosure is divided into three areas: the charger assembly to the right, a 12v distribution board with fuses at the top left, and a 120v AC breaker/distribution panel in the bottom left. This enclosure is oriented vertically in the 2108DS and is located under the refrigerator to the left of the furnace. In other rigs it may be horizontal.
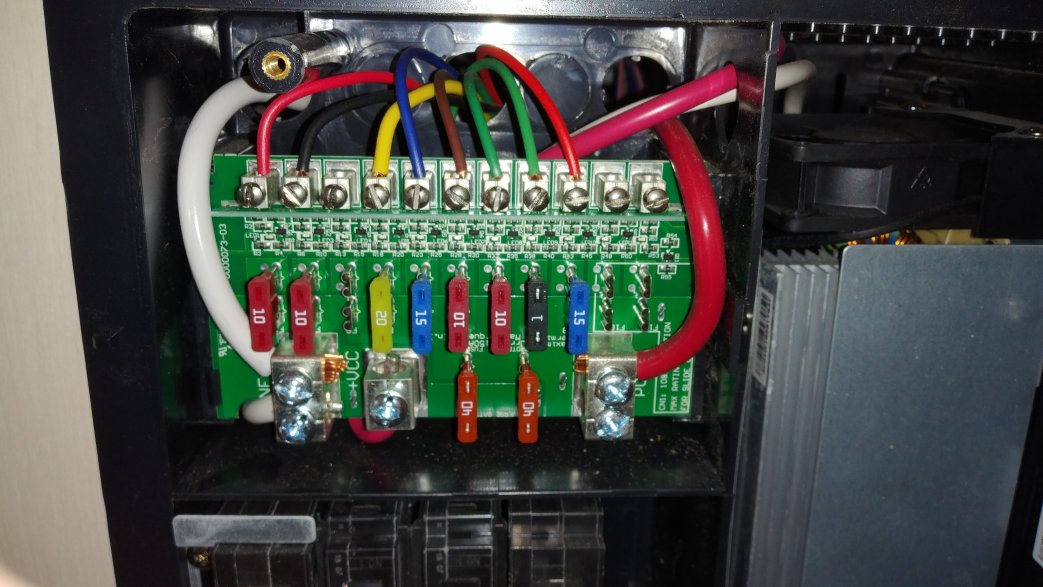
Here's a zoomed in view of the original WFCO 12v distribution/fuse board. I took photos like this mainly in case I had questions later about what went where.
In the next post I'll show how I replaced this stuff. It was really very straightforward.
__________________
Todd
2019 Micro Minnie 2108DS with upgrades and mods here
2020 Toyota Land Cruiser, RedArc TowPro-Elite, Andersen 3380 WDH
|

|

|
|
10-11-2020, 06:15 PM
|
#2
|
|
Winnie-Wise
Join Date: Jul 2019
Location: Rochester, MN
Posts: 434
|
The saga continues. Remember: BOTH SHORE POWER AND THE BATTERY ARE DISCONNECTED!
The PD4655 comes with a replacement 12v distribution/fuse board. Though I didn't call PD and confirm, I believe you don't really need to replace this board, but it does provide the addition of a charge mode indicator LED and pushbutton that lets you control the charging phase. So, of course, I wanted the new board in place!
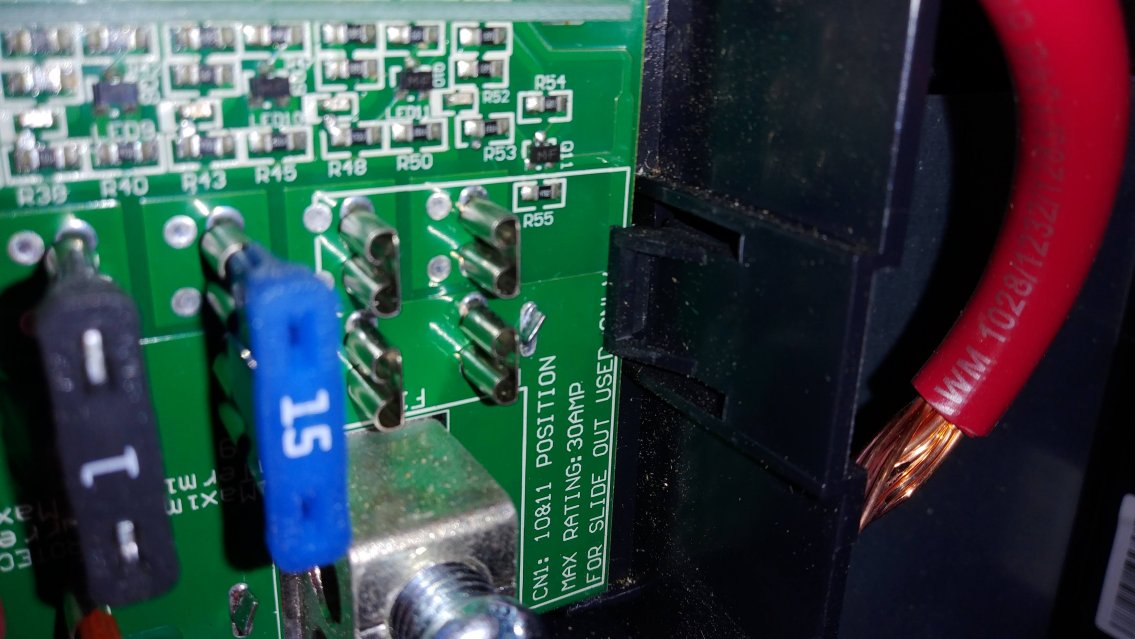
The first step is to unclip the board. The black clip is part of the WFCO enclosure and is a bit hard to see in this zoomed in photo. I found I had to unhook that cable in order to see what I was doing. Once I could see the clip, it was pretty easy to understand how to squeeze it to release the board.
There are four heavy gauge wires going to the 12v board and a whole bunch of branch circuit wires. The four heavy wires are the pair of wires going over to the charger that you can see (next photo below) to the right, and the other pair of wires head down under to the battery. I disconnected these four cables from the old 12v board and then connected the battery cables to the new 12v board. I also disconnected the original WFCO converter's three AC wires hot from the 15A breaker that's off, neutral and ground. Note that the shore power is disconnected and the only reason I switched that breaker off is a reminder which one I was working with.
Note in this next photo that I haven't yet snapped the new 12v board yet into place into the clips. The old 12v board rests on top as the branch circuits and fuses are still tied to it.
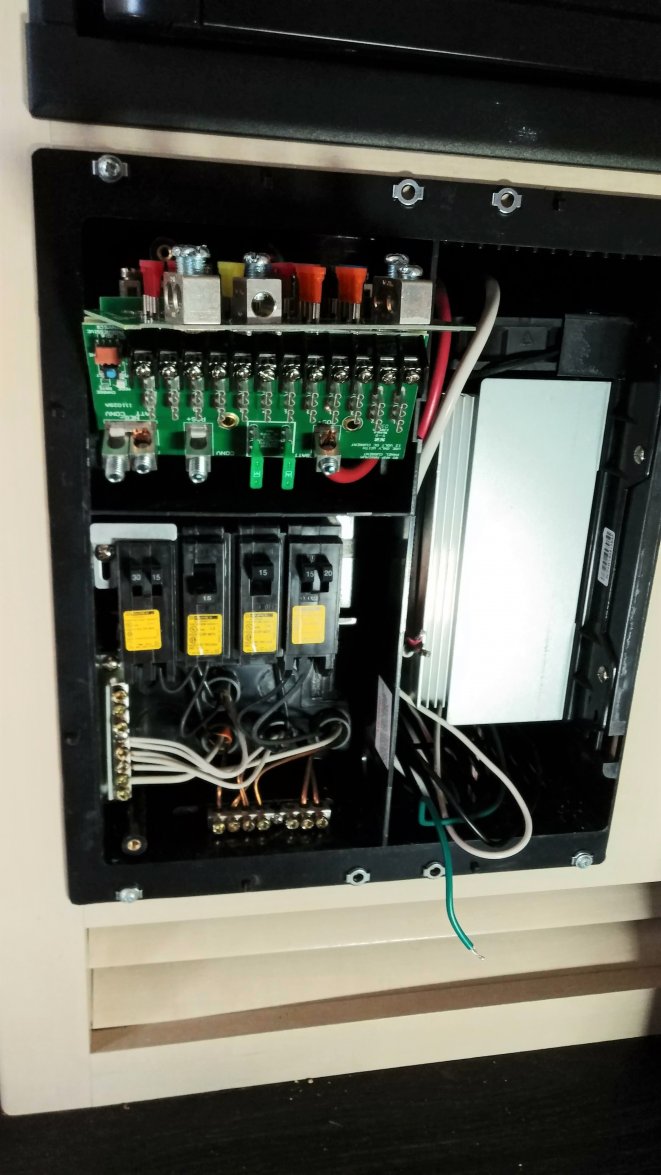
Now I could pull the old WFCO converter. It had two screws along the front edge and then it just pulled out. Note the DC wires went through a hole into the DC section and the AC wires went through a hole into the AC section of the enclosure. The new converter is sitting to the right in this photo and its wires will route the same way.
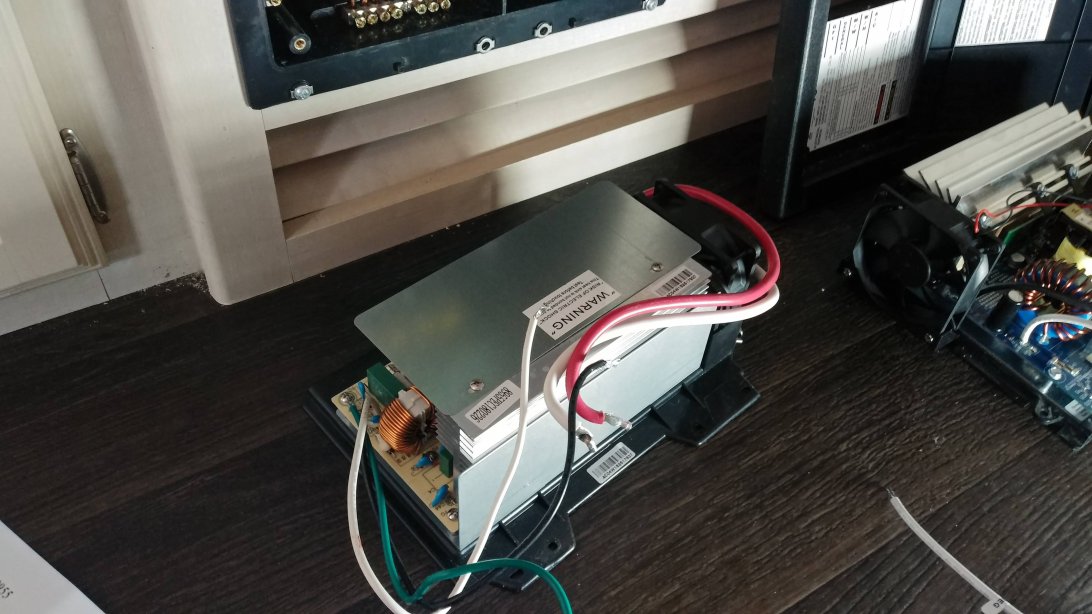
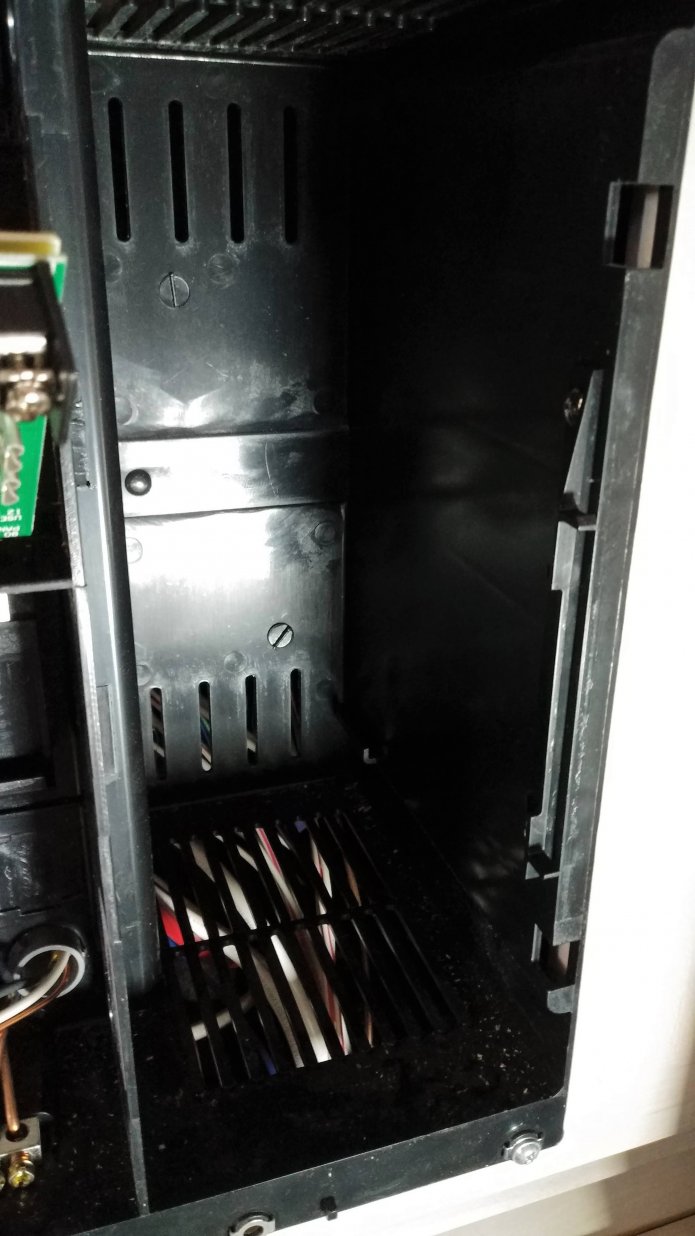
Here's the empty space after the old converter was removed. However, there is a small mod here. The PD4655 came with a little black plastic snap bracket that screwed back into the same holes that fastened the old converter. In fact, the same screws are used. The bracket is hard to make out, but is centered along the right edge and has tabs facing forward.
Now the PD4655 charger assembly slides right into place. There's a slot in the back of the enclosure where it slides in perfectly, and the front snaps into those tabs on that newly added bracket. Now the AC wires can be routed and connected to the AC section, and the DC wires can be routed to the 12v board and connected. All these wires are labeled well, and the AC wires were further zip tied together. So it's a bit hard to mix this stuff up. The AC wires are standard color (black - hot to breaker, white - to neutral bus bar, green - to ground bus bar). The DC wires have stickers with +/- labels.

In the next, and last, post I'll wrap it up.
__________________
Todd
2019 Micro Minnie 2108DS with upgrades and mods here
2020 Toyota Land Cruiser, RedArc TowPro-Elite, Andersen 3380 WDH
|
|
|
|
|
10-11-2020, 06:29 PM
|
#3
|
|
Winnie-Wise
Join Date: Jul 2019
Location: Rochester, MN
Posts: 434
|
The saga finishes! SHORE POWER AND THE BATTERY ARE DISCONNECTED!
Now came the tedious part. Each branch circuit wire needs to be moved from the old 12v board to the new. And each corresponding fuse needs to move as well. I moved a wire and fuse at a time so I wouldn't screw anything up. We don't want to end up with a 15A fuse with a 10A circuit!
One by one I moved them all. The original WFCO cover has a fuse diagram so I was also glancing on that to double check that everything was in proper order.
Finally, the 12v board could be snapped into place. I found this to be very difficult as I didn't want to break the board! Eventually it clicked "enough" that I was satisfied. The new board is really a double layer with an insulating layer between...so the clips caught the bottom board layer.
Also, there is a little 4-pin signal cable that routes from the very top left of the 12v board down to the converter. This is what provides the LED/pushbutton control. You can see the LED and tiny pushbutton at the upper left of the 12v board if you squint. They are just under the brown-ish connector.
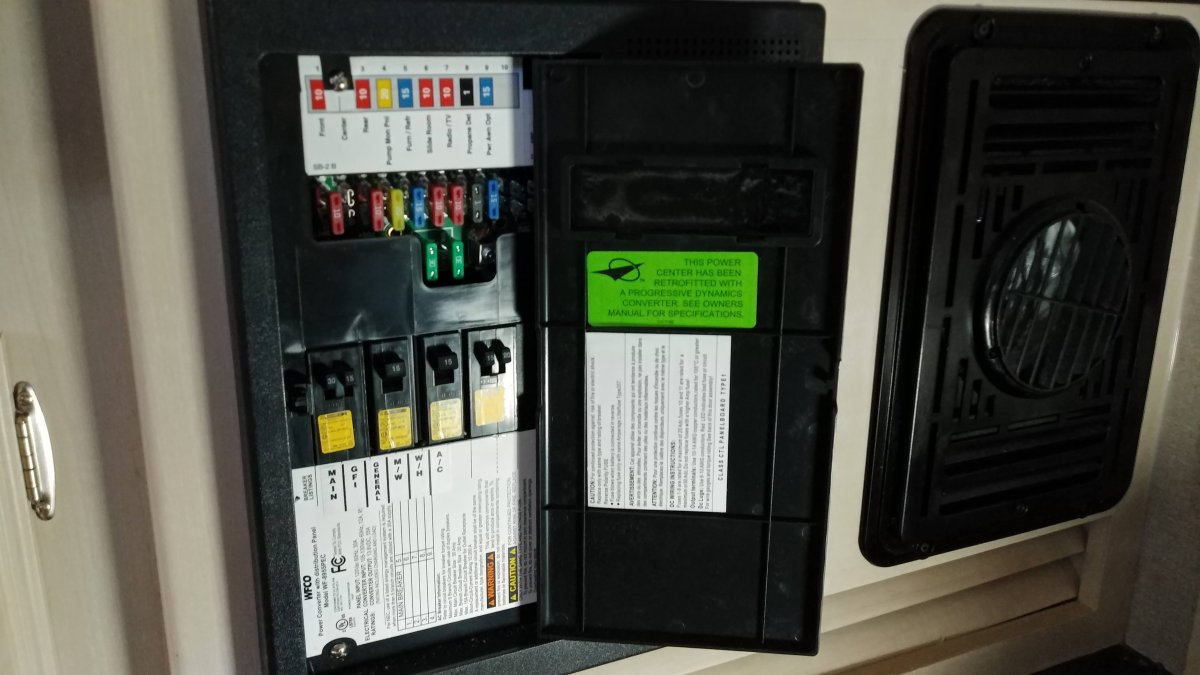
Now it was time to wrap it up and put on the cover. I thought everything lined up well. I kept the branch circuits in original order so was able to keep the original WFCO fuse chart as-is. I added the bright green "retrofit" label as if anyone's gonna actually read it.
Now for the nerve-racking part...trying it out! I didn't have a battery connected (recall I am replacing with Lithium), so I plugged into shore power. All seemed fine. I tried a few things and finally measured the battery wires which were dangling on the ground outside....

I'll claim success! So far it's been working ok, and I'll add any updates here if I learn otherwise. Hope this has been useful to someone. I'll start another thread soon for the main battery install episodes.
__________________
Todd
2019 Micro Minnie 2108DS with upgrades and mods here
2020 Toyota Land Cruiser, RedArc TowPro-Elite, Andersen 3380 WDH
|
|
|
|
|
10-11-2020, 11:44 PM
|
#4
|
|
Winnie-Wise
Join Date: Aug 2020
Location: Sandy Eggo
Posts: 298
|
On my 2401RG the "55 Amp" WFCO 8955 is connected to the battery via a 30A breaker in the frame mounted connection box. Another limiting factor is the approx 30' of AWG 6 wire. The voltage drop, even at 25 amps, becomes pretty significant. I could see that being a problem with the PD converter also. One other quirk I saw with the WFCO is was when I ran on shore power with the battery disconnect open, the voltage rises to 14.7 v, causing several touch lights to turn on by themselves and then can't be turned off. Of course, there are very few times I would expect to run on shore power with the battery disconnected. In this case I was playing with a current shunt.
__________________
2020 Winnebago Minnie 2401RG
2014 Ram 2500 CCSB 4x4 6.7CTD
|
|
|
|
|
10-12-2020, 12:56 AM
|
#5
|
|
Winnebago Camper
Join Date: Nov 2019
Posts: 22
|
Great write-up Todd. Thanks for that.
I'll be upgrading my Progressive Dynamics to a lithium converter soon also, plus the transfer switch and main breakers for a 50A service. I'm not swapping the whole load center. On the PD site there's one reseller listed in TN and he's a very knowledgeable and friendly guy, has the best prices I've seen so far.
.
|
|
|
|
|
10-12-2020, 06:57 AM
|
#6
|
|
Winnie-Wise
Join Date: Jul 2019
Location: Rochester, MN
Posts: 434
|
Quote:
Originally Posted by Old Navy

On my 2401RG the "55 Amp" WFCO 8955 is connected to the battery via a 30A breaker in the frame mounted connection box. Another limiting factor is the approx 30' of AWG 6 wire. The voltage drop, even at 25 amps, becomes pretty significant. I could see that being a problem with the PD converter also.
|
Yeah, I wonder about these names. I suppose "55 Amp" means it can send 30 amps to the battery and still have 25 amps to run other branch circuits while on shore power. If you look close, the two bright green fuses going to the battery are 30 amp. The WFCO had 40 amp fuses.
I've since installed the Battleborn batteries and a Victron battery monitor and will write those up and post soon. When I plugged in the shore power I noted the PD sent 31 amps to the battery, but the current rather quickly dropped because the batteries were already very full. I suspect 30 amps is all I'm going to get, though it's just as well as I have AWG 6 wire. I'm sure it could be done, but changing out that wire would be challenging -- not to mention I'd need to upgrade the charger again to get more than 30 amps to the battery.
__________________
Todd
2019 Micro Minnie 2108DS with upgrades and mods here
2020 Toyota Land Cruiser, RedArc TowPro-Elite, Andersen 3380 WDH
|
|
|
|
|
11-06-2020, 11:11 AM
|
#7
|
|
Winnie-Wise
Join Date: Jul 2019
Location: Rochester, MN
Posts: 434
|
A Follow-up
I've had the batteries in place for some time now and have had some minor issues and thought I'd follow-up here.
Note that I created two additional threads for installing the batteries and a trip report of how it was all working. So there is much more to this story. I also called up Battle Born this morning to cross-check a few things I've learned about the PD4655LIV charger.
First, I've made the observation that the charger appears to always put out 14.55v. Now that isn't necessarily what you'll read at the battery when the current is high and voltage drop is significant over the 6 AWG wire. But that's it. Battle Born says this "LIV" version of the charger is designed only for LiFePO4 batteries and that voltage is what the batteries want. So this model charger is wired to stay in bulk (boost) mode. You can't use it with FLA or other types of batteries.
This is good, but then I'll make the observation that replacing the 12v fuse panel was busy work that wasn't really needed. Recall the new fuse panel only added a single blinkin' LED and a little pushbutton, but otherwise was identical to the WFCO that was already installed. The pushbutton does nothing in the "LIV" model as the charger is always in bulk (boost) mode. I have observed the LED blinks when shore power is disconnected, but I'm not sure it's really telling me anything. It seems to me that a lot of installation effort could be saved by keeping the original 12v fuse board in place.
Finally, I have observed up to 41A delivered to the batteries. I'm fairly well convinced the wire gauge is the issue keeping me from a faster charge. I've learned the 30A reverse polarity protection fuses are ganged together in parallel and thus form a 60A fuse. Perhaps the unit can produce a full 55A but I may never see it in my rig. If I see otherwise, I'll post another update here.
__________________
Todd
2019 Micro Minnie 2108DS with upgrades and mods here
2020 Toyota Land Cruiser, RedArc TowPro-Elite, Andersen 3380 WDH
|
|
|
|
|
11-06-2020, 12:41 PM
|
#8
|
|
Winnebago Master
Join Date: Feb 2020
Posts: 887
|
Very interesting and comprehensive article.
How about running a temporary jumper, maybe car jumper cables, from the new converter to the batteries and see if the reduced voltage drop increases the current significantly. Maybe do this with somewhat discharged batteries where voltage isn't as important as it is at the final end of the curve.
If I were to install Li batteries in my new Thor Axis that is on order, I would swap out the existing converter for a PD 9180 model to maximize battery charging and minimize generator running time while dry camping. I realize I would have to significantly upgrade battery wire size and probably increase the AC breaker that feeds the new converter.
But would like to make sure it will really make a difference before I do it.
David
|
|
|
|
|
11-06-2020, 01:33 PM
|
#9
|
|
Winnie-Wise
Join Date: Aug 2020
Location: Sandy Eggo
Posts: 298
|
Interesting that it's always in "boost" mode. Ideally, I'd want a quality charger within a couple feet of my battery bank. Victron makes one that looks great, the Phoenix 12/50 1+1, but they don't yet make a USA version (230V only).
With your new converter, I'd be interested how it effects your DC system. I had a problem one time where 4 or 5 of my ceiling lights came on by themselves and could not be turned off. Earlier I had disconnected my batteries at the battery switch while on shore power, and somehow the converter was stuck in boost mode instead of being at 13.2V. I had to disconnect shore power to get the lights to reset.
__________________
2020 Winnebago Minnie 2401RG
2014 Ram 2500 CCSB 4x4 6.7CTD
|
|
|
|
|
11-06-2020, 03:28 PM
|
#10
|
|
Winnie-Wise
Join Date: Jul 2019
Location: Rochester, MN
Posts: 434
|
Dang, these are good ideas! Weekend projects!
Quote:
Originally Posted by DavidM
How about running a temporary jumper, maybe car jumper cables, from the new converter to the batteries and see if the reduced voltage drop increases the current significantly. Maybe do this with somewhat discharged batteries where voltage isn't as important as it is at the final end of the curve.
|
I'll try this. A sighting up near 50A would be good to see just to validate why things are acting the way they are.
Quote:
Originally Posted by Old Navy
With your new converter, I'd be interested how it effects your DC system. I had a problem one time where 4 or 5 of my ceiling lights came on by themselves and could not be turned off. Earlier I had disconnected my batteries at the battery switch while on shore power, and somehow the converter was stuck in boost mode instead of being at 13.2V. I had to disconnect shore power to get the lights to reset.
|
Interesting thought. I'll measure, but I assume my DC system is indeed running at higher voltage based on how the 12v fuse panel is made. So what breaks? Will the life of anything be reduced? I'll hope for the best  . Still, the 12v equipment needs to handle boost mode. I doubt the fridge will have trouble, and I know my cpap dc-dc brick won't have trouble (I believe it goes to 40v, but I'd have to check.)
If I replace my charger again, the new one probably won't fit in the space of the WFCO panel. There is space there, but I'd have to do cabinet work, and it's a rats nest of wire so I'm thinking it would be a bad idea to attempt to use the space. So I'd put the charger next to the batteries and run 125v romex from the breaker to the charger location. I'd rather have short cables to the battery vs to the 12v system. If the rig needs that many amps something is very wrong!
__________________
Todd
2019 Micro Minnie 2108DS with upgrades and mods here
2020 Toyota Land Cruiser, RedArc TowPro-Elite, Andersen 3380 WDH
|
|
|
|
|
11-06-2020, 04:04 PM
|
#11
|
|
Winnebago Master
Join Date: Dec 2007
Posts: 992
|
Quote:
Originally Posted by tinglett
So I'd put the charger next to the batteries and run 125v romex from the breaker to the charger location. I'd rather have short cables to the battery vs to the 12v system. If the rig needs that many amps something is very wrong!
|
You beat me to the punch. I was about to suggest you do just that: Move the charger to near the batteries.
|
|
|
|
|
11-07-2020, 10:01 AM
|
#12
|
|
Winnie-Wise
Join Date: Jul 2019
Location: Rochester, MN
Posts: 434
|
Ok, time for a drum roll!... 
I did measure the voltage while on shore power and it sits at 14.55v. Hopefully that will be ok for all the gear I have.
This morning I brought in the good battery and bolted it up as direct as possible to the charger. See the photo of the setup below. The setscrews were m8x1.0 (fine) so all I had were oxide coated bolts. They might be adding some resistance, but all I could measure was about 100mOhm through each cable. The cables are 4 AWG, but I was thinking that should be plenty for a 55A charger.
Check out the readings in the photos if you haven't already. It did peak over 53A a few times and is charging as fast as I'd want for a single battery. Voltage is still down a bit. Either that's a limitation of the charger, a "feature" of the charger, or due to a characteristic of the battery. I don't know. But it's not voltage drop due to cable length.
So the summary is that this charger (and probably the previous WFCO 8955) really can send 55A to the batteries if you have the right setup. I know a few in this thread were saying that (or expecting it) all along. Of course I can't charge the battery on the floor like this, but I can do other things. Maybe in the spring I'll look into a new charger, but I think a couple solar panels and controller are ahead of that project.
__________________
Todd
2019 Micro Minnie 2108DS with upgrades and mods here
2020 Toyota Land Cruiser, RedArc TowPro-Elite, Andersen 3380 WDH
|
|
|
|
|
11-08-2020, 03:31 PM
|
#13
|
|
Winnie-Wise
Join Date: Aug 2020
Location: Sandy Eggo
Posts: 298
|
Quote:
Originally Posted by tinglett
Battle Born says this "LIV" version of the charger is designed only for LiFePO4 batteries and that voltage is what the batteries want. So this model charger is wired to stay in bulk (boost) mode. You can't use it with FLA or other types of batteries.
|
Looks like Battle Born also strongly endorses the Powermax PM3-55LK. These support 3 stage charging for LiFePO4 and are also avail in 60/75/100A models. I guess there are also mods for the PD 9200 series to change their boost mode voltage while retaining the absorption and float voltages.
__________________
2020 Winnebago Minnie 2401RG
2014 Ram 2500 CCSB 4x4 6.7CTD
|
|
|
|
|
01-30-2021, 01:29 PM
|
#14
|
|
Winnie-Wise
Join Date: Dec 2020
Location: Upstate SC
Posts: 303
|
Finally had some time today to install my used Valence battery (U27-12XP) and WFCO 8950L2-MBS converter/charger. Eventually I want to relocate the battery off the tongue and into the pass-thru
The previous owner had 2 6V batteries (Duracell) and a PD4655V. While better than stock, that setup required too much maintenance for my taste.
1. 90lb. weight savings
2. 2X recharge rate
3. 10X number of cycles (lifetime)
4. No maintenance
Want to thank the OP for the writeup. I'm not electrically inclined, but the step by step gave me enough confidence to get it done. Kinda strange removing a non-OEM component and replacing it with a "stock" unit. All seems to be working well. Total cost for this small upgrade was around $650.
|
|
|
|
|
02-07-2022, 02:01 PM
|
#15
|
|
Winnebago Watcher
Join Date: Feb 2022
Posts: 2
|
Very interesting thread...And timely as I'm replacing my AGM batteries with Lithium. I have a Progressive Dynamics PD4655V and I'm told by PD that all I need to do is mover a jumper wire to make it 14.6V constant for LI batteries.
But I'm concerned that the battery BMS might not control the charge stages properly and a constant 14.6 V will be bad for the batteries.
Also, my current solar charger puts out 14.2V in bulk phase. My 12V DC tvs do not like this high voltage and would shut off when the charger went to bulk. I had to add small "Buck" converters to each TV and set them at 12V output. No mater what the input voltage, the TVs now always see exactly 12V.
|
|
|
|
|
02-07-2022, 02:05 PM
|
#16
|
|
Winnebago Watcher
Join Date: Feb 2022
Posts: 2
|
Here is an interesting opinion....
The Progressive Dynamics unit I have is the PD4655V...55amp output
Inteli-Power 4600 Series models can recharge the battery to 90% in 3-6 hours using our patented Charge Wizard technology:
BOOST Mode 14.4 Volts Rapidly brings RV battery up to 90% of full charge.
NORMAL Mode 13.6 Volts Safely completes the charge.
STORAGE Mode 13.2 Volts Maintains charge with minimal gassing or water loss.
EQUALIZATION Mode 14.4 Volts Every 21 hours for a period of 15 minutes prevents battery stratification
& sulfation the leading cause of battery failure.
I asked an "expert" on a Solar Power/Lithium Battery forum about this constant 14.6V situation? (Will Prowse's Forum but he is not the one that answered)
He replied:
This is actually a fine charger profile. 13.6V is a great absorption/float voltage that will get you to 95%+ capacity if the 14.4V didn't already get you there. The 13.2V will allow a little bleed down of the battery.
The "Equalization" charge is not needed and not beneficial, but 15 minutes isn't going to hurt anything. Technically, the battery will be "micro-cycling," and it might have a measurable impact on service life, but this option is WAY better than 14.6V constant voltage.
IMHO, MOST "Li" converters are at best a poor implementation and don't offer any added value that justifies their cost.
|
|
|
|
|
02-12-2022, 07:35 PM
|
#17
|
|
Winnie-Wise
Join Date: Jul 2019
Location: Rochester, MN
Posts: 434
|
It's been a while, so maybe I already said this earlier in this thread, but I did ask the Battleborn guys this exact question. Is it ok to have constant voltage and is it ok to keep it going even though the battery is fully charged? They said it will be fine. The battery manages itself. They do have a long warranty, 11 years if I recall, so if they are wrong they'll be hearing from me eventually. However, my normal usage is dry camping so I'm not normally on shore power for long, so even if they are wrong I probably won't be impacted.
Of course the question was somewhat redundant because I bought the charger from them. I don't think it cost more than a typical charger just because it was specifically for Li batteries.
But note they were talking about their own batteries. Perhaps their battery management system deals with this and others may not? I really don't know.
You maybe should get the batteries in place first and see how it goes. If they charge fast I think you are done!
__________________
Todd
2019 Micro Minnie 2108DS with upgrades and mods here
2020 Toyota Land Cruiser, RedArc TowPro-Elite, Andersen 3380 WDH
|
|
|
|
|
|
Currently Active Users Viewing This Thread: 1 (0 members and 1 guests)
|
|
|
 Posting Rules
|
You may not post new threads
You may not post replies
You may not post attachments
You may not edit your posts
HTML code is Off
|
|
|
|
 » Recent Discussions
 |
|
|
|
|
|
|
|
|
|
|
|
|
|
|
|
|
|
|
|
|
|
|
|
|
|


 Linear Mode

