 |
|
 03-04-2022, 08:51 PM
|
#41
|
|
New to this....
Join Date: Dec 2021
Posts: 175
|
What year is yours?
|

|

|
|
03-05-2022, 05:55 AM
|
#42
|
|
Winnie-Wise
Join Date: Apr 2017
Location: South Central, Pennsylvania
Posts: 446
|
Quote:
Originally Posted by Sentry

What year is yours?
|
2016
__________________
2016 Winnebago Micro Minnie 2106DS, 200Ah BB, 400w rooftop & 500w front cap solar
2020 Tundra SR5 DLCB TRD Off Road, 5.7L V8 w/6.5' bed & 38 gal. tank, 4.30 axle ratio
Blue Ox Sway Pro w/750# bars, wired RVS rear view camera, Renogy 20A DC/DC charger
|
|
|
|
|
03-05-2022, 07:29 AM
|
#43
|
|
Winnie-Wise
Join Date: Apr 2017
Location: South Central, Pennsylvania
Posts: 446
|
The year shouldn't matter. Your wire count, color and sizes may be a different, but the task is the same. What you want to do is re-route the wires that originally went to tongue, back to your new battery location under the bed, keeping the correct polarity.
Also, you want to extend the solar wiring from the roof to your new solar controller under the bed.
__________________
2016 Winnebago Micro Minnie 2106DS, 200Ah BB, 400w rooftop & 500w front cap solar
2020 Tundra SR5 DLCB TRD Off Road, 5.7L V8 w/6.5' bed & 38 gal. tank, 4.30 axle ratio
Blue Ox Sway Pro w/750# bars, wired RVS rear view camera, Renogy 20A DC/DC charger
|
|
|
|
|
03-05-2022, 06:01 PM
|
#44
|
|
New to this....
Join Date: Dec 2021
Posts: 175
|
Just opened the solar entry glad and found where they cut the 10 ga wire after four inches and rocket capped on normal rv wire. Uhg disgusting
__________________
2012 Chevy Silverado 2500HD Z71 4X4 w/ 4:10 Gear Ratio 2.5" Receiver. Z82 Package.
2022 Winnebago 2301BHS, w/ Victron Solar System
|
|
|
|
|
03-05-2022, 06:04 PM
|
#45
|
|
New to this....
Join Date: Dec 2021
Posts: 175
|
Solar panel off of roof. No turning back now.
Screwed up on cutting holes in floor. Entered heat duct going to basement. Didn’t realize it until second hole. Need to fix that or my power components will be heated.
I have a plan, not great one. But it’s a plan.
__________________
2012 Chevy Silverado 2500HD Z71 4X4 w/ 4:10 Gear Ratio 2.5" Receiver. Z82 Package.
2022 Winnebago 2301BHS, w/ Victron Solar System
|
|
|
|
|
03-05-2022, 08:51 PM
|
#46
|
|
New to this....
Join Date: Dec 2021
Posts: 175
|
Alright.. So question on the solar panels....
They are Renogy 175 Watt flex panels...
Should I tape them down?
or
Use the grommets to screw them down and use lap sealant?
I have 2" durabond tape. Maybe not name brand... I expect over time, I will have to basically replace this... Never pretty...
If I use the lap sealant, It can be removed. Although not pretty either, Im thinking better... Panels can be removed at some point for different panels...
Dunno... What are your thoughts on this?
__________________
2012 Chevy Silverado 2500HD Z71 4X4 w/ 4:10 Gear Ratio 2.5" Receiver. Z82 Package.
2022 Winnebago 2301BHS, w/ Victron Solar System
|
|
|
|
|
03-05-2022, 08:53 PM
|
#47
|
|
New to this....
Join Date: Dec 2021
Posts: 175
|
Quote:
Originally Posted by Sentry
Just opened the solar entry glad and found where they cut the 10 ga wire after four inches and rocket capped on normal rv wire. Uhg disgusting
|
Turns out this blue/ white wire... Looks to be 14 ga wire per the schematics...So I am thinking, had I connected more panels to this gland without investigating further, I would have started a fire by burning up the wire...
__________________
2012 Chevy Silverado 2500HD Z71 4X4 w/ 4:10 Gear Ratio 2.5" Receiver. Z82 Package.
2022 Winnebago 2301BHS, w/ Victron Solar System
|
|
|
|
|
03-06-2022, 06:47 AM
|
#48
|
|
Winnie-Wise
Join Date: Apr 2017
Location: South Central, Pennsylvania
Posts: 446
|
Quote:
Originally Posted by Sentry
Alright.. So question on the solar panels....
They are Renogy 175 Watt flex panels...
Should I tape them down?
or
Use the grommets to screw them down and use lap sealant?
I have 2" durabond tape. Maybe not name brand... I expect over time, I will have to basically replace this... Never pretty...
If I use the lap sealant, It can be removed. Although not pretty either, Im thinking better... Panels can be removed at some point for different panels...
Dunno... What are your thoughts on this?
|
First off, I don't have experience with flex panels, but if given the option of tape or sealant, I would first try screws and sealant.
I would put down a pad on sealant where each grommet will be and then screw through the grommet and pad of sealant and add additional sealant on top of the screw heads. My thinking is, this method would allow the back of the panel to breath a little to help dissipate heat build up and moisture under the panel. Also, based on my experience with both sealant and tape, sealant should make it easier to remove the panels in the future if needed.
__________________
2016 Winnebago Micro Minnie 2106DS, 200Ah BB, 400w rooftop & 500w front cap solar
2020 Tundra SR5 DLCB TRD Off Road, 5.7L V8 w/6.5' bed & 38 gal. tank, 4.30 axle ratio
Blue Ox Sway Pro w/750# bars, wired RVS rear view camera, Renogy 20A DC/DC charger
|
|
|
|
|
03-06-2022, 07:45 AM
|
#49
|
|
Winnie-Wise
Join Date: Apr 2017
Location: South Central, Pennsylvania
Posts: 446
|
Quote:
Originally Posted by Sentry
Turns out this blue/ white wire... Looks to be 14 ga wire per the schematics...So I am thinking, had I connected more panels to this gland without investigating further, I would have started a fire by burning up the wire...
|
I know you are planning to pull new 10 AWG wire, so hopefully that goes well for you.
__________________
2016 Winnebago Micro Minnie 2106DS, 200Ah BB, 400w rooftop & 500w front cap solar
2020 Tundra SR5 DLCB TRD Off Road, 5.7L V8 w/6.5' bed & 38 gal. tank, 4.30 axle ratio
Blue Ox Sway Pro w/750# bars, wired RVS rear view camera, Renogy 20A DC/DC charger
|
|
|
|
|
03-06-2022, 08:00 AM
|
#50
|
|
Winnebago Master
Join Date: Oct 2017
Location: Elk Grove, CA
Posts: 3,587
|
Quote:
Originally Posted by Fred 2106DS
First off, I don't have experience with flex panels, but if given the option of tape or sealant, I would first try screws and sealant.
I would put down a pad on sealant where each grommet will be and then screw through the grommet and pad of sealant and add additional sealant on top of the screw heads. My thinking is, this method would allow the back of the panel to breath a little to help dissipate heat build up and moisture under the panel. Also, based on my experience with both sealant and tape, sealant should make it easier to remove the panels in the future if needed.
|
I agree with Fred. If I'm not mistaken, you have a TPO roof, therefore adhesive or tape alone won't be sufficient. Although I'd be tempted to use Eternabond tape around the edges, as you know, it's a bear to remove so I don't think it's worth it. In any case Eternabond's tensile strength is minimal so it wouldn't add much, if any security.
I would, however think about sealing the front edge to minimize the chance of wind getting underneath the panel.
__________________
Bob C
2002 Itasca Suncruiser 35U
Workhorse Chassis
|
|
|
|
|
03-06-2022, 12:33 PM
|
#51
|
|
Winnebago Owner
Join Date: Jun 2020
Posts: 125
|
Solar project
Sentry, I dont believe it has been mentioned. When you hook up solar to your controller you may want a disconnect in between. If you dont have batteries hooked up to controller when solar activates you can burn up your controller. A disconnect would be a good idea especially if you ever wanted to turn off solar in the future. Hope this helps, Travato John
|
|
|
|
|
03-06-2022, 12:44 PM
|
#52
|
|
New to this....
Join Date: Dec 2021
Posts: 175
|
Length of screws for the panels?
I have one inch screws. If I’m understanding Fred correctly, seal where screw would go, place panel and screw in place.
Seal around screws on top not along edges of rest of panel..
Is this the general consensus?
Allowing air flow under panels except from front/ driving direction….
__________________
2012 Chevy Silverado 2500HD Z71 4X4 w/ 4:10 Gear Ratio 2.5" Receiver. Z82 Package.
2022 Winnebago 2301BHS, w/ Victron Solar System
|
|
|
|
|
03-06-2022, 01:58 PM
|
#53
|
|
New to this....
Join Date: Dec 2021
Posts: 175
|
Uhg back to the hole in the heat duct... I think I forgot to take pic before the initial repair inside.Basically two really large holes on the top of the duct. One on the bottom.

This is where I taped foil bubble wrap up to the top of the duct covering the two larger holes.

Then A/C Foil duct tape to cover all openings and cuts to make this repair.

To include the foil insulation covering the bottom of the trailer.
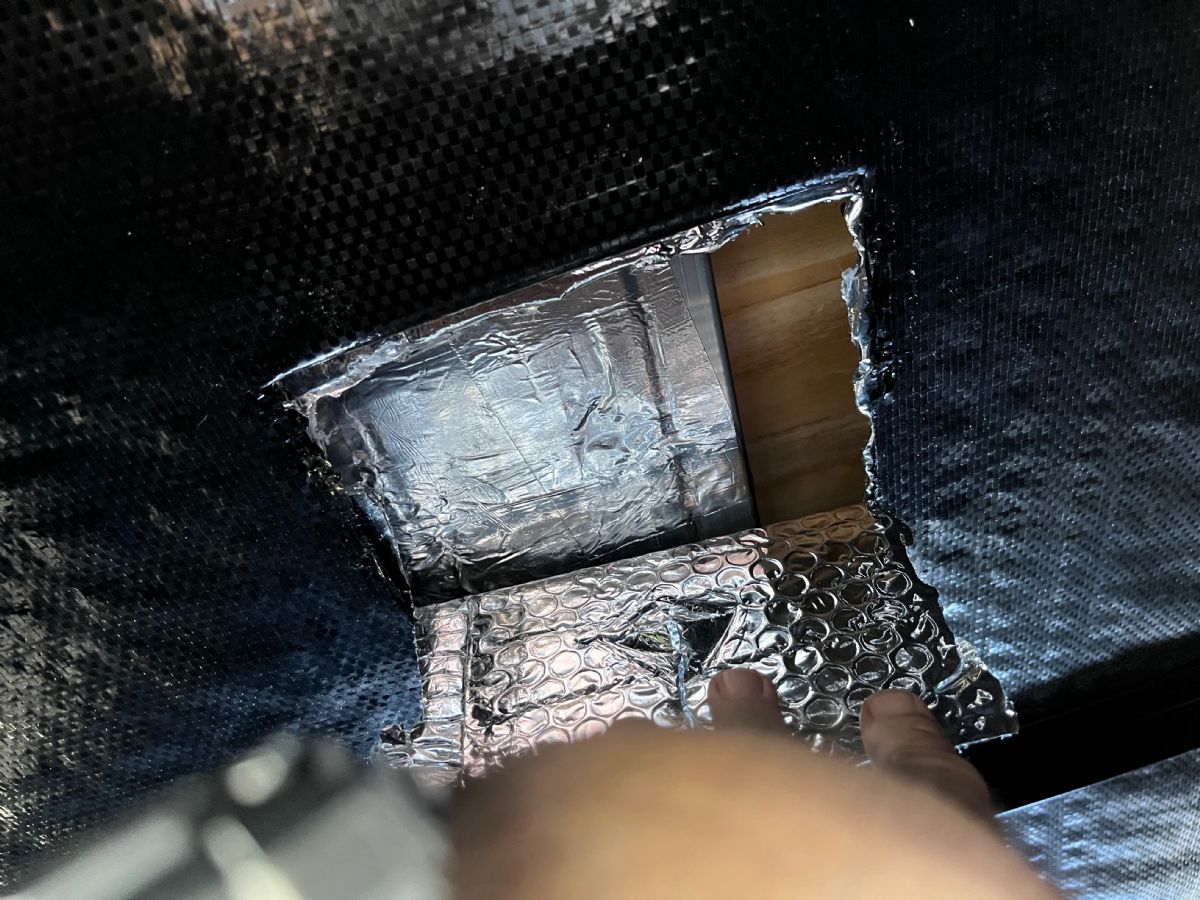

This will be repaired later this week if my Zip Tape arrives, if not gorilla tape for short term.

Same with this opening.

I'm happy with it... I think its about what a professional would do....
__________________
2012 Chevy Silverado 2500HD Z71 4X4 w/ 4:10 Gear Ratio 2.5" Receiver. Z82 Package.
2022 Winnebago 2301BHS, w/ Victron Solar System
|
|
|
|
|
03-06-2022, 04:19 PM
|
#54
|
|
Winnie-Wise
Join Date: Apr 2017
Location: South Central, Pennsylvania
Posts: 446
|
Quote:
Originally Posted by Sentry
Length of screws for the panels?
I have one inch screws. If Im understanding Fred correctly, seal where screw would go, place panel and screw in place.
Seal around screws on top not along edges of rest of panel..
Is this the general consensus?
Allowing air flow under panels except from front/ driving direction
.
|
That's the procedure I would use. Also, recommend using stainless steel screws if you have them.
__________________
2016 Winnebago Micro Minnie 2106DS, 200Ah BB, 400w rooftop & 500w front cap solar
2020 Tundra SR5 DLCB TRD Off Road, 5.7L V8 w/6.5' bed & 38 gal. tank, 4.30 axle ratio
Blue Ox Sway Pro w/750# bars, wired RVS rear view camera, Renogy 20A DC/DC charger
|
|
|
|
|
03-06-2022, 04:31 PM
|
#55
|
|
Winnie-Wise
Join Date: Apr 2017
Location: South Central, Pennsylvania
Posts: 446
|
Quote:
Originally Posted by Sentry
Uhg back to the hole in the heat duct...
|
Your repair looks great!  
__________________
2016 Winnebago Micro Minnie 2106DS, 200Ah BB, 400w rooftop & 500w front cap solar
2020 Tundra SR5 DLCB TRD Off Road, 5.7L V8 w/6.5' bed & 38 gal. tank, 4.30 axle ratio
Blue Ox Sway Pro w/750# bars, wired RVS rear view camera, Renogy 20A DC/DC charger
|
|
|
|
|
03-06-2022, 05:14 PM
|
#56
|
|
Winnebago Master
Join Date: Oct 2017
Location: Elk Grove, CA
Posts: 3,587
|
Quote:
Originally Posted by Fred 2106DS
That's the procedure I would use. Also, recommend using stainless steel screws if you have them.
|
I think the stainless steel screws are necessary, not optional. I suggest using larger rather than smaller screws (#12 or so) for greater holding power in the thin plywood. And you don't need 1" screws, 3/4" is more than adequate. Your roof is made of foam sandwiched between two thin pieces of plywood, so extending down, into the foam, doesn't add any strength and could increase the risk of encountering wires.
Alternatively, some owners use rubber "well nuts" that expand when tightened adding more strength than screw threads. Well nuts use machine screws. I've used both screws and well nuts in the past and neither has failed:
__________________
Bob C
2002 Itasca Suncruiser 35U
Workhorse Chassis
|
|
|
|
|
03-06-2022, 06:15 PM
|
#57
|
|
Winnebago Owner
Join Date: Jan 2022
Posts: 222
|
I 2nd BobC on the stainless and well nuts. A wood screw in 1/8 luan is not a good solution IMO. Way too easy to over tighten the small screws in such a thin sheet.
|
|
|
|
|
03-06-2022, 08:34 PM
|
#58
|
|
Winnie-Wise
Join Date: Apr 2017
Location: South Central, Pennsylvania
Posts: 446
|
I don't disagree with BobC. What he recommends will work fine.
FYI, The roof decking on our Micro Minnie is 7mm OSB covered with TPO, so I didn't have any issues using just stainless screws and sealant for mounting our panels.
You may want to check and see what your roof decking consists of. The easiest way to find out is to remove the shower skylight trim ring. Here are a couple pictures showing our OSB roof decking and TPO covering after removing our skylight trim ring.
You can tell its TPO because it is the same color top and bottom. In our case, it is white top and bottom. If it was EPDM, it would be black on the bottom.
__________________
2016 Winnebago Micro Minnie 2106DS, 200Ah BB, 400w rooftop & 500w front cap solar
2020 Tundra SR5 DLCB TRD Off Road, 5.7L V8 w/6.5' bed & 38 gal. tank, 4.30 axle ratio
Blue Ox Sway Pro w/750# bars, wired RVS rear view camera, Renogy 20A DC/DC charger
|
|
|
|
|
03-06-2022, 11:46 PM
|
#59
|
|
Winnebago Owner
Join Date: Jan 2022
Posts: 222
|
"FYI, The roof decking on our Micro Minnie is 7mm OSB covered with TPO..."
Well, dang, another new* Winnebago roof construction method. Every time I think I've figured out how they made roofs over the years I find another method. 7mm is just a tad over 1/4 inch (0.275).
*new to me.
|
|
|
|
|
03-07-2022, 08:19 AM
|
#60
|
|
Winnebago Master
Join Date: Oct 2017
Location: Elk Grove, CA
Posts: 3,587
|
If it is the 7mm OSB, this is good news and either SS screws (#12) or well nuts will still work and you'll have more holding power than you would have in the 1/8" Luan ply of a foam sandwich.
If you can place the front edge on a cross member (rafter) with longer screws, all the better. You can use a stud finder to locate the cross members or, sometimes, they will be faintly visible after a morning dew on the roof. If you contact Winnebago, they should be able to supply drawings with measurements.
__________________
Bob C
2002 Itasca Suncruiser 35U
Workhorse Chassis
|
|
|
|
|
|
|
Currently Active Users Viewing This Thread: 1 (0 members and 1 guests)
|
|
|
 Posting Rules
|
You may not post new threads
You may not post replies
You may not post attachments
You may not edit your posts
HTML code is Off
|
|
|
|
 » Recent Discussions
 |
|
|
|
|
|
|
|
|
|
|
|
|
|
|
|
|
|
|
|
|
|
|
|
|
|


 Linear Mode

