|
|
Click Here to Login | ||||||

| Bcborn's Albums | |||
| Album Title | Pictures | Last Picture | |
|
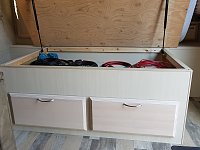
Under Bed Storage
17 x 19 drawers under bed with 1/2 shelf across top.
I placed a vertical divider at the back of the drawers so storage item wont go under the drawers. The new drawer fronts I ordered from Winnebago arrived in the fall of 2022. Will install them once I pull the trailer out of storage. |
2 | 03-10-2024 03:20 PM |
|
2018 Tacoma Double Cab Ltd. 2016 2106FBS Micro Minnie
|
1 | 11-25-2023 02:12 PM |
|
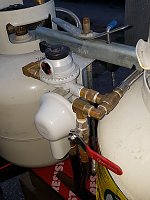
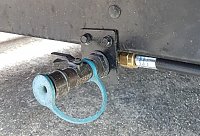
High Pressure Outlet 2.0
We do 100% of our cooking outside and wanted to permanently install the unregulated feed line that we use to fuel our High Pressure Coleman Guide Series 3 Burner Campstove.
I started the upgrade by fixing the unregulated propane line to the additional plumbing at the bottles and I also added a 1/4 shutoff for safety purposes. I ran the unregulated 1/4" propane hose along side the OEM 3/8" propane line that feeds the trailer appliances to the rear of the stepwell. I made an angle iron bracket and attached the outlet fitting to the frame between the step well and the tire. |
3 | 08-22-2023 09:44 PM |
|
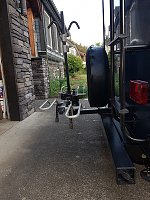
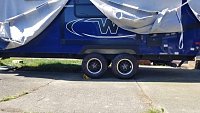
Rear Receiver Hitch
Adding a Rear Receiver Hitch to my Micro Minnie. I removed the original sewer bumper and cut off the original frame mounts, to allow mounting of the new bracket.
I Designed the new 3/16" Thick bracket that extends further rearward to make room for the 2 1/2" x 2 1/2" x 3/16" or 3 x 2 x 3/16 wall HSS crossmember in behind. I chose to go with the 2 1/2 for more vertical support. The original Sewer Tube will weld to the new bracket and the Spare Tire Mount will weld to the top of the 2 1/2" receiver tube. The Bike Carrier Receiver Tube will sit on top of the crossmember and above the sewer tube for more ground clearance. The new bracket will mount to the frame via the original bumper/sewer tube mounting holes and supported by the stabilizer jack bolts along with one additional bolt towards the front of the trailer on the bottom of the frame (to be drilled). The 4" sewer tube will weld in front of the 2 1/2" x 2 1/2" crossmember to the two C Channel brackets and to the underside of the receiver tube. |
13 | 07-05-2023 10:25 PM |
|
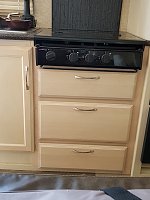
Stove upgrade with glass cooktop
In Progress
The purpose of the remodel is to acquire more usable counter space and cabinet storage. I removed the RV Stove for a cooktop only version. The 2106 by nature has slim storage space so I build a drawer base to add more center storage. The Suburban Cooktop with glass cover requires a wider cutout in the counter and that cutout effects the top corner of the sink door. To address, I moved the counter and cabinet closer to the door. The Cutout needed to be deeper as well, so the removed counter material was used to fill in for the counter being moved to the left. Doing both also made for the drawers to be centered below the cooktop and have the same reveal on both sides of the drawer boxes. I ordered and received the new vertical cabinet framing from a local cabinet shop. The next step was to put everything back together and mount the drawer slides to the cabinet and drawer boxes. Update: I ordered and received the new matching drawer fronts from Winnebago, will install once I open it up in the spring. That will complete this portion of the reno. |
8 | 06-27-2023 10:44 AM |
|
Micro Minnie Axle Riser
Here is my drawing of the 3 1/2" Axle Riser Blocks for the 2016 - 2018 with the non adjustable frame mount with the Lippert Diamond Shaped Axle.
Thanks to Fred2106DS for the great pictures, showing how it all goes together. Once the axle riser blocks are added, I will need to revisit my WDH settings to get them back in range. |
4 | 06-14-2023 11:33 AM |
|
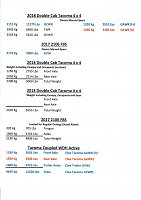
Scale Weigh Ins
Here was my latest weigh-in for my 2017 2106FBS which is towed by our 2018 Toyota Tacoma. It needs one last tweak to get the Tow Vehicle Rear Axle weight down to TV limit.
As you will see in RED I'm over by 21lbs. To get in range I have two options; Transfer more gear to the rear of trailer to remove tongue weight. My current tongue weight is just under 15% (705 Lbs) of the loaded trailer weight, so I have room to adjust. My intension is to purchase a 1000 Lb sureline weigh scale to monitor changes. The other option is to place more tension on the Equalizer E4 Bars, which will move weight from the rear axle and place some on the Tacoma Front Axle and transfer some back to the trailer axles. Issue here is, I want to keep the front of the trailer lower than the rear of the trailer. As it sits the difference between the front of the trailer and the rear of the trailer (at frame corners) is 1/2". The other consideration I need to keep in mind is the front ground to fender height. Currently I'm within 1/8" of the unloaded stock ride height. As you will notice in the picture I do not have Front or Rear Axle weights of the loaded truck, but have the total weight of the loaded truck. Purpose was to get the truck GVW to add to the Trailer GVW to ensure I was in range of the Tacoma's GCWR. The only option I have to adjust front and rear axle weights is via the WDH or trailer loading. The goal; Achieve a front axle weight/height close to unloaded for safety purposes and to maintain stock headlight aiming heights. Achieve a rear axle weight within Toyota compliance. |
2 | 05-09-2023 12:11 PM |
|
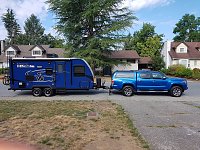
Blue 2106FBS
Hours or buffing and product brought it to life
|
4 | 04-20-2023 12:21 PM |
|
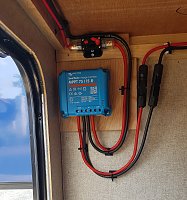
Solar Wiring
Added a Solar Port to the side of the trailer to plug in PV wires from the solar panel. Moved Controller to Passthru and installed a Fuse Panel.
Will be able to now charge Lead Acid or Lithium Trolling Battery as required (Both cannot be charged at the same time. Battery Side Wiring; Under the trailer of my 2017 2106 is a 4" Electrical Junction Box. The Positive #6 from the battery goes to a 30AMP resettable Fuse inside the box. The Negative #6 from the Battery grounds to the frame near the Junction Box. I ran a new red from the input side of the 30AMP Fuse in Box to Fuse Panel in Passthru. I ran a new White from the same grounding screw the negative from the battery was attached. I ran this up to the Fuse panel. My inverter in the trailer utilizes a 30Amp circuit, I ran these wires to the Fuse Block (Red & Blk) via the same conduit to the passthru. Positive (Red) and Negative (Wht) Battery wires to Fuse Panel - 6AWG Positive (Red) lead to Controller via 20Amp resettable Fuse -6AWG stepped down to 8AWG flexible power cord after Fuse. The reason for this resettable fuse was to enable me to cut battery power to Controller to change out batteries. If just the trailer batteries where used, this would not be required. Negative (Blk) to Controller from Fuse Panel - 6AWG stepped down to 8AWG flexible power cord. I placed a 10AWG SAE Port on the door side of the trailer to plug in the PV Wires from the Solar Panel and connect to the PV terminals on the controller. NOTE: On a trailer that is solar ready this port is usually for battery power. I placed a 20Amp Resettable Fuse inline (Positive) on this line so I can cut the solar panel power to the controller until plugging in the battery when changing from Lead Acid to Lithium. If no other batteries are used a regular fuse would be suffice. NOTE: Battery wires must be connected to controller prior to connecting solar panel. My Renogy Suitcase came with a 8 foot cord with +/- MC4 connectors on one end and +/- Alligator Clips on the other. When I add charge to my Battle Born Lithium Battery, I unplug the MC4 Connectors connecting the controller to the trailer lead acid batteries and connect the MC4 connectors from the controller to the Renogy Alligator Charging Cord. Lastly, I put 5/8" spacers in behind the Charge Controller mounting screws to pull the controller off the wall and improve air flow around it. |
6 | 08-31-2022 05:06 PM |
|
Rear Propane Outlet
I removed the 3/8" aluminum plug from the Manifold and replaced with a 5 foot line to a rear bulkhead and RV quick disconnect outlet.
|
5 | 07-26-2022 11:18 AM |
This website is not affiliated with or endorsed by Winnebago Industries or any of its affiliates. This is an independent, unofficial site.


