 |
|
 11-11-2010, 06:00 PM
|
#21
|
|
Winnebago Camper
Join Date: May 2010
Location: Edenton, North Carolina
Posts: 40
|
Quote:
Originally Posted by Lt46

When you guys are discussing pulling the furnace... are you talking about pulling the fan cage/exhaust-intake ports etc. out of the metal box it lives in, OR are you talking about pulling the metal box with these components inside?
Here's a picture of mine; what I'm talking about is; on the left side, where gas line and electrical wires are seen, these come through a vented metal box. Is it this metal box that comes out or does the furnace disengage from this box for removal?  |
Lt46, I just read the thread and had a similar problem with a SF42, but mine was mud daubers in the burner chamber. However on removal; #1 A furnace can be removed in it's entirety by unplugging the electrical connector on the left side, shutting of the LP gas at the tank in front and then disconnecting the copper line to the furnace (Lower left side) then remove (2) screws one one the left side and the other on the right side, they will be in an inset at the bottom of the furnace tray. Now you can pull the entire furnace, tray and all out of the MH. #2 You can leave the tray in the MH and simply remove the furnace by removing only one screw in the front lower center of the tray and pulling the furnace only out of the MH. On removal #2 you will be able to get to everything you need to once the furnace is out. Getting it back in presents a little problem, you must make sure that the metal centering tabs on the side of the furnace do not catch on the open vented sides of the tray. A little care and some well placed profanity help in returning the furnace to the MH.
__________________
"The other" George & Barbara, and the 3 Amigo's
Winnebago Adventurer 34V DP
Edenton, N.C.
|

|

|
|
11-11-2010, 06:15 PM
|
#22
|
|
Winnebago Owner
Join Date: Mar 2008
Location: Central Florida
Posts: 169
|
Blueline,
Great description and explanation! Really appreciate the heads-up on # 2 and the reinstall issue. Thank you.
__________________
Peter
1997 F53 Adventurer 37rw
IAFF L-792 (Retired)
|
|
|
|
|
11-11-2010, 07:09 PM
|
#23
|
|
Winnebago Camper
Join Date: Aug 2009
Posts: 22
|
LT46,
Yep, what Blueline said! While fixing my problem, I found the exhaust tube (that's the bottom of the two tubes on the right side) is extremely deteriorated from rust; however the cover tube (can't see that one in your picture) completely slips over the corroded part, but I think it time for a new one. It wouldn't take much before the rust is allowing the exhaust to escape - READ FIRE HAZARD! I found several SF42's online with a WIDE price range. Gotta be careful the SF42 is what I have and what is shown in your pic. There's also a SF42-F which is similar but is not a substitute. The -F model is removed through the inside, where ours is removed from the outside (read that somewhere). I found a new combustion chamber, but it's more than half the price of the complete unit, so since my unit is 14 years old, I'll probably opt for the complete unit.
__________________
2006, Allegro Bay, 38TDB, W24 Chassis
8.1L Vortec. Moved to a Tiffin in 2014!
|
|
|
|
|
11-13-2010, 07:43 PM
|
#24
|
|
Winnebago Camper
Join Date: May 2009
Posts: 13
|
Quote:
Originally Posted by mikwallace
LT46,
Yep, what Blueline said! While fixing my problem, I found the exhaust tube (that's the bottom of the two tubes on the right side) is extremely deteriorated from rust; however the cover tube (can't see that one in your picture) completely slips over the corroded part, but I think it time for a new one. It wouldn't take much before the rust is allowing the exhaust to escape - READ FIRE HAZARD! I found several SF42's online with a WIDE price range. Gotta be careful the SF42 is what I have and what is shown in your pic. There's also a SF42-F which is similar but is not a substitute. The -F model is removed through the inside, where ours is removed from the outside (read that somewhere). I found a new combustion chamber, but it's more than half the price of the complete unit, so since my unit is 14 years old, I'll probably opt for the complete unit.
|
I also had rusted exhaust tubes and the fan motor shaft had to much play to allow the fans to operate. I have found a place with a great price it is AdventureRV.net $659.00 + shipping for the SF-42. Ray.. 
|
|
|
|
|
11-14-2010, 06:27 PM
|
#25
|
|
Winnebago Camper
Join Date: Aug 2009
Posts: 22
|
Quote:
Originally Posted by RJG
I also had rusted exhaust tubes and the fan motor shaft had to much play to allow the fans to operate. I have found a place with a great price it is AdventureRV.net $659.00 + shipping for the SF-42. Ray.. |
Yes, I found that one also. It's not far from where I live - It would make a great 3-day weekend trip to pick it up in person and swap it out there.
Good Luck!!
__________________
2006, Allegro Bay, 38TDB, W24 Chassis
8.1L Vortec. Moved to a Tiffin in 2014!
|
|
|
|
|
11-15-2010, 06:46 PM
|
#26
|
|
Winnebago Camper
Join Date: May 2009
Posts: 13
|
I did contact them before ordering to make sure these prices were for a new furnace and not reconditioned and with warranty, and they are new. I just received mine and see that there is a cabinet front assembly with 3- 4" ducts, whereas the old furnace does not have this, (installed ?) also the top of the cabinet is wedged in behind a piece of wood held with a corner brace and screws, the only access is with a looong ext with a philips head, like 30 ". The other posibilty is to remove the sofa and reach through the fresh air return to get to the screws by brail of course  And it all seamed so easy;.
Oh by the way, just replaced the converter recently here is what was lurking under the old one. my coach is a 94 so beware. Ray.. 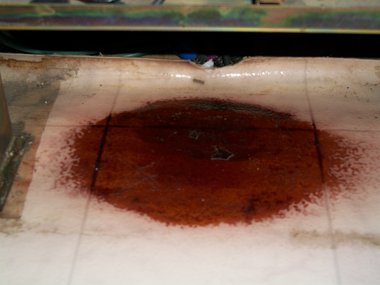
|
|
|
|
|
11-15-2010, 07:10 PM
|
#27
|
|
Winnebago Owner
Join Date: Dec 2001
Location: Gainesville, VA
Posts: 144
|
Make sure you replace the gasket with a new one, don't reuse the old one. It seals out the carbon monoxide exhaust from entering your motor home. 
Best Regards!
__________________
Paul D
2007 Winnebago Journey 39K Freightliner Chassis, Cat C7
|
|
|
|
|
11-16-2010, 05:19 PM
|
#28
|
|
Winnebago Camper
Join Date: May 2009
Posts: 13
|
Quote:
Originally Posted by Old Snipe
Make sure you replace the gasket with a new one, don't reuse the old one. It seals out the carbon monoxide exhaust from entering your motor home.
Best Regards! |
Hello, thanks for the tip, just to be sure, your talking about the air intake and exhaust tube?
the furnace came with a new one of those and the exhaust tube is rivioted on and there appears to be a gasket installed. I was wondering though, if you may have heard of anyone using the side ducts to heat the water and gray & black holding tanks area? although, I would have to plumb it across the basement to get there. any suggestions would be helpfull ( including the new furnace install ) Thanks, Ray..
|
|
|
|
|
11-17-2010, 05:44 PM
|
#29
|
|
Winnebago Owner
Join Date: Dec 2001
Location: Gainesville, VA
Posts: 144
|
No, the gasket between the furnace body where you can see the electrode.
As to heating the basement, the furnace does put out heat that is wasted, but the exhaust is loaded with Carbon Monoxide (CO) and that would kill you if enough got inside your MH. NOT A GOOD IDEA! (I'm not yelling, just emphasizing the very real danger). 
Best Regards!
__________________
Paul D
2007 Winnebago Journey 39K Freightliner Chassis, Cat C7
|
|
|
|
|
11-17-2010, 09:35 PM
|
#30
|
|
Winnebago Camper
Join Date: May 2009
Posts: 13
|
Quote:
Originally Posted by Old Snipe
No, the gasket between the furnace body where you can see the electrode.
As to heating the basement, the furnace does put out heat that is wasted, but the exhaust is loaded with Carbon Monoxide (CO) and that would kill you if enough got inside your MH. NOT A GOOD IDEA! (I'm not yelling, just emphasizing the very real danger).
Best Regards! |
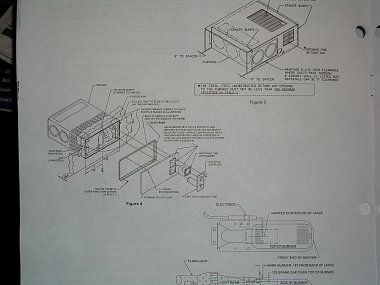
Paul, I appreciate your patience, and I'm thinking I haven't been to clear,( and this is a new furnace) so all gaskets are new, But I want to be sure I do this correct!! I will try to load a couple of pic's and refer to them. on figure (9) part #12 is this the gasket? or figure (10) parts 39 & 57. Also the ducts I was wondering about are on the side of the cabinet figure (3) and duct collar in figure(8) part # (7) to plumb to the tank area. The old furnace and cabinet has a fiberglass type of gasket between the front of the furnace and the ducting for the forced air entry to the coach, the new unit does not have that and the front of the furnace is covered by a plate with three ducts with the covers in place as you can see from the pic's, whereas the old furnace was completely open. I'll have to remove the covers and am wondering if the fiberglass sort of gasket is necessary? in view of the cabinet front assembly. if so I would think they would have included it with the furnace? Thanks again Ray.. 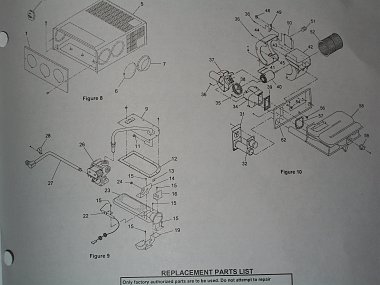
|
|
|
|
|
11-18-2010, 03:15 PM
|
#31
|
|
Winnebago Owner
Join Date: Dec 2001
Location: Gainesville, VA
Posts: 144
|
Yes, that is the gasket in the burner area. That can't be reused and needs to be replaced if you've opened up the area that gives you access to the ignitor.
I see what you were talking about now using the ducts that are closed off to route heat to the tanks. That would work if you can plumb it, but I'd think that maybe that would cut hot air flow to the ducts into your MH.
What I misunderstood was I thought you were looking at using the hot burner exhaust to plumb to the tank area, that's where the CO would come from.
It will be interesting to see how your plans work out, in theory it makes sense. Cost wise, have you looked into tank heating pads and heat tape on the exposed water lines.?
By posting the pictures it helped me to understand what you meant. Good luck and keep us posted on how everything works out.
Best Regards!
__________________
Paul D
2007 Winnebago Journey 39K Freightliner Chassis, Cat C7
|
|
|
|
|
11-18-2010, 06:58 PM
|
#32
|
|
Winnebago Camper
Join Date: Aug 2009
Posts: 22
|
The ductwork on my '96 Adventurer runs from front to rear along the center of the basement with registers coming off the duct through the floor to heat the living area. My ductwork has a 3/4" hole in each basement compartment that allows heat to enter the basement. Inadvertently found this out last winter while messing around one of the storage areas and the heat came on and the hot air hit me in the face!!
__________________
2006, Allegro Bay, 38TDB, W24 Chassis
8.1L Vortec. Moved to a Tiffin in 2014!
|
|
|
|
|
11-18-2010, 07:01 PM
|
#33
|
|
Winnebago Camper
Join Date: Aug 2009
Posts: 22
|
Quote:
Originally Posted by RJG
I did contact them before ordering to make sure these prices were for a new furnace and not reconditioned and with warranty, and they are new. I just received mine and see that there is a cabinet front assembly with 3- 4" ducts, whereas the old furnace does not have this, (installed ?) also the top of the cabinet is wedged in behind a piece of wood held with a corner brace and screws, the only access is with a looong ext with a philips head, like 30 ". The other posibilty is to remove the sofa and reach through the fresh air return to get to the screws by brail of course And it all seamed so easy;.
Oh by the way, just replaced the converter recently here is what was lurking under the old one. my coach is a 94 so beware. Ray.. Attachment 6661 |
Yes, I found the same under my converter. There's a thread somewhere on this forum with my pictures. Looks similar to yours!!
__________________
2006, Allegro Bay, 38TDB, W24 Chassis
8.1L Vortec. Moved to a Tiffin in 2014!
|
|
|
|
|
11-19-2010, 05:51 PM
|
#34
|
|
Winnebago Camper
Join Date: May 2009
Posts: 13
|
Quote:
Originally Posted by mikwallace
Yes, I found the same under my converter. There's a thread somewhere on this forum with my pictures. Looks similar to yours!!
|
Fortunate, we are to discover this before a disaster!!
I was wondering if it wouldn't be better to drill a hole out at the locations of the holding tanks bay, otherwise I will have to cross a storage bay with the duct to get to the holding tanks, but I wasn't sure what size hole and weather to attach a duct collor and a way to close it. seams like extra work for something I would only be using when its cold anyway, so the hole in yours is 3/4" sounds like it could work. Thanks !!
On another note, I was thinking of making a new post to inquire about the new furnace I purchased SF-42 and the installation, because of the old furnace and the way it was installed,IE, the front cabinet assembly in particular, the pictures I posted in the previous threads, show the new furnace with the front cabinet assem and 3 ducts still closed, to be removed, the old cabinet has no front cover and is open to the plenum with a fiberglass type gasket, so I have been curious if anyone else has experienced this with their furnace set u? possibly someone has modified it to obtain more heat or to keep the temp cooler in the cabinet, also there is a on/off rocker switch in the furnace cabinet where it appears that the thermostat wires (blue ) are connected and then to the circuit board and the other somewhere to the rear, so I am trying to figure how to wire to the old connector with the two blue wires one has a white piece of plastic with++++ on it thinking that is hot it ties to the circuit board, but on the thermostat there is a on switch a temp setting, guessing again that the ++ wire will control the on/off although I havent traced those wires there yet. AS YOU AN SEE ELEC IS NOT MY THING!! any help will greatly be appreciated, and sorry for the book here.. Ray..
|
|
|
|
|
11-20-2010, 07:49 AM
|
#35
|
|
Winnebago Camper
Join Date: May 2009
Posts: 13
|
Quote:
Originally Posted by Old Snipe
Yes, that is the gasket in the burner area. That can't be reused and needs to be replaced if you've opened up the area that gives you access to the ignitor.
I see what you were talking about now using the ducts that are closed off to route heat to the tanks. That would work if you can plumb it, but I'd think that maybe that would cut hot air flow to the ducts into your MH.
What I misunderstood was I thought you were looking at using the hot burner exhaust to plumb to the tank area, that's where the CO would come from.
It will be interesting to see how your plans work out, in theory it makes sense. Cost wise, have you looked into tank heating pads and heat tape on the exposed water lines.?
By posting the pictures it helped me to understand what you meant. Good luck and keep us posted on how everything works out.
Best Regards!
|
Hi Paul,
I did look into the heating pads for the tanks and found those to be starting around $100.00 and up, depending on the size of the tanks, then x's three, am hoping I could do it less expensive, initially anyways, LPG vs ELEC ?? who knows in the end. the heat tape for sure though, Thank you for your suggestions, still have questions about the install as you may see from my prior post. Thanks again, Ray..
|
|
|
|
|
11-21-2010, 07:01 PM
|
#36
|
|
Winnebago Master
Join Date: Sep 2007
Posts: 724
|
Quote:
Originally Posted by RJG
Hi Paul,
I did look into the heating pads for the tanks and found those to be starting around $100.00 and up, depending on the size of the tanks, then x's three, am hoping I could do it less expensive, initially anyways, LPG vs ELEC ?? who knows in the end. the heat tape for sure though, Thank you for your suggestions, still have questions about the install as you may see from my prior post. Thanks again, Ray..
|
in '06 shortly after i purchased my moho, i installed 3 inside-outside wired temp gauges from harbor freight.  if i had to do it again i would go with wireless gauges. 
i found that the forward water tank-pump-heater compartment maintains above freezing temps if i keep either the electric or propane water heater on. i usually use the electric element.
the center water tank compartment is ok too. it gets some heat from the water heater and kitchen cabinet area. it is only a few degrees cooler that the fwd compartment.
the aft water service compartment needs a little supplemental heat if the temps get much below 30 deg. i use a 100w light bulb in a trouble light for this purpose. 
i disconnect and blow the fresh water hose and stinky slinky out with compressed air if the temps are forecast to be below freezing as they were last night and are again tonight.
we use 3 small electric space heaters usually set on 750w inside the moho to keep us toasty. 2 heaters work well until it gets below 40 deg.
__________________
01 WINNEBAGO 35U W20.8.1L SW Wa, Hi. Good Sam, SKP. AMSOIL fluids. BANKS ecm program. SCAN GAUGE II w/ Ally temp. 2 LIFELINE GPL-6CT AGM Batts on their sides. TST tptts. K&N panel air filter. AERO mufflers. TAYLOR plug wires. ULTRA POWER track bar. KONI fsd shocks, toad '14 smart car
|
|
|
|
|
11-21-2010, 09:36 PM
|
#37
|
|
Winnebago Camper
Join Date: May 2009
Posts: 13
|
Quote:
Originally Posted by DAN L
in '06 shortly after i purchased my moho, i installed 3 inside-outside wired temp gauges from harbor freight. if i had to do it again i would go with wireless gauges.
i found that the forward water tank-pump-heater compartment maintains above freezing temps if i keep either the electric or propane water heater on. i usually use the electric element.
the center water tank compartment is ok too. it gets some heat from the water heater and kitchen cabinet area. it is only a few degrees cooler that the fwd compartment.
the aft water service compartment needs a little supplemental heat if the temps get much below 30 deg. i use a 100w light bulb in a trouble light for this purpose.
i disconnect and blow the fresh water hose and stinky slinky out with compressed air if the temps are forecast to be below freezing as they were last night and are again tonight.
we use 3 small electric space heaters usually set on 750w inside the moho to keep us toasty. 2 heaters work well until it gets below 40 deg. |
Hello Dan, Those are some really good suggestions, I hadn't thought about installing temp gauges in the tank compartment  My holding tanks are all in one bay, I have three clamp on lights with 100 watt bulbs that I have had to use to un gell my fuel lines before, I could use those. I have a couple of elec oil type heaters to use inside also. I have recently bought a new furnace and will get that working soon, I'm in NV now and am planing to move to AK in may 2011 it gets cold here, in the teens with wind chill well below that, nothing like AK though! although I don't plan on living in the moho in the winter there because I'll probley end up in the interior Real cold - 50 or so some of the time. anyway thanks for your thoughts I really appreciate it Ray.. 94 Itaska 34' DP
|
|
|
|
|
11-22-2010, 01:44 AM
|
#38
|
|
Winnebago Master
Join Date: Sep 2007
Posts: 724
|
ray,
you're welcome.
__________________
01 WINNEBAGO 35U W20.8.1L SW Wa, Hi. Good Sam, SKP. AMSOIL fluids. BANKS ecm program. SCAN GAUGE II w/ Ally temp. 2 LIFELINE GPL-6CT AGM Batts on their sides. TST tptts. K&N panel air filter. AERO mufflers. TAYLOR plug wires. ULTRA POWER track bar. KONI fsd shocks, toad '14 smart car
|
|
|
|
|
11-27-2010, 11:00 AM
|
#39
|
|
Winnebago Camper
Join Date: Aug 2009
Posts: 22
|

Quote:
Originally Posted by RJG
.....On another note, I was thinking of making a new post to inquire about the new furnace I purchased SF-42 and the installation, because of the old furnace and the way it was installed,IE, the front cabinet assembly in particular, the pictures I posted in the previous threads, show the new furnace with the front cabinet assem and 3 ducts still closed, to be removed, the old cabinet has no front cover and is open to the plenum with a fiberglass type gasket, so I have been curious if anyone else has experienced this with their furnace set u? possibly someone has modified it to obtain more heat or to keep the temp cooler in the cabinet, also there is a on/off rocker switch in the furnace cabinet where it appears that the thermostat wires (blue ) are connected and then to the circuit board and the other somewhere to the rear, so I am trying to figure how to wire to the old connector with the two blue wires one has a white piece of plastic with++++ on it thinking that is hot it ties to the circuit board, but on the thermostat there is a on switch a temp setting, guessing again that the ++ wire will control the on/off although I havent traced those wires there yet. AS YOU AN SEE ELEC IS NOT MY THING!! any help will greatly be appreciated, and sorry for the book here.. Ray.. |
I'm extremely curious as to your progress on the new SF42 installation, and couldn't find your pictures mentioned.
After spending the last week on the road during this Thanksgiving Holiday, my heater has been sporadic at best. I've determined it's either the module board, or a bad ground? I found a link and downloaded the .PDF file to a trouble shooting flow chart from Suburban. I'm not going to spend a lot of manhours on the troubleshooting because I've got to replace the heater due to corroded exhaust tube. I could replace just the combustion chamber, but its $320 + shipping and the whole heater new is about twice that - but then you have a complete new system.
So perhaps, a new thread would be appropriate.
Good Luck!
__________________
2006, Allegro Bay, 38TDB, W24 Chassis
8.1L Vortec. Moved to a Tiffin in 2014!
|
|
|
|
|
11-27-2010, 06:54 PM
|
#40
|
|
Winnebago Camper
Join Date: May 2009
Posts: 13
|
Quote:
Originally Posted by mikwallace
I'm extremely curious as to your progress on the new SF42 installation, and couldn't find your pictures mentioned.
After spending the last week on the road during this Thanksgiving Holiday, my heater has been sporadic at best. I've determined it's either the module board, or a bad ground? I found a link and downloaded the .PDF file to a trouble shooting flow chart from Suburban. I'm not going to spend a lot of manhours on the troubleshooting because I've got to replace the heater due to corroded exhaust tube. I could replace just the combustion chamber, but its $320 + shipping and the whole heater new is about twice that - but then you have a complete new system.
So perhaps, a new thread would be appropriate.
Good Luck!
|
Hello, hope your Thanksgiving was good, I just completed the install and it WORKS!! AH HEAT.  the pics I had been talking about are at the top of the page, just of the furnace parts so Paul could see what I was talking about.
I had to trace the wires on the furnace (blue thermostat) one went to the new on/off switch on the new furnace, the other to the limit switch. if you get the new furnace be sure to save the old wire connector as you will need it to splice to the new furnace. the furnace came with a front assembly on the cabinet and places to knock out three ducts, the old furnace did not have that? so I installed it the way it was without that plate.
Also, the old cabinet was locked in by a piece of wood that the elec ran through, I had to remove the furnace from the cabinet and bend down the top to access the wood held by corner brackets and screws, remove the screws to get it out, after measuring the new cabinet There was no way to get in without raising the wood 1/4", I used self tapping screws with the old brackets in place made the new screw holes just at the top of the bracket it worked out to be the amount I needed and helped with alignment, secured the bracket at the new position and drilled the bottom holes. There is weather striping on the top of the wood that I replaced (a little thinner)
I used (leak lock) joint sealing compound on the gas connection threads, got it from a friend who has a propane company, he said its hard to come by, but you will need something that won't break down with liquid propane, all in all it was not to bad, Hope this helps. For me the new furnace was the way to go being 16 years old and all. Well take care and good luck! Ray..
oh yes, while its removed its a good time to blow out the ducts
|
|
|
|
|
|
|
Currently Active Users Viewing This Thread: 1 (0 members and 1 guests)
|
|
|
 Posting Rules
|
You may not post new threads
You may not post replies
You may not post attachments
You may not edit your posts
HTML code is Off
|
|
|
 Similar Threads
|
| Thread |
Thread Starter |
Forum |
Replies |
Last Post |
|
Furnace
|
Robert Rice |
Winnebago General Discussions |
17 |
12-24-2010 08:18 AM |
|
Heat Pump and Gas Furnace
|
dengraham |
Winnebago General Discussions |
10 |
02-28-2009 01:55 PM |
|
Furnace Smudge
|
traveler of california |
General Maintenance and Repair |
8 |
01-10-2009 05:44 PM |
|
|
» Recent Discussions |
|
|
|
|
|
|
|
|
|
|
|
|
|
|
|
|
|
|
|
|
|
|
|
|
|


 Linear Mode

