 |
 02-12-2023, 09:40 PM
|
#1
|
|
Winnebago Camper
Join Date: Feb 2023
Posts: 7
|
Wet behind toilet wall
My husband saw a streak of brown liquid on the outside compartment door where our tank valves are and the toilet is on the other side of the outside wall above the compartment. He replaced the toilet flange with no change. Now we notice the exterior wall behind the wallpaper and next to the toilet feels damp. What could be leaking and causing this? There is no wetness on the floor just the wall.
|

|

|
|
02-13-2023, 03:12 AM
|
#2
|
|
Winnebago Master
Join Date: Jul 2019
Location: Branson MO area
Posts: 685
|
Welcome to the club. It would be a great help if you would let the folks know what rig you have. I would also suggest that you put the rig info in your signature block so future post we will know the infromation.
This is a way out guess, you might look at the vent tube on the roof. As water never flows up your problem has to be coming from somewhere above the toilet .
Hopefully some folks with more knowledge will help out
__________________
07 Meridian 36G
Roadmaster tow dolly
Great Wife!! & Max the Frisbee chasing dog.
|
|
|
|
|
02-13-2023, 12:23 PM
|
#3
|
|
Winnebago Camper
Join Date: Feb 2023
Posts: 7
|
Wet be all next to toilet
This is an update to my original post. We have a 2095 Winnebago Journey 36 Class A.
As you sit on the toilet the wetness is on the lower part of the wall to the right of the toilet. There is a heavy vinyl wallpaper on the wall.
On the outside of the rig there is a brown streak that shows up starting at the top of the outside door. Behind that door is the compartment that holds the shut off valves for the grey and black tanks.
We have been traveling but will be home in 2 weeks to try to see/fix but any tips are helpful.
My husband will probably watch some You tube videos also.
|
|
|
|
|
02-13-2023, 01:00 PM
|
#4
|
|
Site Team
Join Date: Sep 2009
Location: Spring Branch, TX
Posts: 7,817
|
Maybe you mean a 2005 Journey or something else. Can you set us straight and also, there is a floorplan designation that goes with the 36'. You'll find it on the cover of your Operator's Manual or on the yellow placard on the wall next to the driver's captain's chair.
Here are the possible model numbers for a 2005 Jouney:
Journey
WKP32T
WKP34H
WKP36G
WKP39F
WKP39K
So, just guessing here... maybe you have a 2005 Journey WKP36G????? You tell us.
__________________
2017 Winnebago Adventurer 37F
2016 Lincoln MKX Toad
|
|
|
|
|
02-13-2023, 05:13 PM
|
#5
|
|
Winnebago Camper
Join Date: Feb 2023
Posts: 7
|
Sorry - typo in my post! It is a 2005 Journey, 36, 2 slides on driver side, diesel, 350 Cat engine.
|
|
|
|
|
02-13-2023, 05:19 PM
|
#6
|
|
Site Team
Join Date: Sep 2009
Location: Spring Branch, TX
Posts: 7,817
|
Quote:
Originally Posted by We-us

Sorry - typo in my post! It is a 2005 Journey, 36’, 2 slides on driver side, diesel, 350 Cat engine.
|
So... do you have a 2005 Journey WKP36G???
If so, we can provide a link to your Plumbing diagram of your motorhome. I'd think that might help you.
__________________
2017 Winnebago Adventurer 37F
2016 Lincoln MKX Toad
|
|
|
|
|
02-14-2023, 06:09 AM
|
#7
|
|
Winnebago Camper
Join Date: Feb 2023
Posts: 7
|
I have a WKP36G 2005 Journey Class A diesel.
|
|
|
|
|
02-14-2023, 08:08 AM
|
#8
|
|
Site Team
Join Date: Sep 2009
Location: Spring Branch, TX
Posts: 7,817
|
Thanks for the added detail, this stuff is really necessary for all of us to help you.
Heres the plumbing diagram for your coach this will show you whats running behind those walls.
https://www.winnebago.com/Files/File...p36g_plumb.pdf
__________________
2017 Winnebago Adventurer 37F
2016 Lincoln MKX Toad
|
|
|
|
|
02-14-2023, 10:52 AM
|
#9
|
|
Winnebago Camper
Join Date: Feb 2023
Posts: 7
|
Thank you!
|
|
|
|
|
02-19-2023, 10:29 PM
|
#10
|
|
Winnebago Master
Join Date: Dec 2009
Location: Out there, somewhere
Posts: 1,742
|
We-us,
I just got to this thread. We have a very close sistership to yours. It's an '04 Itasca Horizon 36GD with the CAT C-7 330HP. Now, while we have not had your same problem, I have had to remove the paneling from a wall in the living room to access the plumbing that was so geniously placed there by Winnebago/Itasca. If your plumbing is at least close to ours, what's back there behind or, INSIDE the wall I should say are two valves, one is an anti-siphon valve and the other is a back-flow preventer.
They are both on the same line. I don't like saying all RV's are build alike but, again, if yours is like ours, what those valves and that line is for is this. If you have a BLACK TANK flush system in your wet bay, you'll see a garden hose connection there. It is NOT, REPEAT NOT for general water or water to fill your fresh water tank. That connection is there to hook up a garden hose and if all is working correctly, the water will flow through that plumbing and through those two valves, and then it will enter the black tank via a nozzle mounted on one of the sides of the tank.
It is there to sort of *Power flush* your black tank. It does a fair job at best. I still like using the wand you attach to a hose and stick it down the toilet. To me, that does a way better job of washing all the walls of the inside of that black tank and, that means cleaning the area where the sensors are so they work better.
Now, all this that I'm explaining pertains to using that black tank flush. That system is ONLY in use and uses water under pressure, when you're flushing that tank. If, IF, you don't power flush your black tank, and don't use that system, then all I've just talked about is non important.
In that case, you also have a water supply line for your toilet in that wall, or should be there anyways. Below are some pictures of the inside of that wall I'm speaking of. Now, is yours the exact same, not a clue. But, in one or two of the pictures, you'll see both the black tank flush line with the valves up top of that line. And the other line, way down low by the floor, is the supply line to the toilet. If this is your problem, you may have a crack in that supply line.
I'm just surmising what could be your issue here. Since I've been there-done that on so many things on this coach of ours, I thought I'd throw this at ya just in case it may help.
Scott
__________________
2004 ITASCA HORIZON 36GD, 2011 GMC Sierra 1500 4x4 Toad '08 GL 1800 Gold Wing  Retired-29.5 yrs, SDFD, Ham - KI6OND
Me, Karla and the Sophie character, (mini Schnauzer)
Retired-29.5 yrs, SDFD, Ham - KI6OND
Me, Karla and the Sophie character, (mini Schnauzer)
|
|
|
|
|
02-20-2023, 08:08 AM
|
#11
|
|
Winnebago Master
Join Date: Nov 2018
Location: Pflugerville/Austin, Tx
Posts: 7,497
|
Comparing the places to where the water lines and drains fit, makes me think the first look would be at the vent cap on the roof and how it is sealed.
I don't see any lines close to the outside wall but if the roof vent cap is not sealed I might see it going in there and working it's way over to the sidewall. Is there a slight dome or slope on the roof at that point?
What I see happen is that the water can enter at one spot, land on top of some layer like wood under the fiberglass, etc. and then find no direct way to go inside there, so it moves to the next joint in materials which can be the roof edge. There it can have several different ways to go, forward, back or down!
If we think of the wall as a "sandwich" of several layers, it can choose to go down between any of those layers that has a small space to get down the wall. At some point going down the wall, there will be cracks between sections and it may find that crack and go in, out or over again.
Any windows, doors or joints in the material can let the water change directions, so that it seems to just appear out of nowhere!
But it almost always works it's way down!
Looking at this clip of the water lines on your RV, they are under the floor or more toward the center of the RV than where you see it wet. Only popping up above the floorline where it comes up to the stool. Not wet around the stool or this line?
Click this snip to get a better view. Water lines are drawn as dashed lines and below floor.
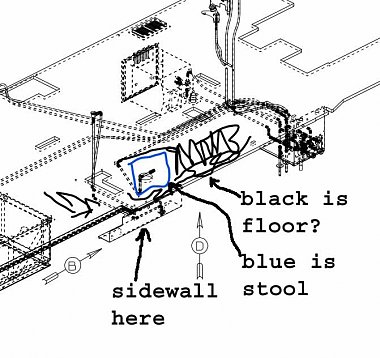
So getting up the wall several inches would depend on wicking and that seems more likely to come out on the floor or be more obvious. Coming down the wall to come out both inside and outside at where two panels meet, seems better idea?
So if there are no openings in the outer wall and your plumbing is below the wet spots, I look above.
The vent and roof edge sealing needs a close look!
EDIT:
I see vacuum breaker as being left of stool with outside wall to right in this view?

__________________
Richard
Why no RV year, make and floorplan on MY signature as we suggest for others?
I currently DO NOT have one! 
|
|
|
|
|
03-25-2023, 06:00 AM
|
#12
|
|
Winnebago Camper
Join Date: Feb 2023
Posts: 7
|
We finally figured out the cause of the wet wall in the toilet room. It is most likely the caulking around the window (outside). We had some dry weather and then rain the wall felt damper when it rained. Unfortunately we realized this on yet another trip and right now driving home with several hours of rain. So once home and hopefully drier weather my husband is going to remove the old caulking and recaulk.
Not sure if we need to replace the wall panel after the fix though.
|
|
|
|
|
03-25-2023, 05:40 PM
|
#13
|
|
Winnebago Master
Join Date: Oct 2017
Location: Elk Grove, CA
Posts: 3,583
|
Quote:
Originally Posted by We-us
We finally figured out the cause of the wet wall in the toilet room. It is most likely the caulking around the window (outside). We had some dry weather and then rain the wall felt damper when it rained. Unfortunately we realized this on yet another trip and right now driving home with several hours of rain. So once home and hopefully drier weather my husband is going to remove the old caulking and recaulk.
Not sure if we need to replace the wall panel after the fix though.
|
I'd seal it temporarily with Gorilla Tape. They make a clear tape that can be applied to wet surfaces:
https://www.gorillatough.com/product...-gorilla-tape/
Even if you can't get to the repair for a while, this should last a good, long time.
__________________
Bob C
2002 Itasca Suncruiser 35U
Workhorse Chassis
|
|
|
|
|
03-26-2023, 09:26 AM
|
#14
|
|
Winnebago Master
Join Date: Nov 2018
Location: Pflugerville/Austin, Tx
Posts: 7,497
|
Quote:
Originally Posted by We-us
We finally figured out the cause of the wet wall in the toilet room. It is most likely the caulking around the window (outside). We had some dry weather and then rain the wall felt damper when it rained. Unfortunately we realized this on yet another trip and right now driving home with several hours of rain. So once home and hopefully drier weather my husband is going to remove the old caulking and recaulk.
Not sure if we need to replace the wall panel after the fix though.
|
Whether and when to repair a wet wall can get to be a real question.
When younger and more ambition as well as broke, we bought and sold a number of used RV and it was always a question when buying or selling.
Did the folks have a leak and they fixed it and replaced the damaged parts? OR did they replace the damage to hide the leak they still have?
No firm answers were ever really reliable, so I tend to deferr the repair until I see FOR SURE that the leak is fixed and not coming back! 
__________________
Richard
Why no RV year, make and floorplan on MY signature as we suggest for others?
I currently DO NOT have one!
|
|
|
|
|
03-26-2023, 11:06 AM
|
#15
|
|
Winnebago Master
Join Date: Aug 2001
Location: North America somewhere
Posts: 2,099
|
Without drying out the interior of the wall, you are risking the probability of mold/mildew forming, plus further wood-rot.
Although it is a lot of work, removing the interior paneling and running a fan on the wet/damp section is recommended. Of course this comes after eliminating leaks.
If you already see mold/mildew, use something like Concrobium mold conttrol to kill and seal the mold after the area is dry.
__________________
2000 Winnebago Ultimate Freedom USQ40JD, ISC 8.3 Cummins 350, Spartan MM Chassis. USA 1SG, retired;PPA,Good Sam Life member,FMCA. "We the people are the rightful masters of both the Congress and the Courts - not to overthrow the Constitution but to overthrow men who pervert the Constitution." Abraham Lincoln
|
|
|
|
|
|
Currently Active Users Viewing This Thread: 1 (0 members and 1 guests)
|
|
|
 Posting Rules
|
You may not post new threads
You may not post replies
You may not post attachments
You may not edit your posts
HTML code is Off
|
|
|
|
 » Recent Discussions
 |
|
|
|
|
|
|
|
|
|
|
|
|
|
|
|
|
|
|
|
|
|
|
|
|
|


 Linear Mode

