 |
|
 05-21-2023, 09:49 AM
|
#1
|
|
Winnie-Wise
Join Date: Oct 2018
Posts: 356
|
Power flush leak 2012 Itasca Suncruiser 37F
I own a 2012 Itasca Suncruiser 37F. It has a blackwater leak that only occurs when the power flush in the rear bath is used. The leak occurs almost directly under the front toilet. As near as I can figure, the black tank is in that location. My guess is that the drain line from the rear toilet is cracked or come loose, where it enters the black tank. Fluid leaks every time the rear toilet is flushed but never when the front toilet is flushed. The rear is a power flush and the front is just a gravity flush. Unfortunately, the water heater is under that location. I originally thought it was a water heater leak. I have no idea as to how to get access to the black tank. My temporary work around is to not use the rear toilet. Any ideas or suggestions?
EDIT: I just noticed the diagram that Moriches added to rtwright68's thread. I think that my setup may be simular and am wondering if slowly dropping a long rod down from the roof vent might eliminate any blockage at the 90 degree angle, where the rear toilet sewer line enters the black tank. There really shouldn't be much pressure from the power flush at that point unless there is a roof vent or sewer line blockage.
|

|

|
|
05-21-2023, 05:44 PM
|
#2
|
|
Winnebago Master
Join Date: Nov 2018
Location: Pflugerville/Austin, Tx
Posts: 7,501
|
Good job getting all the small points of the problem spelled out! But then I need to check!
I think this may turn out to be one of those things that is "so simple" to look at but may be lots harder to actually fix??
Tell me if this sounds /looks like what you are seeing!
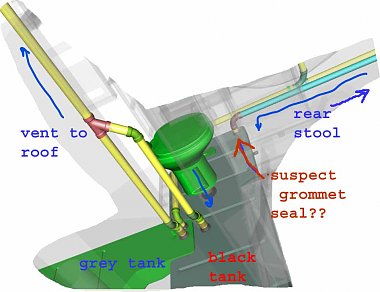
You have the rear stool and when flushing it at point 1, it leaks at point 2?
Click these snips to get a better/larger view!
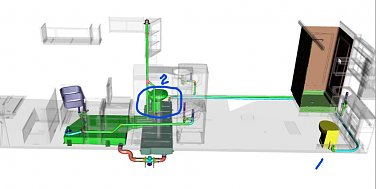
So if we turn it up and look from under side, the line seems to run pretty direct across the rear and up the side to drop into the tank.
I'm thinking about the only way for it to get out of that pipe is at the top of the black tank? And if I look at that part, it shows as a "grommet" and the parts list shows a clear seal???
I'm thinking it "could " be a glue joint at that elbow but then I first think of the "clear seam seal" as some form of caulking and lots more suspect?
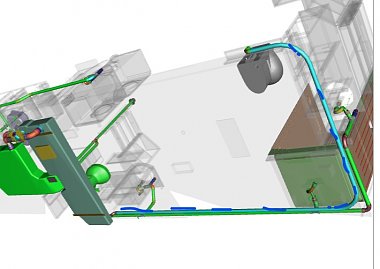
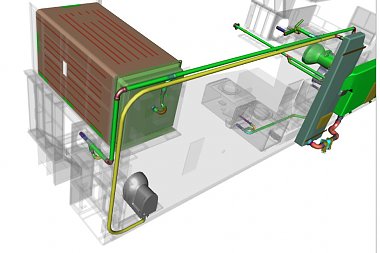
Another view of more of the tanks, etc. shows not much help on going to the roof vent, etc as the black and grey use a combined vent and getting it cleared doesn't look like where the black from the rear runs into the tank??
The big hurt is that it looks like a real trick to get hands on the seal to do anything with it?? Getting to it from above? Not likely to be an easy one!!
But then I may be really bumming it as there might be some form of lightweight panel that could be taken off inside for access?
This drawing look leaves lots of things you may be able to spot that are not shown on paper?? 
Any chance that elbow might be just below the bottom of a section of vanity? Maybe a small access panel left in that area to work it from above?
Wishfull thinking? 
__________________
Richard
Why no RV year, make and floorplan on MY signature as we suggest for others?
I currently DO NOT have one! 
|
|
|
|
|
05-21-2023, 06:15 PM
|
#3
|
|
Winnie-Wise
Join Date: Oct 2018
Posts: 356
|
Directly beside the commode shown in your last diagram, there is a magazine rack access panel. When removes, all that is there is outside TV wiring. To the right of that is the sink vanity. I have not attempted to remove it's bottom because I suspect that there if flooring below it. Your vent diagram appears accurate because there is no roof vent directly above that location. The vent is near the center of the coach. I'm still thinking a blockage at the 90 degree drop into the tank. If waste was in that long run and left to dry in the off season, it would become a solid that could not make the 90 degree turn. I'm thinking, flush the power flush toilet, let it sit for a week and then flush again. Repeat and see if leak eventually goes away. It's a long shot but better than ripping up flooring.
EDIT: As stated earlier, there should be very little drain line pressure at the tank unless the drain line or vent is blocked.
|
|
|
|
|
05-21-2023, 07:02 PM
|
#4
|
|
Winnebago Master
Join Date: Nov 2018
Location: Pflugerville/Austin, Tx
Posts: 7,501
|
Sounds right and ripping out the floor is way out there!
One idea that might also be considered is something we used on a mobile home on septic.
It was a weekend place and drains were really slow but we used a granule emzyme and added if down the stool when we left each week. It did not kill the septic bacteria but it seemed to settle in low spots and that was where the drains tried to stop up. Given time the bacteria in the cleaner set, multiplied and fed on the junk in the pipes.
When we remodeled and built on so that we cut several drain lines, I was amazed at how clean they were! Being a former rental owner, I've looked in way too many drain lines!
No specific brands to recommond but maybe just try one that looks good?
Most anything looks better than tearing up the floor! But also look carefull for any cuts in the floor under that vanity as we did not find the flap until I had wires to run in the area on our RV. It had sides which were cut at angles so that it just dropped in and had no fasteners to hold it nor for me to find!
A different thought while setting here?
Any chance of a tower of yuck built up where it drops into the tank and the tower is blocking the inlet pipe?
Looking at the drawing, any chance of using a wand to shoot water over there to try to move any tower over and out the drain?
I have one something like this and hooked to a hose, it gets pretty good pressure that I can aim in the right general direction. Stuck down the stool, maybe?
https://www.homedepot.com/p/Sun-Joe-...E&gclsrc=aw.ds
Maybe better than some other ideas I've mentioned?
__________________
Richard
Why no RV year, make and floorplan on MY signature as we suggest for others?
I currently DO NOT have one!
|
|
|
|
|
05-22-2023, 10:42 AM
|
#5
|
|
Winnie-Wise
Join Date: Oct 2018
Posts: 356
|
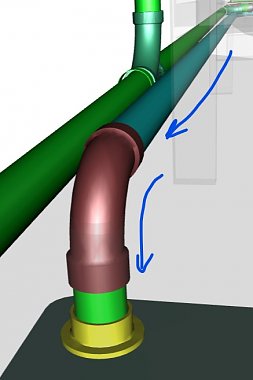
Morich: Thank you for the diagrams. They prompted me to remove the magazine rack beside the front toilet and take another look. I have found the problem. Looking at your 3rd diagram, there is a joint right before the sewer line makes a 90 degree down into the black tank. (Where your 2 arrows meet). That joint has become disconnected. It is my guess is that it was NEVER glued and took 11 years to vibrate loose. It won't be easy to fix. May have to cut a hole in the back of the vanity and then cover it with a screwed down panel.
Sorry that my picture isn't very good but it is a difficult location.
|
|
|
|
|
05-22-2023, 11:12 AM
|
#6
|
|
Winnebago Master
Join Date: Nov 2018
Location: Pflugerville/Austin, Tx
Posts: 7,501
|
Yep! I see the gap! That is one of those things we like to think will not happen but life has a way of sneaking up on us.
Good deal to find it but the fix does look awkward!
Step one is finding the trouble, then we get into the fix and that can be a bear at times.
But you have moved the ball down the field! Congrats!
__________________
Richard
Why no RV year, make and floorplan on MY signature as we suggest for others?
I currently DO NOT have one!
|
|
|
|
|
05-22-2023, 11:44 AM
|
#7
|
|
Winnie-Wise
Join Date: Oct 2018
Posts: 356
|
The picture doesn't make the distance between the pipe and the 90 degree elbow look very big but it is over an inch. I could barely grab the pipe with my left hand but was unable to budge it. I went to the back storage compartment and there is 10"panel in the roof. I hope that I can get some leverage on the pipe from there. That access is for the shower drain, so I may be out of luck. Looks like it may be a 2 man operation. We have rain clouds coming in, so I think I am done for the day.
|
|
|
|
|
05-23-2023, 06:50 AM
|
#8
|
|
Winnie-Wise
Join Date: Oct 2018
Posts: 356
|
After sleeping on this, it occured to me that the sewer line is on top of the flooring, so after passing beneath the vanity it has to pass under the head of the bed frame. That means that if I remove the mattress and plywood sheet underneath it a long length of the pipe should be exposed. That would make it possible for one person to move the pipe toward the 90 degree elbow, while a second person guided it into the elbow. Since I can grab the end of the pipe, I should be able to sand it clean and apply PVC cement. I'll have to wait until my son visits, but I think that I've got this figured out.
|
|
|
|
|
05-23-2023, 07:36 AM
|
#9
|
|
Winnebago Master
Join Date: Nov 2018
Location: Pflugerville/Austin, Tx
Posts: 7,501
|
An alternate to having to move the pipe?
IF (big IF?) you can get to the end of the pipe to clean and prep, what about adding a fitting between the pipe end and elbow? The fitting will often add an inch osr os to the length and it might also let you cut the end back to get into good solid pipe. Big question of how much you can get to the pipe????
That looks like PVC to ABS elbow? Does that mean they may not have used the right solvent and that made it come apart ? But looking closer, that el end looks "funny". What type fitting is that? Grommet at the end? Weird RV only special thing??
Sometimes we just have to get there to see what we really have and go from there!
When done right and it welds together, I just don't try to get them apart! I've forgotten all I knew about which solvent for which material but do remember there is some difference!
__________________
Richard
Why no RV year, make and floorplan on MY signature as we suggest for others?
I currently DO NOT have one!
|
|
|
|
|
05-23-2023, 07:49 AM
|
#10
|
|
Winnebago Master
Join Date: Nov 2018
Location: Pflugerville/Austin, Tx
Posts: 7,501
|
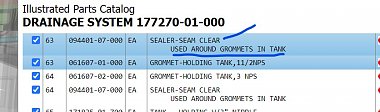
Looking for what material the el? I get this as the part number but little info other than "plastic":
ELBOW-PLAS-1/4BD 11/2X90 XLT
010008-01-000
I find the XLT is extra long turn.
But 1/4 BD is a mystery to me?? Quarter bend but they already show that with putting in the 90 at the end? Not finding any online to get more info either!
May be RV weird is involved here!
__________________
Richard
Why no RV year, make and floorplan on MY signature as we suggest for others?
I currently DO NOT have one!
|
|
|
|
|
05-23-2023, 08:29 AM
|
#11
|
|
Winnie-Wise
Join Date: Oct 2018
Posts: 356
|
Quote:
Originally Posted by Morich

But looking closer, that el end looks "funny". What type fitting is that? Grommet at the end? Weird RV only special thing!
|
The end of the elbow looks funny because it is black and there is a black rubber strap/clamp attaching it to the floor. The poor lighting makes it appear to be part of the elbow. It may actually be part of the elbow and may explain the BD in the part number. If the parts list doesn't show a clamp, it is part of the elbow.
EDIT: Those white water lines in the picture are flexible plastic, so I can probably temporarily disconnect them to make more room to work.
|
|
|
|
|
05-23-2023, 08:46 AM
|
#12
|
|
Winnie-Wise
Join Date: Oct 2018
Posts: 356
|
Quote:
Originally Posted by Morich
That looks like PVC to ABS elbow? Does that mean they may not have used the right solvent and that made it come apart ?
|
I'm thinking that they used the wrong type of pipe. In the picture, the black pipe running parallel to the pipe is the grey water drain pipe from the rear bath. It is black but the black water pipe is white PVC.
|
|
|
|
|
05-23-2023, 09:15 AM
|
#13
|
|
Winnebago Master
Join Date: Nov 2018
Location: Pflugerville/Austin, Tx
Posts: 7,501
|
More questions than answers when looking at WHY!
Looks like they had some concern about the solid waste if using fittings and normal ABS as they describe this pipe as pipe-flexible and no fittings, but the grey from the shower, etc is just ABS using elbow fittings at corners.
Seems so little difference that I would have expected to find either flex on both as less cutting and fitting parts together or ABS on both. There is "some" advantage of no seams for waste to collect on but that seems kind of overworking the idea to me.
But "Pipe-flexible" does little to tell us what solvent to use and maybe they did not get the right answer when they built it??
Digging deep enough you find some weird stuff!
But then when you are looking at getting it pulled back to fit, the flexible may mean it moves easier---if you can get a grip? 
EDIT:
I'll stop bugging you with the questions and let you get to work. You have things to figure out!!
__________________
Richard
Why no RV year, make and floorplan on MY signature as we suggest for others?
I currently DO NOT have one!
|
|
|
|
|
05-23-2023, 10:17 AM
|
#14
|
|
Winnie-Wise
Join Date: Oct 2018
Posts: 356
|
Your discovery that it is flexible tubing answers some questions of mine. I wouldn't expect ridged pipe to pull back as much as it did. Being flexible, it is probably more elastic and if it was stretched during installation it would put a constant pull/tension on the joint with the 90 degree elbow.
I won't be working on it for several weeks, because I see it as a 2 man operation and my son won't be here until the second week of June. Hopefully, when I get under the bed I'll find some labeling on the pipe that will give me a hint as to what solvent/adhesive to use. I also intend to clamp down the tubing, so it won't put pull/tension on the 90 degree elbow.
Thanks for all the help.
|
|
|
|
|
05-23-2023, 01:19 PM
|
#15
|
|
Winnie-Wise
Join Date: Oct 2018
Posts: 356
|
I couldn't get the problem out of my head, so I went out and removed the vanity floor. I could get a better grip on the drain line but still could not move it enough to mate with the 90 degree elbow. A short extension may be necessary after all. The tubing appears to be the same as the flexible PVC tubing used on hot tubs.
|
|
|
|
|
05-23-2023, 03:16 PM
|
#16
|
|
Winnebago Master
Join Date: Nov 2018
Location: Pflugerville/Austin, Tx
Posts: 7,501
|
Gulp!!
What does one use to go inside an ABS el and outside a flexible tube and what to "glue " them together??
I've never tried to solvent weld a flex pipe!
There must be something but it's not one I've tried! Maybe we've just been lucky and never had to ask before?
Flex seems to call for bputting something inside the flex but then you make a potentail spot for waste to hang on that inside lip, so better to put the upstream end inside any added parts? But then you can't use something like screw clamp on the outside of a solid fitting?
It started as looking like a problem to get to it but once you've worked around that, the simple question of what to use to get it back together seems to get harder!
BAH!
__________________
Richard
Why no RV year, make and floorplan on MY signature as we suggest for others?
I currently DO NOT have one!
|
|
|
|
|
05-23-2023, 03:34 PM
|
#17
|
|
Winnie-Wise
Join Date: Oct 2018
Posts: 356
|
I think that I have got this. Hot tub manufacturers bond to flex tubing all the time and spa jets have considerably more constant pressure than a drain line. I noted that Winnebago didn't use and purple primer. That leads me to believe that they didn't use the proper solvent/glue either. I have decided to add a short extension to the flush line, because I don't want constant tension/pull on the joint. I have the components ready to go. Just need to get down to the clean up/prep and dry fitting trial.
|
|
|
|
|
05-23-2023, 04:41 PM
|
#18
|
|
Winnebago Master
Join Date: Nov 2018
Location: Pflugerville/Austin, Tx
Posts: 7,501
|
Have to agree on all points.
I had not thought about the hot tubs!
If you are getting more pressure than that on this drain line, change your eating habits!!!!
__________________
Richard
Why no RV year, make and floorplan on MY signature as we suggest for others?
I currently DO NOT have one!
|
|
|
|
|
05-28-2023, 05:20 PM
|
#19
|
|
Winnebago Owner
Join Date: Oct 2019
Location: Conway,Sc.
Posts: 83
|
Interesting read and one that Ill be taking a look at. Wish Id have read this last weekend when I had the 1/2 bath toilet pulled to replace the seals, would have been easier to get my old neck into the magazine rack access hole. On a related note of flex piping, its used on your kitchen sink drain which I discovered after finding water running out from under the sink cabinet. I used that glue, several wraps of plumbers repair tape and cinched the two together with Ty-raps. The pie pan was there from the P.O. apparently to remedy a slow leak.
__________________
2011 Winnebago Adventurer 37F
2018 Chevy Equinox
|
|
|
|
|
05-28-2023, 05:57 PM
|
#20
|
|
Winnie-Wise
Join Date: Oct 2018
Posts: 356
|
I still haven't fixed the drain line. I put a 1 1/2 inch extension on the 90 degree elbow but now the flex line needs to be pulled back about 3/4 inch, glue applied and then slipped into the elbow extension. To pull the line back, I'll need to get under the bed, where I can get a better grip on it. The line may even be attached down, under the bed. It appears that the flex line must shrink with age. It was out of the 90 degree elbow by about 1 1/2 inches and couldn't be stretched back. It'll be a 2 man operation. One person moving the hose and the other guiding it into the elbow extension.
|
|
|
|
|
|
|
Currently Active Users Viewing This Thread: 1 (0 members and 1 guests)
|
|
|
 Posting Rules
|
You may not post new threads
You may not post replies
You may not post attachments
You may not edit your posts
HTML code is Off
|
|
|
|
 » Recent Discussions
 |
|
|
|
|
|
|
|
|
|
|
|
|
|
|
|
|
|
|
|
|
|
|
|
|
|


 Linear Mode

