 |
|
 05-18-2022, 08:39 PM
|
#61
|
|
Winnie-Wise
Join Date: Mar 2018
Posts: 344
|
Quote:
Originally Posted by edju

Just curious, what did you end up doing?
|
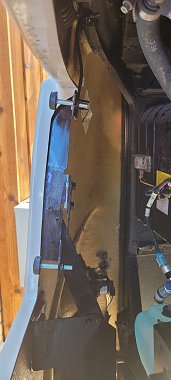
Screws and nuts, see post #55 above for pics. I wanted a more permanent solution.
Finally got my touch-up paint sorted out. Both Winnebago's paint guide and Lichtsinn parts show the front cap color as taupe, which is too light. I got a bottle of mocha from paintscratch.com and it's a perfect match.
__________________
2015 Vista 27N
|

|

|
|
05-19-2022, 09:07 AM
|
#62
|
|
Winnebago Owner
Join Date: May 2020
Posts: 180
|
wyocamper - great find on the paint.
Your unit has a darker color than some other Vista's. I like the two-tone of your unit
My 2017 Vista 29ve is likely the champagne or beige. The front cap is the same as the sides (more or less).
__________________
2017 Winnebago Vista 29ve
|
|
|
|
|
05-25-2022, 07:26 PM
|
#63
|
|
Winnebago Watcher
Join Date: May 2022
Posts: 1
|
Hood Latch bracket
Checking fluids on my 2017 Sightseer and driver side hood latch bracket fell off. Appreciate others posts about this issue. Hopefully dealer/repair shop will get fix right. Feels like it should have been a recall. I have had a large number of manufacturing quality/design issues with my rig.
|
|
|
|
|
06-20-2022, 07:44 PM
|
#64
|
|
Winnebago Master
Join Date: Jun 2020
Location: Dallas, Texas
Posts: 1,051
|
How is it that I have NEVER seen this thread, until today while searching for Hood Brackets 
I just returned from a trip Houston to Dallas and I lost my passenger side bracket and one of the metal bumpers on the driver side was loose enough that I removed it by hand.
Had I known about this I would have made it a routine check while I check oil.
I have 2019 29VE.
This thread has me scared, I really can't imagine having to drill holes in the fiberglass? From just looking at it, I think Winnebago just did not use enough epoxy. I believe it is suppose to ooze through the holes and make mechanical seal / clamp to the the fiberglass wall.
I am waiting on my parts; a hood bracket and 2 stops.
What kind of price should I expect to pay a RV Dealer or Service Repair Facility to reinstall and to cover the driver side with even more epoxy?
I am in Dallas area (Carrollton). I have excellent repair center, but they are 1 1/2 hours away, and I don't want to drive that far with a loose hood.
All ideas are welcome, but just understand the screws and bolts just scare me (especially the grill). My RV is 3 1/2 years old.
__________________
2019 Sunstar 29ve; Toad Lincoln Navigator; RVi Brake 3; Roadmaster Nighthawk 676; Sumo Springs; Safe T Plus; Onan EC-30 AGS; Vmax 250ah AGM; T-Mobile Internet; Southwire EMS 44270/34951 Display 40301; Jet Flo Macerator; Alpine SPE500 Speakers; Visio M21D-H8R
|
|
|
|
|
06-20-2022, 08:10 PM
|
#65
|
|
Winnebago Master
Join Date: Nov 2011
Location: Full time RV'er
Posts: 1,177
|
Quote:
Originally Posted by dkoldman
How is it that I have NEVER seen this thread, until today while searching for Hood Brackets
Snip
All ideas are welcome, but just understand the screws and bolts just scare me (especially the grill). My RV is 3 1/2 years old. |
I don't understand why a couple screws would scare you. If you've ever seen fiberglass repaired, a tiny screw hole is nothing to a pro. Instead of worrying about things falling off, just drill a small hole in the fiberglass, add a stainless flat washer, a plastic insert lock nut, to either a stainless button head screw or a flathead screw. Nothing to it, and you can get any holes patched at your leisure by a fiberglass pro after re-epoxying brackets (not recommended as it's already shown that it fails) without having to drive 1.5 hours to do it. And yea, if you have a shop reset those brackets with epoxy, you'll have to worry about them breaking free again sometime down the road, while it costs you $125/hr to do so.
Here's my ad free blog link for the reasonable method of a couple screws holding each bracket when needed: Body work...front
And: Body work...rear
But, to each their own...
|
|
|
|
|
06-20-2022, 09:07 PM
|
#66
|
|
Winnie-Wise
Join Date: Mar 2018
Posts: 344
|
I used a 5/32 high speed drill bit and a cordless impact driver (much smaller than my cordless driver/drill) and drilled from the inside out, being careful to not push too hard out of concern that it might cause a "blow-out" chip on the outside. An 8-32x1" pan-head screw and small washer on the outside, a 1" fender washer and another small washer on the inside, and a nyloc hex nut. All stainless steel. It's much easier to get to if you remove the hood panel entirely. Now I don't have to worry about the resin failing again.
__________________
2015 Vista 27N
|
|
|
|
|
06-20-2022, 10:25 PM
|
#67
|
|
Winnebago Owner
Join Date: Jun 2020
Posts: 186
|
Quote:
Originally Posted by dkoldman
How is it that I have NEVER seen this thread, until today while searching for Hood Brackets
I just returned from a trip Houston to Dallas and I lost my passenger side bracket and one of the metal bumpers on the driver side was loose enough that I removed it by hand.
Had I known about this I would have made it a routine check while I check oil.
I have 2019 29VE.
This thread has me scared, I really can't imagine having to drill holes in the fiberglass? From just looking at it, I think Winnebago just did not use enough epoxy. I believe it is suppose to ooze through the holes and make mechanical seal / clamp to the the fiberglass wall.
I am waiting on my parts; a hood bracket and 2 stops.
What kind of price should I expect to pay a RV Dealer or Service Repair Facility to reinstall and to cover the driver side with even more epoxy?
I am in Dallas area (Carrollton). I have excellent repair center, but they are 1 1/2 hours away, and I don't want to drive that far with a loose hood.
All ideas are welcome, but just understand the screws and bolts just scare me (especially the grill). My RV is 3 1/2 years old. |
I checked mine after the first time I read the thread. I saw lots of epoxy, squeezing out the holes/slots. Then on I-10 in West Texas a really loud bang and Jump like we ran over something big happened. Couldnt see anything, but the lower stair was bent, and the exhaust pipe had a nice crease in it. Was opening the hood to check for a leak, and it was the passenger side bracket gone, which is what we ran over.
This is a design flaw, and is dangerous. Should be a recall. We are lucky it didnt blow out the rear tire at speed.
__________________
2020 Winnebago Vista 29V
San Francisco Bay Area
|
|
|
|
|
06-21-2022, 06:06 PM
|
#68
|
|
Winnebago Master
Join Date: Jun 2020
Location: Dallas, Texas
Posts: 1,051
|
Quote:
Originally Posted by Jim_HiTek
I don't understand why a couple screws would scare you. If you've ever seen fiberglass repaired, a tiny screw hole is nothing to a pro. Instead of worrying about things falling off, just drill a small hole in the fiberglass, add a stainless flat washer, a plastic insert lock nut, to either a stainless button head screw or a flathead screw. Nothing to it, and you can get any holes patched at your leisure by a fiberglass pro after re-epoxying brackets (not recommended as it's already shown that it fails) without having to drive 1.5 hours to do it. And yea, if you have a shop reset those brackets with epoxy, you'll have to worry about them breaking free again sometime down the road, while it costs you $125/hr to do so.
Here's my ad free blog link for the reasonable method of a couple screws holding each bracket when needed: Body work...front
And: Body work...rear
But, to each their own... |
Thanks. I will take under advisement. It scares me because I believe every man must realize his own limitations. Drilling hole in my RV actually frightens me the more I believe it is something than is expected of most anyone? I have done a lot of stuff on my RV, but unless I have qualified service center that will do the screw mounting, it likely will not happen for me. I am not sure I would even try the epoxy?
__________________
2019 Sunstar 29ve; Toad Lincoln Navigator; RVi Brake 3; Roadmaster Nighthawk 676; Sumo Springs; Safe T Plus; Onan EC-30 AGS; Vmax 250ah AGM; T-Mobile Internet; Southwire EMS 44270/34951 Display 40301; Jet Flo Macerator; Alpine SPE500 Speakers; Visio M21D-H8R
|
|
|
|
|
06-21-2022, 06:16 PM
|
#69
|
|
Winnebago Master
Join Date: Jun 2020
Location: Dallas, Texas
Posts: 1,051
|
Quote:
Originally Posted by sundog964
I checked mine after the first time I read the thread. I saw lots of epoxy, squeezing out the holes/slots. Then on I-10 in West Texas a really loud bang and Jump like we ran over something big happened. Couldnt see anything, but the lower stair was bent, and the exhaust pipe had a nice crease in it. Was opening the hood to check for a leak, and it was the passenger side bracket gone, which is what we ran over.
This is a design flaw, and is dangerous. Should be a recall. We are lucky it didnt blow out the rear tire at speed.
|
So what are you saying occurred? Did the epoxy that was in the holes break or shear off? Did the epoxy come off the fiberglass?
I wish I had known about this to look before hand  But from what I can see it looks like it is more of a quality of manufacturing issue than a design flaw? I don't see how it is possible to come off if the epoxy has been applied liberally and the bracket sits down inside of the epoxy. It basically should clamp the bracket against the wall of epoxy.
Seems like if it were a recall, the fix would be apply the same epoxy completely over the bracket. There would never be need to remove it.
I have to wait to get the parts. When I do, I will have to check with a few service centers to see what they can do or recommend. I will not rule out screws if I can have it done professionally. I would want the final product to look better than what it does now.
__________________
2019 Sunstar 29ve; Toad Lincoln Navigator; RVi Brake 3; Roadmaster Nighthawk 676; Sumo Springs; Safe T Plus; Onan EC-30 AGS; Vmax 250ah AGM; T-Mobile Internet; Southwire EMS 44270/34951 Display 40301; Jet Flo Macerator; Alpine SPE500 Speakers; Visio M21D-H8R
|
|
|
|
|
06-21-2022, 06:28 PM
|
#70
|
|
Winnebago Master
Join Date: Nov 2011
Location: Full time RV'er
Posts: 1,177
|
Mine is a '02, and the Winnebago factory process was the same back then as it is now. Really don't thing they are going to change. In addition, it's rare that in 19 years of following and reading about these Winnies have I heard of anyone loosing a piece off their RV so a recall of millions of big RV's isn't likely. I said 'rare' but it does happen as someone in this tread just lost a bracket onto the road somewhere.
Now, note, there are millions of these vehicles on the road, and Winnie will just point at all those that don't have their brackets come loose from the epoxy and say, "Not a problem".
Quote:
Originally Posted by dkoldman
Thanks. I will take under advisement. It scares me because I believe every man must realize his own limitations. Drilling hole in my RV actually frightens me the more I believe it is something than is expected of most anyone? I have done a lot of stuff on my RV, but unless I have qualified service center that will do the screw mounting, it likely will not happen for me. I am not sure I would even try the epoxy?
|
I have a friend with a '04 Journey and her hood cover was getting loose, like mine had previously. And it was just before she was to leave Mexico and head home to NH. Anyway, she didn't have the time or inclination to do that work and when she got home she had her favorite RV shop do them for her. They used SS button head screws and when I saw it the next year, the work looked good. She told them what I suggested about drilling just 2 holes per bracket and her rig ended up with a few on the nose of her RV but they looked like they were factory installed.
That's an option.
Why it happens to some, but not all is just a matter of luck really. I used to work in a factory that used epoxy for some products and occasionally, the weather (moisture and heat cause the most problems), the concentration and attention of the worker, the quality of the workmanship pre-application and other factors would sometimes fail us and the epoxy would never harden right. Or it would go bad in funny ways. Often after we'd shipped the product. So, in the case of an RV, where the product is subjected to a small earthquake every time it's on the road, it's remarkable that they don't have 100% failure rate.
|
|
|
|
|
06-21-2022, 09:50 PM
|
#71
|
|
Winnebago Owner
Join Date: Jun 2020
Posts: 186
|
Quote:
Originally Posted by dkoldman
So what are you saying occurred? Did the epoxy that was in the holes break or shear off? Did the epoxy come off the fiberglass?
I wish I had known about this to look before hand But from what I can see it looks like it is more of a quality of manufacturing issue than a design flaw? I don't see how it is possible to come off if the epoxy has been applied liberally and the bracket sits down inside of the epoxy. It basically should clamp the bracket against the wall of epoxy.
Seems like if it were a recall, the fix would be apply the same epoxy completely over the bracket. There would never be need to remove it.
I have to wait to get the parts. When I do, I will have to check with a few service centers to see what they can do or recommend. I will not rule out screws if I can have it done professionally. I would want the final product to look better than what it does now. |
Yes, the epoxy peeled off of the fiberglass and metal about 50% left behind on the part and the fiberglass. The surface area is at least 6 inches square, so with a GOOD epoxy and proper surface preparation should be able to hold. Ive got satellites orbiting which are held together with epoxy, but we called it blue death, and it would pull out the parent material on a pull test.
So this in my opinion is a design flaw, because it counts on clearly individual effort to do, and it is not done properly. So sure, manufacturing issue, but the design needs to account for variability and have a safety factor. The first person I met with a similar RV warned me that this was he first thing I should do. I of course didnt listen.
So the recommendation from a structural engineer is to have it bolted on. It is what I will do when I get the new parts.
__________________
2020 Winnebago Vista 29V
San Francisco Bay Area
|
|
|
|
|
06-22-2022, 06:16 AM
|
#72
|
|
Winnebago Master
Join Date: Jun 2020
Location: Dallas, Texas
Posts: 1,051
|
Quote:
Originally Posted by sundog964
Yes, the epoxy peeled off of the fiberglass and metal about 50% left behind on the part and the fiberglass. The surface area is at least 6 inches square, so with a GOOD epoxy and proper surface preparation should be able to hold. Ive got satellites orbiting which are held together with epoxy, but we called it blue death, and it would pull out the parent material on a pull test.
So this in my opinion is a design flaw, because it counts on clearly individual effort to do, and it is not done properly. So sure, manufacturing issue, but the design needs to account for variability and have a safety factor. The first person I met with a similar RV warned me that this was he first thing I should do. I of course didnt listen.
So the recommendation from a structural engineer is to have it bolted on. It is what I will do when I get the new parts.
|
Sounds like you are describing that the process is capable thus a process control problem, which should vest with with Quality and/or Industrial Engineering. At current Winnebago Engineering rework procedure does not mandate bolt or screws.
I wish I had a sniff of this issue, as I could have easily checked as many times as I am under the hood checking oil and other things. What I would have done, was to clean both fully functioning sides with alcohol and apply liberal amounts of the Plexus over the existing epoxy to expand the coverage to new perimeter fiberglass thus sealing the OEM epoxy in place. I would then add tie wraps or similar strap to the passenger side; so that if it were to fall, it would hang in place.
As it is, I will be at the mercy ( or heed their advice) of whoever I hire to fix. Someone may be confident on how they can apply screws and how they may make it look it better that I am good with that. I also feel like if done the right way, and you can damn be sure I will personally inspect, the standard mfg process will work.
__________________
2019 Sunstar 29ve; Toad Lincoln Navigator; RVi Brake 3; Roadmaster Nighthawk 676; Sumo Springs; Safe T Plus; Onan EC-30 AGS; Vmax 250ah AGM; T-Mobile Internet; Southwire EMS 44270/34951 Display 40301; Jet Flo Macerator; Alpine SPE500 Speakers; Visio M21D-H8R
|
|
|
|
|
06-22-2022, 06:27 AM
|
#73
|
|
Winnebago Master
Join Date: Jun 2020
Location: Dallas, Texas
Posts: 1,051
|
Quote:
Originally Posted by Jim_HiTek
Mine is a '02, and the Winnebago factory process was the same back then as it is now. Really don't thing they are going to change. In addition, it's rare that in 19 years of following and reading about these Winnies have I heard of anyone loosing a piece off their RV so a recall of millions of big RV's isn't likely. I said 'rare' but it does happen as someone in this tread just lost a bracket onto the road somewhere.
Now, note, there are millions of these vehicles on the road, and Winnie will just point at all those that don't have their brackets come loose from the epoxy and say, "Not a problem".
I have a friend with a '04 Journey and her hood cover was getting loose, like mine had previously. And it was just before she was to leave Mexico and head home to NH. Anyway, she didn't have the time or inclination to do that work and when she got home she had her favorite RV shop do them for her. They used SS button head screws and when I saw it the next year, the work looked good. She told them what I suggested about drilling just 2 holes per bracket and her rig ended up with a few on the nose of her RV but they looked like they were factory installed.
That's an option.
Why it happens to some, but not all is just a matter of luck really. I used to work in a factory that used epoxy for some products and occasionally, the weather (moisture and heat cause the most problems), the concentration and attention of the worker, the quality of the workmanship pre-application and other factors would sometimes fail us and the epoxy would never harden right. Or it would go bad in funny ways. Often after we'd shipped the product. So, in the case of an RV, where the product is subjected to a small earthquake every time it's on the road, it's remarkable that they don't have 100% failure rate.
|
Thanks. When I get the parts, I will start talking with my service guys to see what they advise. I will likely gravitate to what they feel most comfortable with and do best. Screws on my hood will have to look BETTER than factor.
I have now focused on the epoxy issue and from looking at the ones that properly recessed in the epoxy, I feel it is impossible to drop of. However some are not pushed into the epoxy enough to oozed through the holes to help clamp down. I am thinking that when it is repaired and cured. I may apply additional Plexus epoxy on top for a secondary seal. The latter I can do myself.
I will keep all posted and appreciate all of the input. To be honest, I ain't mad at Winnebago. They have stepped up to the plate to help. They have told me what they recommend and I have parts coming. I am inclined to hire someone to simply install right by the book.
__________________
2019 Sunstar 29ve; Toad Lincoln Navigator; RVi Brake 3; Roadmaster Nighthawk 676; Sumo Springs; Safe T Plus; Onan EC-30 AGS; Vmax 250ah AGM; T-Mobile Internet; Southwire EMS 44270/34951 Display 40301; Jet Flo Macerator; Alpine SPE500 Speakers; Visio M21D-H8R
|
|
|
|
|
06-22-2022, 07:17 AM
|
#74
|
|
Site Team
Join Date: Sep 2009
Location: Spring Branch, TX
Posts: 7,818
|
I doubt this is a rare problem and have seen lots of threads on this topic on this and other RV forums. I’m kind of surprised that every Winnebago motorhome owner hasn’t heard of this issue. I sure had before mine fell off.
I was lucky, my hood bracket fell off at the independent repair shop I use for oil changes. They just glued it back on for me, no charge. They found it laying on the ground in front of the RV.
__________________
2017 Winnebago Adventurer 37F
2016 Lincoln MKX Toad
|
|
|
|
|
06-22-2022, 09:23 AM
|
#75
|
|
Winnebago Master
Join Date: Nov 2011
Location: Full time RV'er
Posts: 1,177
|
Quote:
Originally Posted by creativepart
I doubt this is a rare problem and have seen lots of threads on this topic on this and other RV forums. Im kind of surprised that every Winnebago motorhome owner hasnt heard of this issue. I sure had before mine fell off.
I was lucky, my hood bracket fell off at the independent repair shop I use for oil changes. They just glued it back on for me, no charge. They found it laying on the ground in front of the RV.
|
I am with you, I don't think the loosening up of the brackets when the epoxy gives out is all that rare, what I was trying to say is that I don't believe that the brackets falling onto the freeway at speed is all that common.
But, of course a poster on a public forum like this one might hesitate to say their bracket fell off at speed, to minimize their liability exposure. I'd wager the outfits that manufacture the brackets would certainly know how many they sell each year to the after market.
|
|
|
|
|
06-22-2022, 05:54 PM
|
#76
|
|
Winnie-Wise
Join Date: Mar 2018
Posts: 344
|
Quote:
Originally Posted by creativepart
I doubt this is a rare problem and have seen lots of threads on this topic on this and other RV forums.
|
Quote:
Originally Posted by wyocamper
I ordered the parts today, no luck finding them on the highway. David at Lichtenstein RV parts assumed correctly that it was the passenger side, since that side seems to fall off all the time.
|
It happens often enough that the parts store can guess which side fell off.
On mine the epoxy was still stuck on the fiberglass, and the epoxy that was squeezed through the holes on the bracket was still there too. But the bracket had broken off cleanly. That made it easy to find the correct spots to drill through.
On the driver's side that was still attached I broke off the "bulbs" of epoxy that were squeezed through the bracket holes, and then drilled through the matching holes on that side.
__________________
2015 Vista 27N
|
|
|
|
|
06-22-2022, 06:13 PM
|
#77
|
|
Winnebago Master
Join Date: Jun 2020
Location: Dallas, Texas
Posts: 1,051
|
Quote:
Originally Posted by wyocamper
It happens often enough that the parts store can guess which side fell off.
On mine the epoxy was still stuck on the fiberglass, and the epoxy that was squeezed through the holes on the bracket was still there too. But the bracket had broken off cleanly. That made it easy to find the correct spots to drill through.
On the driver's side that was still attached I broke off the "bulbs" of epoxy that were squeezed through the bracket holes, and then drilled through the matching holes on that side.
|
I have seen that reference several times now, but not sure how much stock can be made on correctly guessing passenger side?
My driver side has a support arm so it is another point of epoxy so even if the main bracket came loose, the support arm will hold the driver side bracket to the hood.
I also noticed that all of my epoxy is affixed to the fiberglass and I can zero indication that ANY has come off the fiberglass. It is VERY DIFFICULT to even try to get it off.
The failure as far as I can tell on my unit, is that the bulbs on passenger side were small or almost not existent. IMO just sloppy installation with epoxy being to thin as to not be fully seated in the epoxy.
so to me in a real sense the issue is that the passenger side is prone to be lost. A support arm like on the driver side, could eliminate the stress if the problems occurs. I may make my own strap ( maybe some chain akin to what you may see in a toilet?). But I doubt very seriously, that now I am aware that this was a problem that it will ever occur again on my coach.
Having said all that, my repair center may tell me Nope, they not gonna glue epoxy, they gonna put in screws for me? They know me and I trust them so time will tell. I am just proud of Winnebago for stepping up, a 5 min wait and a 5 minute call and I was all good 
__________________
2019 Sunstar 29ve; Toad Lincoln Navigator; RVi Brake 3; Roadmaster Nighthawk 676; Sumo Springs; Safe T Plus; Onan EC-30 AGS; Vmax 250ah AGM; T-Mobile Internet; Southwire EMS 44270/34951 Display 40301; Jet Flo Macerator; Alpine SPE500 Speakers; Visio M21D-H8R
|
|
|
|
|
06-24-2022, 06:33 AM
|
#78
|
|
Winnebago Master
Join Date: Jun 2020
Location: Dallas, Texas
Posts: 1,051
|
Update
I received the parts yesterday ( 3 lbs); so heavier than I thought. So I phone it in to Winnebago on a Monday, get parts on a Thursday. Hopefully; today I will be able to make a few calls to see about someone to service. Mobile services start with at $300 & $200/hr to finish. My preferred shop is 1 hour away at about $100/hr.
I planned to let the Service shops tell me how they suggest to fix, now armed with information I have learned about the problem.
__________________
2019 Sunstar 29ve; Toad Lincoln Navigator; RVi Brake 3; Roadmaster Nighthawk 676; Sumo Springs; Safe T Plus; Onan EC-30 AGS; Vmax 250ah AGM; T-Mobile Internet; Southwire EMS 44270/34951 Display 40301; Jet Flo Macerator; Alpine SPE500 Speakers; Visio M21D-H8R
|
|
|
|
|
06-29-2022, 04:50 PM
|
#79
|
|
Winnebago Master
Join Date: Jun 2020
Location: Dallas, Texas
Posts: 1,051
|
My Hood Latch is Fixed
I had three different solutions proposed to me by local repair shops and one mobile repair.
None of them recommended the screw in the fiberglass solution, nor would they even attempt.
The Winnebago dealer promised to repair both sides by the book as Winnebago IND prescribed; but tried to assure me the quality would be better than OEM. They wanted $1,100.
My preferred shop had what I viewed as a wonderful idea as they proposed to embed the bracket on both sides with Fiberglass resin, basically making it a permanent part of the inside fiberglass wall. No screws or anything visible from outside. They wanted $1,150
A mobile tech came by my house ( no charge) and made a recommendation of installing two steel brackets to the newly supplied bracket from Winnebago. The top bracket he made mounted to a steel plate behind the windshield and the bottom bracket he made mounted to the steel plate just to the left of radiator. It is solid as a rock and ain't moving. It took him 2 hours to make the parts and install. He charged $300
I called and reported the same to Winnebago the structural design change. They were impressed and pleased that I was happy. My plan is still to buy some 2 part epoxy for added security on the pieces that actually mount on the hood. I want to find a 2 part epoxy that is strong as Plexus, but easier to dispense. In the meantime; after some time has passed, I will consider doing the same thing on driver side, but it is showing no signs of coming apart.
__________________
2019 Sunstar 29ve; Toad Lincoln Navigator; RVi Brake 3; Roadmaster Nighthawk 676; Sumo Springs; Safe T Plus; Onan EC-30 AGS; Vmax 250ah AGM; T-Mobile Internet; Southwire EMS 44270/34951 Display 40301; Jet Flo Macerator; Alpine SPE500 Speakers; Visio M21D-H8R
|
|
|
|
|
06-29-2022, 11:30 PM
|
#80
|
|
Winnie-Wise
Join Date: Jul 2010
Location: on a constant, around the country, trip!
Posts: 404
|
I know this subject has been tossed around for years, I commented too, many years ago. It just isn't complicated. Occasionally the factory did not do proper surface prep before gluing metal brackets onto fiberglass panels. Too many times, on too many RV's apparently.
8-9 years ago, on my 2010 Journey, I took the loose, and near loose brackets off the inside hood, and rear engine grill, did the proper surface prep, and glued the brackets back into place. Most I used JB Weld epoxy, the rear engine grill I used a super construction adhesive (with dots of JB Weld to hold the grill in place while the adhesive cured over three days)
All brackets and the grill have stayed in place over the years of driving around the country, across some bumpy roads paved and gravel.
There are many valid solutions, regluing, bolts, fiberglass, etc. Most only taking an hour or two to complete. All will work if proper procedures are followed. The Winnebago design could be improved, but isn't necessarily faulty, but the surface prep and quality control were really lacking!
Just an old guy's opinion of course.
__________________
2010 Journey 39n - 2017 Jeep Cherokee Trailhawk - this our 13th year living aboard, travelling and visiting the Pacific NW, summer 2023 
|
|
|
|
|
|
|
Currently Active Users Viewing This Thread: 1 (0 members and 1 guests)
|
|
|
 Posting Rules
|
You may not post new threads
You may not post replies
You may not post attachments
You may not edit your posts
HTML code is Off
|
|
|
|
 » Recent Discussions
 |
|
|
|
|
|
|
|
|
|
|
|
|
|
|
|
|
|
|
|
|
|
|
|
|
|


 :
:  Linear Mode

