 |
|
 07-01-2018, 11:48 AM
|
#1
|
|
Winnebago Master
Join Date: Oct 2011
Location: Houston TX
Posts: 881
|
 Mods and Upgrades--Post 'em here!
Have you made mods or customized your Winnie? Please share; tell us what you did and if you can, post pictures. 
|

|

|
|
07-07-2018, 09:38 PM
|
#2
|
|
Winnebago Master
Join Date: Mar 2017
Location: Tucson, AZ
Posts: 535
|
OK. I'll break the ice. We bought from the original owner, and we've done a lot. Not necessarily out of need, but because regardless if buy a car, a house or a chest of drawers, new or used, you are buying someone else's dream. Our dream will always be a work in progress. First, the outside. We fought a losing battle with decals, so we removed them and had a local guy paint them back on. We did not have the front, two side and rear Winnebago and Journey SE logos repainted due to the cost. Besides, we've not seen a retainer check from Winnebago for being a 62.5MPH billboard. 
Port Side You may see an ancient Mov'n View dome. It stopped locking on satellite not long after we bought the rig. So I pulled the dome and saw one of the nylon gears had worn teeth. Wouldn't engage. Winegard no longer makes or supports that model. Took the gear all over town. No luck. Was thinking new (whew!!$$$$$) Was in my shop taking a trashed microwave apart (wanted the magnatron), noticed table rotating gear looked familiar. A match! Almost five years later, Mov'nView still giving us TV and the portable antenna is in the basement.
Stbd Side We think our guy did a nice job.
On our maiden voyage, we pulled in at Wilcox, AZ (apple pie and the Rex Allen Museum) for fuel. Scratched the door edge on a guard post. SWMBO was not happy. As a voyage repair, I covered it with Gorilla Tape. As voyage repairs will, it became permanent. Three years later, as we were removing decals we took the tape off as well. Was worried it might have cooked on. But, still looked new, peeled away no problem. Liked it so much, put it back after new paint job.

Gorilla tape worked so well on the door edge, after new paint job, we did the entire lower edge, both sides, bow to stern. Looks great. About a year old in this pic. No more gravel chips!
Will post interior mods and upgrades next.
Fair Winds and Following Seas
__________________
Terry & Rosalina
2007 Winnebago Journey 34SE
Retired Navy Mustang & Navy Wife
|
|
|
|
|
07-07-2018, 10:42 PM
|
#3
|
|
Winnebago Master
Join Date: Mar 2017
Location: Tucson, AZ
Posts: 535
|
As we stated prior, you always buy someone else's dream, the fun is making it your dream. Here's what we did to the interior.
The original owner glued carpet to the vinyl step caps. We could not get the glue off, so we just re-tiled them with wood kick plates to match our cabinetry.
Found some flexible track compatible with our front curtains. Installed it on the ceiling and hung drapes behind capt's chairs to keep us cool on the road.
We took out all the original carpet and vinyl and installed vinyl throughout. Much easier than folks would have you believe.
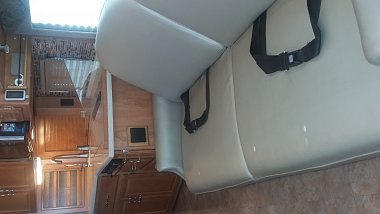
A lot going on in this pic. We had the easy rest sofa stripped to the frame and re-upholstered, including new foam and a soft "pleather". Put a drink holder there (put them all over the place actually). Just above, built a little shelf and a compact weather station. Behind the stove we installed that genuine vinyl imitation stone self stick backsplash. Works better than we expected. Finally, we built a new purpose built spice/condiment shelf -- one that has utility.
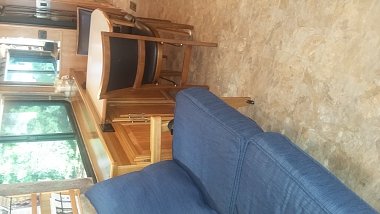
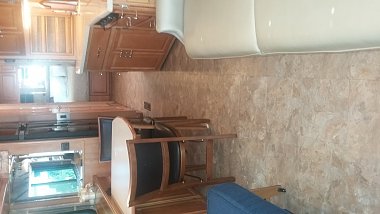
We donated the original euro-chair. Tried a love seat in its place. Bulky and no storage. Saw one in the window at the Scandinavian store. Snapped a pic and built one to suit. Storage underneath, cushions are patio furniture, replaceable on a whim. We sold the original dinette, and built the credenza with table. Suits us better. The table is original. Slips into a slot in the credenza. Two positions -- as pic, room for two. Slides out 11" to seat four (friendly folk). The credenza gives us the same cubic foot of storage as the dinette did, just more accessable, and a better surface for our laptops (note the two usb/120vac outlets)

A closer view of the credenza. Turns out that poplar stained with Minwax hickory mixed with a little Minwax red mahogany is a dead on match for the original cherry with a coffee glaze. And, 1/2 the weight of cherry.
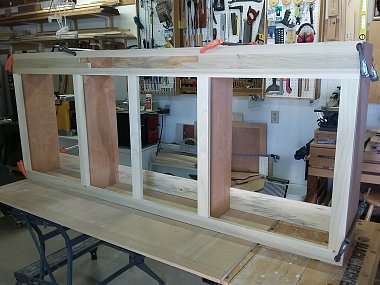
Here's the credenza in progress.
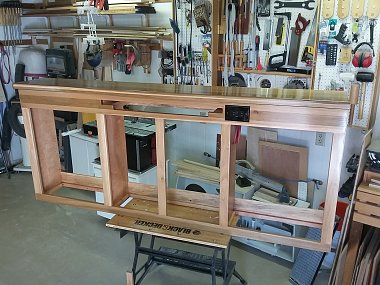
Again

And again
We liked the stone look vinyl enough to do the vanity backsplash as well.
We also deconstructed all the fabric covering on the window valences, headboard, etc. had the fabric drycleaned and reinstalled it over new foam backing.
__________________
Terry & Rosalina
2007 Winnebago Journey 34SE
Retired Navy Mustang & Navy Wife
|
|
|
|
|
07-07-2018, 11:06 PM
|
#4
|
|
Winnebago Master
Join Date: Mar 2017
Location: Tucson, AZ
Posts: 535
|
Third installment of our upgrade/remodel saga. Getting the entertainment system to do what we want.
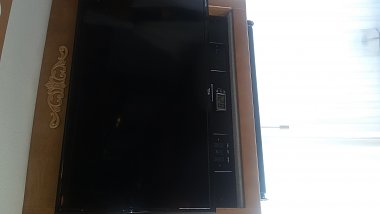
We've actually re-done the flat screen twice. Just added this smarter TV with built in Roku. At the same time gathered together switches that were apparently installed at random previously. So now the surround sound selector switch and satellite dish switch are on the same plate with a new switch controlling the Video Control Center. Before the VCC was always on -- a parasitic drain. Also, we have the home theater, TV and Directv receiver plugged into a switchable outlet to stop that parasitic drain. Finally, we installed a usb/hdmi plate just under the TV so those can be accessed from the front.
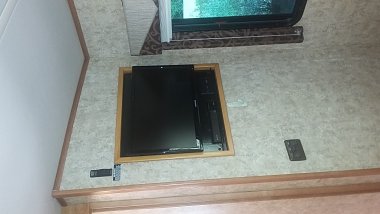
Put a larger screen in the bedroom. Took some hdmi back to the TV. Added a bluray player and, as in the front, a usb/hdmi plate for easy access. In 45 years we've never laid in bed watching TV. But maybe we can send the grandaughters back there and get them out of our hair.
Don't care about the basement TV. Outside is for campfires and adult beverages.
Fair Winds and Following Seas
__________________
Terry & Rosalina
2007 Winnebago Journey 34SE
Retired Navy Mustang & Navy Wife
|
|
|
|
|
07-07-2018, 11:14 PM
|
#5
|
|
Winnebago Master
Join Date: Oct 2017
Location: Elk Grove, CA
Posts: 3,583
|
Nice work! I've been remodeling my 2002 Suncruiser 35U to be more wheelchair friendly, new floors, recliners, upholstery, valances, etc. My future plan is to also design and build a credenza. I hope to be able to include an electric TV lift in the credenza.
If I can just find time to finish, I'll put together a post with photos.
|

|
|
|
07-07-2018, 11:30 PM
|
#6
|
|
Winnebago Master
Join Date: Mar 2017
Location: Tucson, AZ
Posts: 535
|
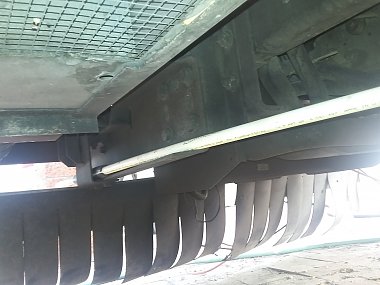
Final installment of our mods/upgrades. We had to do something about our engine overheating.
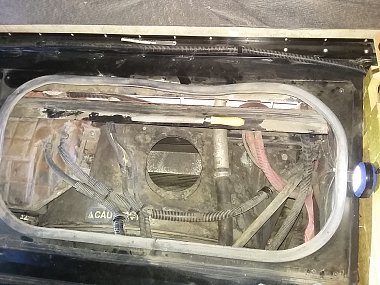
As we all know, dirty CAC and radiators are prime culprits leading to high temps. Cleaning them can be a bear. So we cut a hole in our fan shroud and installed an eight inch cargo hatch left over from our kayaking days. Here's the hole. The grayish bar is the top of the CAC. Now we have easy access to both sides of the CAC and radiator.
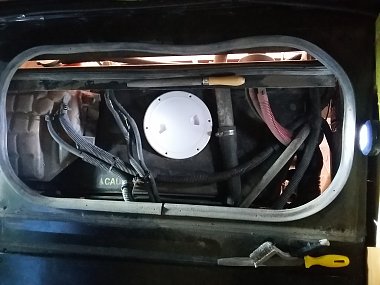
The kayak hatch is in place. We cleaned up the area a little.
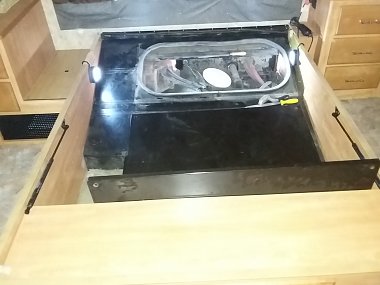
Showing the assembly below our bed.
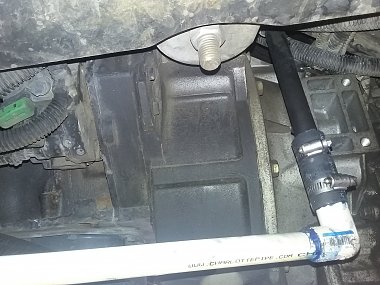
Much of the gunk on the CAC and radiator comes from oil fumes released by the crankcase breather tube. So we attached a piece of cpvc to it with a short section of heater hose.
Led the cpvc aft of the radiator
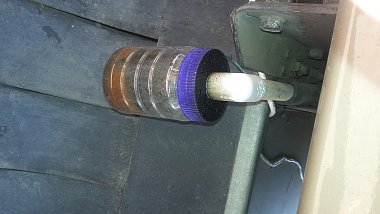
And terminated it in a disposable mayo jar filled with steel wool. Huge improvement. And our dinghy is cleaner, too!
All of this and the preceding is as of July2018. Likely more to come. Hope you found some interest.
Fair Winds and Following Seas
__________________
Terry & Rosalina
2007 Winnebago Journey 34SE
Retired Navy Mustang & Navy Wife
|
|
|
|
|
07-07-2018, 11:34 PM
|
#7
|
|
Winnebago Master
Join Date: Oct 2011
Location: Houston TX
Posts: 881
|
Wow, Terry! What a way to kick off the thread! I'm in awe of all your improvements.
|
|
|
|
|
07-11-2018, 04:22 PM
|
#8
|
|
Winnebago Watcher
Join Date: Feb 2018
Location: Longwood
Posts: 3
|
Sagging ceiling
Hi folks, has anybody tackled a saggy ceiling? My '05 Horizon has the ceiling sagging in a number of places. Right now it's being held up with some white thumb tacks. I've r ad other threads with similar issues, but have yet to find a suitable fix short of having a total ceiling replacement.
|
|
|
|
|
07-11-2018, 05:18 PM
|
#9
|
|
Winnebago Camper
Join Date: Feb 2013
Location: Murrells Inlet, SC
Posts: 23
|
Hi piper23t
my '05 horizon is in the same predicament. sagging all over the place. I am about to use Gorilla glue, and a wallpaper seam roller to spread it. going to "inject" it with some long horse needles and a hyperdermic. I think I read earlier that PETRO did this and was successful. Everything is purchased, going to do it right after my Nova Scotia Trip in AUG.
-mike
__________________
Mike & Jo
2005 Itasca Horizon 40KD w/ISL 400
2006 Jeep Rubicon / 1300w Solar + 600ah LifeBlue Lithium
|
|
|
|
|
07-11-2018, 05:25 PM
|
#10
|
|
Winnebago Camper
Join Date: Apr 2018
Location: Mesa, Arizona
Posts: 21
|
TV Cabinet storage
Our 2005 38j Itasca Sunrise doesn't have lots of storage for us who full time so I am constantly looking for space.
One change I made: it came with flat screen TV's but they were screwed into the large cabinets in the bus. What once were meant to house the large tube tv's were now empty space behind the flat screen units.
After taking the TV's out, I cut matching finished oak plywood to fill the opening. I then put two hinges on the plywood and basically created a door for the opening into the TV cabinet. I put a latch on the bottom to lock it closed and was all set.
But before mounting the TV, you have to cut openings in the 'door' so you can access the cable ports to route wires and any other info like TV serial numbers.
When you mount the TV to the 'door' make sure you use correct length screws. And since these tv's may have been designed to hang, they weren't built for bouncing down the highway from those 4 screws... I also put a ledge under the TV to hold it and take as much stress and weight as possible from the mounting screws. This is to make sure the TV doesn't bounce itself into pieces and crack it's backside.
Also make sure that when you mount the TV, and open the door to get access inside the cabinet, nothing gets crunched if it opens all the way... or if in our case, it would (still does actually) close our bedroom slideout... hmmm not very well planned on someones part. 
The end result is I now have in the bedroom, a TV cabinet that now has shelves in it and is home for all the little bits of stuff I want to have access to. And in the living room I now have a liquor cabinet where I store my oversized margarita machine as well as the bulky items like paper towels, TP and the occasional cheap bottles of tequila behind the TV.
|
|
|
|
|
07-11-2018, 06:16 PM
|
#11
|
|
2016 Winnebago Navion 24J
Join Date: Jun 2018
Location: Sarasota, Florida
Posts: 33
|
Quote:
Originally Posted by CigarBoy

Hi piper23t
my '05 horizon is in the same predicament. sagging all over the place. I am about to use Gorilla glue, and a wallpaper seam roller to spread it. going to "inject" it with some long horse needles and a hyperdermic. I think I read earlier that PETRO did this and was successful. Everything is purchased, going to do it right after my Nova Scotia Trip in AUG.
-mike
|
Only use 3M Super 77 Spray Glue
https://www.3m.com/3M/en_US/company-...3242460&rt=rud
It still may not hold for very long if it has a foam material between the vinyl and the backing panel. The vinyl can be completely taken down and then the backing panel can easily be cleaned of the decaying foam by rubbing it off with your hands.
Then you can do the same to the vinyl. After that some new thin sheet foam can be attached with spray glue. Lastly spray some glue on the foam on the ceiling and carefully attach the the vinyl.
If it were me I would take it to a automotive headliner installer and put a new vinyl headliner on that already has the foam attached to the vinyl (much easier) The Backing panel still needs to be "rubbed" clean. I have done it both ways and the last approach has the best result.
__________________
Roger, Margo, Schnitzel & CoCo
2016 Navion 24J
Retired engineer and Corvette restorer
|
|
|
|
|
07-11-2018, 07:52 PM
|
#12
|
|
Winnebago Watcher
Join Date: Feb 2018
Location: Longwood
Posts: 3
|
Thanks for the response Cigarboy and Mr Margo.
I'm going to check with a headliner shop. I tried the spray glue without success. Removing the foam may be too big for me to handle. All depends on finding someone that can handle it and dollars.
|
|
|
|
|
07-12-2018, 03:17 AM
|
#13
|
|
Winnebago Camper
Join Date: Oct 2010
Posts: 12
|
4 Wheel Drive Sightseer 30 B
Easy for off road travel on the beach. Custom 20 wheels and All Terrain Tires.
|
|
|
|
|
07-12-2018, 05:09 AM
|
#14
|
|
Winnebago Owner
Join Date: Feb 2014
Posts: 112
|
Quote:
Originally Posted by Oldchinahand
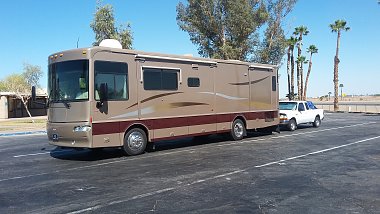
OK. I'll break the ice. We bought from the original owner, and we've done a lot. Not necessarily out of need, but because regardless if buy a car, a house or a chest of drawers, new or used, you are buying someone else's dream. Our dream will always be a work in progress. First, the outside. We fought a losing battle with decals, so we removed them and had a local guy paint them back on. We did not have the front, two side and rear Winnebago and Journey SE logos repainted due to the cost. Besides, we've not seen a retainer check from Winnebago for being a 62.5MPH billboard.
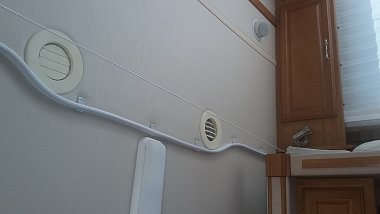
Attachment 169822
Port Side You may see an ancient Mov'n View dome. It stopped locking on satellite not long after we bought the rig. So I pulled the dome and saw one of the nylon gears had worn teeth. Wouldn't engage. Winegard no longer makes or supports that model. Took the gear all over town. No luck. Was thinking new (whew!!$$$$$) Was in my shop taking a trashed microwave apart (wanted the magnatron), noticed table rotating gear looked familiar. A match! Almost five years later, Mov'nView still giving us TV and the portable antenna is in the basement.
Attachment 169823
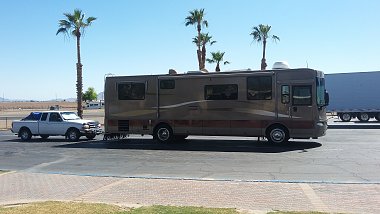
Stbd Side We think our guy did a nice job.
Attachment 169824
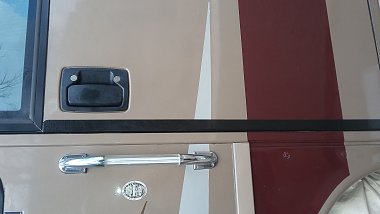
On our maiden voyage, we pulled in at Wilcox, AZ (apple pie and the Rex Allen Museum) for fuel. Scratched the door edge on a guard post. SWMBO was not happy. As a voyage repair, I covered it with Gorilla Tape. As voyage repairs will, it became permanent. Three years later, as we were removing decals we took the tape off as well. Was worried it might have cooked on. But, still looked new, peeled away no problem. Liked it so much, put it back after new paint job.
Attachment 169825
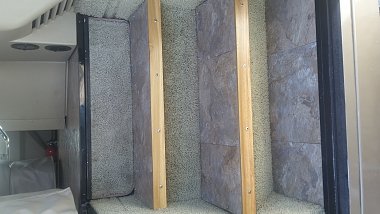
Gorilla tape worked so well on the door edge, after new paint job, we did the entire lower edge, both sides, bow to stern. Looks great. About a year old in this pic. No more gravel chips!
Will post interior mods and upgrades next.
Fair Winds and Following Seas |
Great Story about the gears, sourced from old Micro. Your tale give us horders new spirit to resist trashing our old equipment.
__________________
Denny
Stuart, Fl
|
|
|
|
|
07-13-2018, 09:33 AM
|
#15
|
|
Winnebago Master
Join Date: Jun 2013
Location: Full-timer/volunteer w/SOWERS
Posts: 2,737
|
I'll be posting here soon. Just saving the thread. Removed the bedroom TV. Building a cabinet for DW to store sewing stuff in. Going out today to order new doors. Will post the project when complete.
Rick
__________________
Rick & Melissa Young & Dawson (RIP), 2011 Meridian 40U, FL XCL, ISL 380HP/DEF, Al 3000 MH, 2014 Honda CR-V, SMI AF1, Blue Ox TruCenter & tow equip.,EEZTire TPMS.
Servants On Wheels Ever Ready. Best job we ever paid to do  . (full time volunteers) . (full time volunteers)
|
|
|
|
|
07-13-2018, 02:01 PM
|
#16
|
|
Winnebago Master
Join Date: Jun 2013
Location: Full-timer/volunteer w/SOWERS
Posts: 2,737
|
First thing first
To be honest, I started this project backwards. This story will explain why.
We have rarely used the bedroom TV. We were having work done on the slide lock at the factory in Junction City, OR. The tech told me what he went through to get to a screw in the drop ceiling side strip so I thought it would be prudent to remove the TV before he did any more damage. I had to return to have parts installed.
With the TV gone we found the room more open. Then I removed the mounting bracket. DW came up with the idea to utilize this area with a cabinet for her sewing stuff. When I started the project in earnest I was under the false impression that doors would be relatively easy to find. Well, let me tell you, they ARE NOT! (So much for "more open'.)
Here is where I found the closest match and by my design options: https://www.horizoncabinetdoor.com/index.php
I found out that the door width is limited in a single panel size. I was over the size limit so the doors will have two panels each. I must use the frame size I have built. While at the factory a leak was discovered in the slide roof caused by factory install screws that were too long.  The vinyl ceiling was still full of water when I started working on this project so I have a small drain hole with a paper towel wick hanging out of it. The ceiling is slowly drying out. The doors and drawer front will be here in 4 to 6 weeks. Cost $220.67 with free shipping.
I have the left side panel and front frame made. I picked up the custom stain from the store today. When I am satisfied with the color depth I will finish it with a satin poly.
In my next post I will publish pictures.
__________________
Rick & Melissa Young & Dawson (RIP), 2011 Meridian 40U, FL XCL, ISL 380HP/DEF, Al 3000 MH, 2014 Honda CR-V, SMI AF1, Blue Ox TruCenter & tow equip.,EEZTire TPMS.
Servants On Wheels Ever Ready. Best job we ever paid to do . (full time volunteers)
|
|
|
|
|
07-15-2018, 05:39 PM
|
#17
|
|
Winnebago Master
Join Date: Jun 2013
Location: Full-timer/volunteer w/SOWERS
Posts: 2,737
|
Project update
I am on my way to making this a reality. First I need to make a confession. I realized that when I placed the order for the doors I gave the wrong width measurement. This error may cost me a $35 cancellation even though I caught it within a few hours. We'll see tomorrow. I used the full width of the opening instead of the half width X2.  
Here are some pictures:
I removed the TV, TV mount and cables. The power cable ran down to the lower equipment bay and over to the left side of the stand. I removed the two outlets and left the one in place on the stand side. The facade panel over the equipment port was held on with brad nails in each corner. I popped off with little effort. The rail was held on with 4 screws. The rail is pocket drilled. I removed the screws with a long square drive bit and reattached it on the bottom to finish the drawer receiver space.
The new side panel is a simple rectangle with 1/4" birch ply glued to it. The face styles and rails are 1 1/2" maple. I used a router for the bull nose edge. I used a pocket drill jig to prepare the styles for attachment to the rails. The left style has a 1/4" grove in it to receive the side panel.
The stain is not a great match but it works. I tried to have it mixed but the guy didn't have a good eye. This picture is only a dry run. I am going to do a little more stain concept and then poly with a satin.
The drawer is a simple box made from 1/2 cdx. Only thing I could get at the local HD in a 2x2 panel. I have a prestain that I am using and I will use this to seal the drawer.
I'll post again when the doors and hardware arrive.
Rick
__________________
Rick & Melissa Young & Dawson (RIP), 2011 Meridian 40U, FL XCL, ISL 380HP/DEF, Al 3000 MH, 2014 Honda CR-V, SMI AF1, Blue Ox TruCenter & tow equip.,EEZTire TPMS.
Servants On Wheels Ever Ready. Best job we ever paid to do . (full time volunteers)
|
|
|
|
|
07-15-2018, 05:58 PM
|
#18
|
|
Winnebago Master
Join Date: Oct 2011
Location: Houston TX
Posts: 881
|
Wow, lookin' good, Rick.
I'm getting ready to order new captain's chairs for our RV from Bradd & Hall and I'm scared I'll make a mistake. 
|
|
|
|
|
07-16-2018, 08:13 AM
|
#19
|
|
Winnebago Master
Join Date: Jun 2013
Location: Full-timer/volunteer w/SOWERS
Posts: 2,737
|
Quote:
Originally Posted by SarahW
Wow, lookin' good, Rick.
I'm getting ready to order new captain's chairs for our RV from Bradd & Hall and I'm scared I'll make a mistake. |
Wanted to pull mine off to deep clean under it. Couldn't figure out how to get to the nuts to hold them while removing the bolts. What do you have for a RV? Any light shedding on how to find the nuts?
Why are you replacing your chairs?
__________________
Rick & Melissa Young & Dawson (RIP), 2011 Meridian 40U, FL XCL, ISL 380HP/DEF, Al 3000 MH, 2014 Honda CR-V, SMI AF1, Blue Ox TruCenter & tow equip.,EEZTire TPMS.
Servants On Wheels Ever Ready. Best job we ever paid to do . (full time volunteers)
|
|
|
|
|
07-16-2018, 10:36 AM
|
#20
|
|
Winnebago Master
Join Date: Oct 2011
Location: Houston TX
Posts: 881
|
Quote:
Originally Posted by jerichorick
Wanted to pull mine off to deep clean under it. Couldn't figure out how to get to the nuts to hold them while removing the bolts. What do you have for a RV? Any light shedding on how to find the nuts?
Why are you replacing your chairs?
|
Do you have Flexsteel chairs? Apparently there are 4 bolts that hold it onto a frame base on the pedestal. We haven't attempted to remove them yet but posts on iRV2 say "it's easy!!" ") So we'll see. I will be taking pics when we swap them, but it's going to take several weeks to get the chairs.
We have a 2012 Fleetwood Bounder that has the Halo Austin fake leather that has begun to shred. Apparently several of the RV manufacturers used that crap starting in 2009 or so. It looks great and is really soft, but begins to delaminate after a few years. We got estimates on reupholstery that were basically the same as buying new seats, so we decided to just order new.
|
|
|
|
|
|
|
Currently Active Users Viewing This Thread: 1 (0 members and 1 guests)
|
|
|
 Posting Rules
|
You may not post new threads
You may not post replies
You may not post attachments
You may not edit your posts
HTML code is Off
|
|
|
|
 » Recent Discussions
 |
|
|
|
|
|
|
|
|
|
|
|
|
|
|
|
|
|
|
|
|
|
|
|
|
|


 Linear Mode

