 |
|
 11-02-2010, 12:48 PM
|
#1
|
|
Winnebago Watcher
Join Date: Dec 2009
Location: Ky
Posts: 1
|
insulation
Hello All
I have a2004 30b and I have been kicking around the chance of insulating the wet bay.I seems to be just a poly propolene or ethelene Compartment . Before I try to reinvent the wheel I thought I might find someone that has been there and done that. Any Ideas would be greatly appreciated. Billg
|

|

|
|
11-03-2010, 08:49 AM
|
#2
|
|
Winnebago Master
Join Date: Aug 2002
Location: ...hopefully on the road!
Posts: 1,653
|
Welcome to the forum! I have no idea what a "30b" is, but my wet bay is similar to what you describe. Mine orginally had a light undercoat layer that wore off. A couple of years ago, I bought a couple cans of spray undercoat, and put 3 layers or so on the outside/underside of the compartment. I use remote thermometer sensors in cold weather, and the undercoating helped some.
__________________
Paul (KE5LXU) ...was fulltimin', now parttimin'
'03 Winnebago UA 40e TRADED OFF JUL 2023 / '17 Jeep Grand Cherokee toad
|
|
|
|
|
11-06-2011, 10:39 AM
|
#3
|
|
Winnebago Owner
Join Date: Mar 2007
Location: The Villages, FL
Posts: 62
|
Im with you, Billg. We overwintered last year and will be doing same this winter before hitting the road for warmer climes. I found that when the outside temperature dropped to 25° F, I had to provide some electric heat in the wet bay; I used a cute little 200W personal ceramic heater, as incandescent bulbs are getting hard to find. I want to insulate this compartment and have a 4 x 8 x 1 piece of Dow Super TUFF-R from Home Depot that Id like to use. My question to anyone who might have done this already is what type of adhesive goop to use to stick the foam to the compartment and to stick the edges of the foam boards together? This particular 1 foam board has laminated surfaces (foil on one side, blue plastic on the other); the cut edges will be exposed foam. Liquid Nails? Or what?
Someone out there must have insulated the outside of the wet bay. Thanks if you can help.
__________________
Dean (flew west) & Diane - Fulltiming since April '12 
2004 Itasca Suncruiser 38R, Workhorse W22, Blue Ox, 2014 Ford Focus Titanium Hatchback (auto trans), 320 watts of portable solar
|
|
|
|
|
11-06-2011, 10:49 AM
|
#4
|
|
Winnebago Master
Join Date: Dec 2005
Location: Buxton, North Dakota
Posts: 1,037
|
You can use the metal duct tape to finish off the edges. You should be able to find a suitiable Locktite or Liquid Nails adhesive. You could also use fender washers and bolts to attach the sheets.
__________________
2003 Winnebago Adventurer 38G F53/ V10 605 watts of Solar
1999 Winnebago Brave 35C Handicap Equipped
F53/V10
1999 Jeep Cherokee & 1991 Jeep Wrangler Renegade
|
|
|
|
|
11-06-2011, 04:45 PM
|
#5
|
|
Winnebago Owner
Join Date: Mar 2007
Location: The Villages, FL
Posts: 62
|
Thanks for the quick reply, John. Metal tape sounds like the best solution for the joints. Sealants and adhesives continue to mystify me. Seems like there ought to be a reference where one could specify the usage and it would point definitively to the correct "goop." I'm a little reluctant to penetrate the compartment with fasteners, but their necessity is due to my inability to know if a particular adhesive can hold the foam board to a plastic or metal compartment shell under windy, wet conditions. I still wonder if there aren't a bunch of do-it-yourself RVers out there who have already insulated strategic compartments in this manner. I appreciate your help!
Dean
__________________
Dean (flew west) & Diane - Fulltiming since April '12
2004 Itasca Suncruiser 38R, Workhorse W22, Blue Ox, 2014 Ford Focus Titanium Hatchback (auto trans), 320 watts of portable solar
|
|
|
|
|
11-06-2011, 05:44 PM
|
#6
|
|
Winnebago Master
Join Date: Dec 2005
Location: Buxton, North Dakota
Posts: 1,037
|
Dean, it does look like Gorilla glue meets all of the requirements. A lot of adhesives would have trouble with the compartment material, but this application list shows plastic, glass and foam, so I think it would work. I, myself would still use some mechanical method to help hold on the insulation. A few 1/8" to 1/4" holes certainly wouldn't hurt the compartment enclosure.
__________________
2003 Winnebago Adventurer 38G F53/ V10 605 watts of Solar
1999 Winnebago Brave 35C Handicap Equipped
F53/V10
1999 Jeep Cherokee & 1991 Jeep Wrangler Renegade
|
|
|
|
|
11-06-2011, 08:22 PM
|
#7
|
|
Registered User
Join Date: Oct 2010
Location: Indiana
Posts: 164
|
Simple spray on contact cement should hold the foam...
|
|
|
|
|
11-08-2011, 05:05 PM
|
#8
|
|
Winnebago Camper
Join Date: Mar 2009
Posts: 6
|
insulation
I insulated my compartment with 1" foam board and held in place with large zip ties and plastic washer I made. Them drilled holes in compartment and used spray foam insulation to seal edges and help hold foam board inplace. Haven't really had means to get a good check of temp inside. I was able to use a ray teck to get temp of 36deg inside with furance running and a outside temp of 24deg here in MN. It has stayed in tack for almost two years now. Used this way because most adhesive won't take the flexing.
winnebago tour
Wayne
|
|
|
|
|
11-11-2011, 11:05 AM
|
#9
|
|
Winnebago Owner
Join Date: Mar 2007
Location: The Villages, FL
Posts: 62
|
I checked out the Gorilla glue, but it said something about avoiding plastic; also, the sides of the plastic compartment to which I want to apply foam board arent anywhere near flat, which also makes some problems for contact cement. Im considering trying Loctite PL Premium Polyurethane Construction Adhesive (Home Depot); the tube says: Use On: Wood, metal, OSB, drywall; Stone, masonry, concrete, bricks; Vinyl, plastics; Foam; Sub-floor, construction joints. The foam board I want to use basically has laminated plastic surfaces, so I like the recommended use for vinyl, plastics, and foam. Has anyone out there used this product?
Wayne: Thanks, I knew someone out there had done this! Can you give me more description, either in words or pictures? What kind of foam boardfaced or unfaced? Zip ties around the whole compartment or through holes in the foam and the compartment walls? Did you apply spray foam from inside the compartment through holes to the foam board outside? In short, is the foam insulation board secured to the coach by the zip ties, or the spray foam, or both? While spray foam is a great filler and closer, it doesnt strike me as very strong in an adhesive way. More info would be much appreciated.
__________________
Dean (flew west) & Diane - Fulltiming since April '12
2004 Itasca Suncruiser 38R, Workhorse W22, Blue Ox, 2014 Ford Focus Titanium Hatchback (auto trans), 320 watts of portable solar
|
|
|
|
|
11-11-2011, 06:48 PM
|
#10
|
|
Winnebago Camper
Join Date: Mar 2009
Posts: 6
|
it was faced with foil on one side and clear or plain. I put the foil on the outside and used zip ties (2) on each panel to hold in place. Then used spray foam on any spaces and around all edges to hold foam board to compartment and to seal edges. The zip ties held the foam board in place and foam helped hold and seal edges of board. Its not that good by itself but the two together work pretty good.
|
|
|
|
|
12-10-2011, 12:37 PM
|
#11
|
|
Winnebago Owner
Join Date: Mar 2007
Location: The Villages, FL
Posts: 62
|
Compartment Insulation Finished!
I just dont know where the time goes, but here is the post script on my basement compartment exterior insulation job. Temperatures here in northeast PA have been in the high 20s overnight, and we just got back from a 5-day local shakedown cruise with the new insulation.
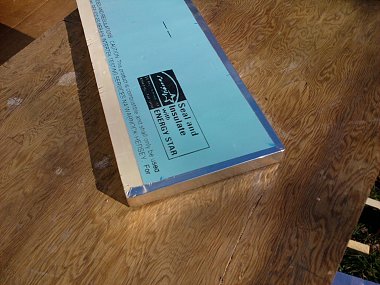
I used 3 products all mentioned above: the Tuff-R 1 foam 4x8 board, the Loctite PL Premium adhesive, and a roll of metal foil tape; plus 8 stainless steel screws from 1¼ to 2 long and 8 fender washers. I chose the foam board for its 6.5 R-value and its 2-sided facing, plastic foil on one side and blue plastic something else on the other. I put the foil side out and after final taping of the joints, it made a nice-looking silver box of foam.
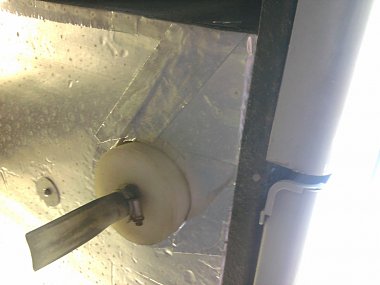
I did the tank drain/water fill compartment (the wet bay) behind the left rear wheels and the water heater (WH)/water pump compartment behind the right front wheel. The sides of the plastic wet bay are not flat, whether by installation or age; they are bowed, so I had to take that into consideration as I fitted things together. I started with the wet bay by cutting board pieces an inch or so oversize and fitting them by hand. I cut a few notches, squeezed the foam edge thinner in places, and got each side as tight as I could to the sides and top. Then I marked the extended edges for final trim, taking into account the compartment bulges and where the covering foam piece would go. Under the wet bay I had to go around the cylindrical drain well, so I cut a U-shaped piece out in the direction I figured to slide the board home (which was generally from the circle to the corner of this piece). I then cut the circle out of the U-piece and used the remainder to put in later, sealing the butt joints with adhesive and tape.
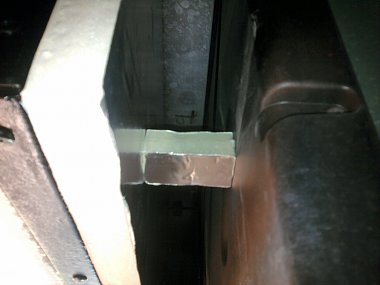
I used some foam trimmings to test the adhesive and found foam to foam joints far superior to butting a foam edge to the blue plastic facing. I could break a foam to facing joint by hand with some effort, but with a foam to foam joint, the foam would yield first and the adhesive would not let go. For this reason, wherever I joined corners of my foam box, I cut the blue facing back by 1 to achieve better adhesion and sealing. I applied the foil tape to all exposed edges that went up against coach surfaces, even if I put some adhesive there to support or seal it. The foil tape is available in the HVAC area of your local hardware or do-it-yourself store.
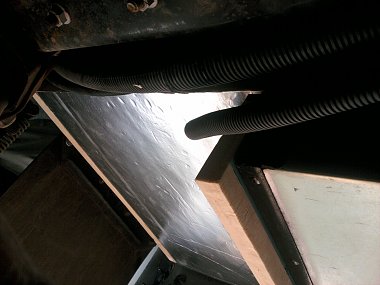
Heres a piece from the WH compartment showing the edge taping and facing trim job.
As I glued the finished foam pieces to the compartment, I was usually able to use foam scraps to wedge between the foam board and coach structures like adjacent compartments or the chassis rails. This held them securely for overnight curing.
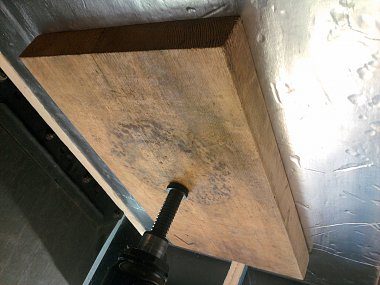
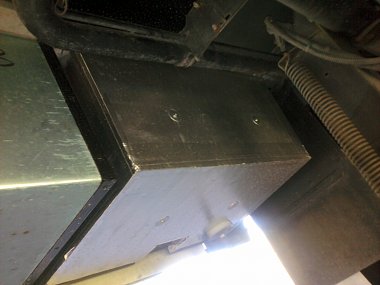
For the bottom pieces, especially under the WH compartment, I used a bottle jack on a stack of blocks below and youll probably recognize the 2x12 holding up the foam is one of my wheel and stabilizer blocks from the stabilizers circular foot print stained on it.
Once all fitted foam pieces were glued in place, all the corners joints were taped with two widths of the foil tape and fender washers were used in strategic and convenient places to lend mechanical support to the adhesive job. I only used 2 on the bottom pieces and 2 on a couple of the side pieces on each compartment, a total of 8 screws and washers.
Here is a shot under the WH compartment with one bottom piece already on (left) and one to go (right). The WH compartment had more surfaces and closer quarters to deal with, but at least all the surfaces were metal and flat!
So drop me a note in a couple of years and Ill let you know if my foam boxes have fallen off, fallen apart, or my water has frozen. (Dont be sillyIll put the heat on in those compartments before Ill ever let that happen!)
Here's to happy and warm traveling!
__________________
Dean (flew west) & Diane - Fulltiming since April '12
2004 Itasca Suncruiser 38R, Workhorse W22, Blue Ox, 2014 Ford Focus Titanium Hatchback (auto trans), 320 watts of portable solar
|
|
|
|
|
12-10-2011, 09:49 PM
|
#12
|
|
Winnebago Master
Join Date: Dec 2005
Location: Buxton, North Dakota
Posts: 1,037
|
That looks like it came from the factory that way. I'll probably be doing it to mine also. Nice job.
__________________
2003 Winnebago Adventurer 38G F53/ V10 605 watts of Solar
1999 Winnebago Brave 35C Handicap Equipped
F53/V10
1999 Jeep Cherokee & 1991 Jeep Wrangler Renegade
|
|
|
|
|
12-11-2011, 03:29 AM
|
#13
|
|
Winnebago Camper
Join Date: Feb 2000
Location: Stapleton NE
Posts: 42
|
Here's a webpage I found about gluing different materials and which glue to use for various applications. Hope you find it helpful. This to That (Glue Advice)
|
|
|
|
|
12-12-2011, 07:54 AM
|
#14
|
|
Winnebago Owner
Join Date: Mar 2007
Location: The Villages, FL
Posts: 62
|
Thanks, John. And thanks Capt. Gadget for that interesting website. I wish their list of materials was a lot longer, but it is a good starting place, and maybe if we all submitted specific material pairs to them, they would add them to their lists.
Temperatures here have dropped to just under 20 over the last couple of nights, and the insulation has significantly reduced the need for supplemental heat in those two compartments. Currently, on the suggestion of someone, somewhere, in one of the forums, I am installing a 120V receptacle in my dump bay. This will provide me with a utility power outlet on the streetside of the coach to balance the external receptacle on the curbside, and it will allow me to plug in a thermostatically controlled receptacle for my light bulb or ceramic heater.
Having already run the 12-2 line from the C/B panel (streetside at rear cap) under the dresser in the bedroom toward the dump bay behind the left rear wheels, I am getting mighty curious about the propane furnace airflow (intake under the dresser) and its effect on this compartment, among others. I hope there are some other threads that will demystify where all the furnace air travels in its circuit. Gotta start looking into that.
Thanks again to all! 
__________________
Dean (flew west) & Diane - Fulltiming since April '12
2004 Itasca Suncruiser 38R, Workhorse W22, Blue Ox, 2014 Ford Focus Titanium Hatchback (auto trans), 320 watts of portable solar
|
|
|
|
|
12-20-2011, 10:06 AM
|
#15
|
|
Winnebago Owner
Join Date: Mar 2007
Location: The Villages, FL
Posts: 62
|
Postscript
Adding this insulation to these two compartments has really paid off for cold weather live-in operation. In the dump bay, I completed installation of a GFCI receptacle, I am getting a Lux Win100 thermostatic outlet for Christmas, and I already have a bulb socket to plug in there. With OATs in the high teens and the propane furnace on, the dump bay is staying above freezing. I'm thinking a small 25W bulb is going to be all I need in there when the temp gets to 10° and down to zero, 40W at the most. The water heater compartment is staying even warmer without any electric heat. I have already tested a non-electric method to add heat there while we are living aboard and the furnace is on (set back to 62° at night). By lifting the front furnace floor vent out, I can lift the coach heater flapper door and put a clothespin on it to prop it open a bit, thus forcing a little warm air into the compartment. If this proves totally successful, I may install a cord or chain to the corner of the flapper that can be pulled from above the floor at the corner of the vent. I'll update when it gets really cold!
__________________
Dean (flew west) & Diane - Fulltiming since April '12
2004 Itasca Suncruiser 38R, Workhorse W22, Blue Ox, 2014 Ford Focus Titanium Hatchback (auto trans), 320 watts of portable solar
|
|
|
|
|
12-20-2011, 04:35 PM
|
#16
|
|
Winnebago Master
Join Date: Aug 2002
Location: ...hopefully on the road!
Posts: 1,653
|
Quote:
|
I have already tested a non-electric method to add heat there while we are living aboard and the furnace is on
|
Do you mean adding heat in addition to what the basement furnace vents are already providing? ...or are you saying that on your coach the furnace does not put heat into the sealed part of the basement?
We have been in temps at 5 below zero for as long as a week with no problems at all as long as we run the LP furnaces ...and that was before I used an auto trouble light in the water bay and a flood lamp in the water pump compartment as I do now !
__________________
Paul (KE5LXU) ...was fulltimin', now parttimin'
'03 Winnebago UA 40e TRADED OFF JUL 2023 / '17 Jeep Grand Cherokee toad
|
|
|
|
|
12-21-2011, 10:09 AM
|
#17
|
|
Winnebago Owner
Join Date: Mar 2007
Location: The Villages, FL
Posts: 62
|
In our 04 Suncruiser, the important basement compartments (where tanks and water lines are) get heat from the propane furnace system, though Ill be darned if I can tell exactly where the hot air is tapped down there. The cold air return to the furnace is unfiltered and located under the dresser in the bedroom; the hot air is distributed to the cabin from floor vents via a duct under the floor from the back to the front. I have used smoke to investigate airflow at vents throughout the cabin (front of TV cabinet behind copilots seat, at floor level in hallway below the One Place panel, and under the shower); these are all connected in various places to the basement areas and they all gently blow air out into the cabin. Same situation for various drawer openings that are similarly connected. A small positive pressure is being supplied by the furnace to all these basement areas, but apparently not as much as in your rig if you can go to -5°.
Since doing my Water Heater Removal and Coach Heater Repair (see Files area, Heating and Cooling), I discovered how things work at the front end of the furnace duct. Although the WH compartment normally gets a little bit of the furnace air from somewhere (??) underneath the floor, it is not enough when things really get down to the low teens. So, to admit additional furnace air to this compartment, instead of putting in a drop light, I am now going to reach in the front-most furnace floor vent and pull the flapper toward me and prop it open with a clothespin. The smoke test at the TV cabinet vent and the remote temperature sensor in the compartment tell me this is raising the compartment temperature several degrees. This flapper normally only opens when the coach heater (engine running) is applying air pressure to the other side of it.
Hope this clarifies.
__________________
Dean (flew west) & Diane - Fulltiming since April '12
2004 Itasca Suncruiser 38R, Workhorse W22, Blue Ox, 2014 Ford Focus Titanium Hatchback (auto trans), 320 watts of portable solar
|
|
|
|
|
12-21-2011, 10:41 AM
|
#18
|
|
Winnebago Camper
Join Date: Sep 2011
Location: Mid-Missouri
Posts: 9
|
How about just coating the outside of the box with spray foam? It is under the RV, right? It dries hard. A little patience and care and you could cover the box air tight.
My '89 Georgie Boy had spray on foam all over the underside of the rv for insulation. The bottom of the exposed floor (plywood) was coated with it also.
Another option is finding a place that can spray on some foam insulation for you. I had the inside of a fiberglass camper shell lined with about 1" of foam years ago. They spray on the right amount and it expand to the correct thickness.
__________________
Mike and Carla
1998 42' Overland Larado Diesel Pusher
On the road - here and there - Full Timing
|
|
|
|
|
01-02-2012, 12:56 AM
|
#19
|
|
Winnebago Camper
Join Date: Jun 2010
Location: STETTLER
Posts: 25
|
One of the best adhesives has got to be closed cell spray foam. It will fill in any indentations and it sticks too everything & everything sticks to it. It took a month to get the stuff off my hands after doing house renos. If you are DIY you can order the two part kits and spray foam it all yourself. I did this in our house-sure got rid of cool air when windy. I used sheet foam in awkward spots & used the spray foam as an adhesive.
|
|
|
|
|
01-03-2012, 11:02 AM
|
#20
|
|
Winnebago Owner
Join Date: Mar 2007
Location: The Villages, FL
Posts: 62
|
Thanks for the thoughts on spray foam. I've used 1-part foam to fill some spaces, but holding the can upside down while I'm upside down under the coach seems problematic for any kind of a thorough and finished look. The foam board with the foil side out gives you a nice shiny exterior box when done. And with the two part stuff, I'd probably just foam myself into a ball stuck under the chassis!
One comment/correction regarding the Lux Win100 thermostat mentioned above: It is a nice unit, but be aware that it can only be set in the 45° - 90° F range. I was counting on having it turn on my lightbulb or mini-heater at 32° or so, and then shut it off at maybe 35°. It won't do that, because you cannot set temperatures in the low 30s. I didn't find this out until I cut it out of its packaging and actually started programming it. This info is not on the selling website, the package, or even the instructions within!
So for now, I'm controlling my lightbulb manually, but I might try a Thermocube (on at 35° off at 45°). If anyone has a 32° solution out there, I'd love to hear about it.
Dean
__________________
Dean (flew west) & Diane - Fulltiming since April '12
2004 Itasca Suncruiser 38R, Workhorse W22, Blue Ox, 2014 Ford Focus Titanium Hatchback (auto trans), 320 watts of portable solar
|
|
|
|
|
|
|
Currently Active Users Viewing This Thread: 1 (0 members and 1 guests)
|
|
|
 Posting Rules
|
You may not post new threads
You may not post replies
You may not post attachments
You may not edit your posts
HTML code is Off
|
|
|
 Similar Threads
|
| Thread |
Thread Starter |
Forum |
Replies |
Last Post |
|
Ford V10 Doghouse Insulation
|
|
General Maintenance and Repair |
21 |
12-31-1969 07:00 PM |
|
|
» Recent Discussions |
|
|
|
|
|
|
|
|
|
|
|
|
|
|
|
|
|
|
|
|
|
|
|
|
|


 Linear Mode

