 |
 01-26-2023, 03:03 PM
|
#1
|
|
Winnebago Camper
Join Date: Dec 2005
Location: upstate S.C.
Posts: 19
|
2003 Journey dash fan replacement
I need to replace the dash heater/ac fan, squawking like crazy, and only running on high speed, so resisitors are bad also. how do I remove the lower dash to get to the blower? I can see it through the louvers, but not sure what to remove and how. does anyone know where the resistors are for the lower speeds? Thanks, B
|

|

|
|
01-26-2023, 10:11 PM
|
#2
|
|
Winnebago Master
Join Date: Aug 2001
Location: North America somewhere
Posts: 2,098
|
On my MH, the resistor in on the outside of the heater core box on the outside of the firewall.
__________________
2000 Winnebago Ultimate Freedom USQ40JD, ISC 8.3 Cummins 350, Spartan MM Chassis. USA 1SG, retired;PPA,Good Sam Life member,FMCA. "We the people are the rightful masters of both the Congress and the Courts - not to overthrow the Constitution but to overthrow men who pervert the Constitution." Abraham Lincoln
|
|
|
|
|
01-27-2023, 09:41 AM
|
#3
|
|
Site Team
Join Date: Sep 2009
Location: Spring Branch, TX
Posts: 7,817
|
I would leave all behind the dashboard hvac to an auto hvac repair shop. To me, that’s a specialized area of knowledge and one that’s not historically full of repair ripoffs. Perhaps that’s just me.
__________________
2017 Winnebago Adventurer 37F
2016 Lincoln MKX Toad
|
|
|
|
|
01-27-2023, 10:33 AM
|
#4
|
|
Winnebago Master
Join Date: Nov 2018
Location: Pflugerville/Austin, Tx
Posts: 7,497
|
I find that looking at the parts lists can sometimes lead me to how to take things apart.
It might be better to let you go direct to the parts here?
https://catalog3d.winnebagoind.com/menu/Parts.htm
__________________
Richard
Why no RV year, make and floorplan on MY signature as we suggest for others?
I currently DO NOT have one! 
|

|
|
|
01-27-2023, 02:23 PM
|
#5
|
|
Winnebago Camper
Join Date: Dec 2005
Location: upstate S.C.
Posts: 19
|
thanks for the suggestions, can't see anything from the Winnie parts diagram that helps, i will keep looking.
|
|
|
|
|
01-27-2023, 03:34 PM
|
#6
|
|
Winnebago Master
Join Date: Nov 2018
Location: Pflugerville/Austin, Tx
Posts: 7,497
|
Okay, no reliable help there, so maybe some faulty memory type stuff?
Is there a carpeted "shield"' in front of the motor or is there a plastic cover with louvers exposed that you can see?
On some, I have found metal el bracket with screws hidden in the carpeting that comes off pretty easy----once I found the screws!
On other There was a plastic formed "shoud" that had a metal trim like strip running along the right side that let that end come out and pull out from clips on the left side.
That's where I was hoping for pictures to show as much clearer than word salad!
On the resister pack it seems to vary but all I have searched and found were in the air flow as that also cools them. I would have to start with more likely out under the hood if the thing sticks out there. Maybe look for wires going to it searching all the large space where the air moves?
Sounds like you have seen one before so know there is often not much to see of them from the outside? Just kind of small plate screwed to the plastic with wires??
Sounds like bearings on the motor so once finding it, you may have already found the resister pack.
Good luck.
__________________
Richard
Why no RV year, make and floorplan on MY signature as we suggest for others?
I currently DO NOT have one!
|
|
|
|
|
01-27-2023, 04:42 PM
|
#7
|
|
Winnebago Camper
Join Date: Dec 2005
Location: upstate S.C.
Posts: 19
|
It is a plastic cover with louvers, i can see the motor right behind it. I will check for screws under the carpet to start with. I was hoping not to have to remove all the upper dash to get to it. I will check for the resistors in the airbox under the hood, too. thanks.
|
|
|
|
|
01-27-2023, 06:08 PM
|
#8
|
|
Winnebago Master
Join Date: Nov 2018
Location: Pflugerville/Austin, Tx
Posts: 7,497
|
A different look?
I found this drawing on page 94 of this set:
https://www.winnebago.com/Files/File...O/3wkp34hd.pdf
It looks like they did not show the cover as part of the AC but part of the "front end".
If this looks like what you have, you may be able to spot a couple screws that hold a metal strip on the right end of the plastic shroud and when the trim strip is off the shoud then may pull out and let the left end out of some clips there?

Still hunting and pecking for the right dope so let me know if this is closer? 
__________________
Richard
Why no RV year, make and floorplan on MY signature as we suggest for others?
I currently DO NOT have one!
|
|
|
|
|
01-28-2023, 09:06 AM
|
#9
|
|
Winnebago Camper
Join Date: Dec 2005
Location: upstate S.C.
Posts: 19
|
Hi Morich, yes this is it. i spent this morning working on it, and it appears that the dash gauges and upper panels will need to be removed to access the left edge of the louvered cover where it is screwed in. I have a good shop in SC I am going to turn this over to, they have experience with the journeys and have probably done this before. I am a DIY guy and appreciate all the help from the Winnie community, thanks for taking the time to assist me.
|
|
|
|
|
01-28-2023, 10:53 AM
|
#10
|
|
Winnebago Master
Join Date: Aug 2001
Location: North America somewhere
Posts: 2,098
|
This old 2014 irv2.com thread has useful information in it and included hot links. https://www.irv2.com/forums/f115/das...ion-74445.html
and
https://www.google.com/search?q=winn...earch=irv2.com
When you need a solution to an RV problem, use the Google search box at the top of each irv2.com webpage to locate past threads addressing the problem.
irv2.com has a hundred times more members, which greatly increases the odds of obtaining a solution.
Morich is on there too, and we've both found a lot of answers there. Your name and password is the same there as here.
__________________
2000 Winnebago Ultimate Freedom USQ40JD, ISC 8.3 Cummins 350, Spartan MM Chassis. USA 1SG, retired;PPA,Good Sam Life member,FMCA. "We the people are the rightful masters of both the Congress and the Courts - not to overthrow the Constitution but to overthrow men who pervert the Constitution." Abraham Lincoln
|
|
|
|
|
02-01-2023, 04:34 PM
|
#11
|
|
Winnebago Owner
Join Date: Feb 2015
Posts: 65
|
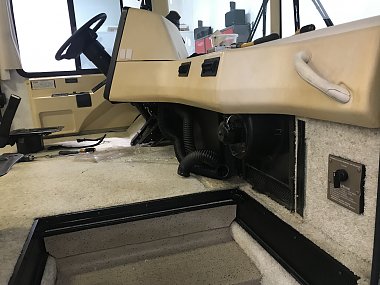
I just took my lower dash out to replace the floor. I stared on the lower center console and worked toward the driver door, mine was just held in with a few sheet metal screws. as you can see there is a clip on the right hand side that it slides into.
__________________
Frank
2001 Itasca Horizon
24' Enclosed Car Hauler
|
|
|
|
|
02-01-2023, 05:21 PM
|
#12
|
|
Winnebago Camper
Join Date: Dec 2005
Location: upstate S.C.
Posts: 19
|
Thanks for the info and pic. I will attack this again and see if i can get it out. changing the blower will be the easiest part.
|
|
|
|
|
02-01-2023, 07:06 PM
|
#13
|
|
MetroManic
Join Date: Jan 2020
Location: Puyallup, WA
Posts: 9
|
Replacing the blower fan and speed resistor.
I have an '03 Journey DL 36GD and had to do the same fan replacement a couple years ago. I'll try to attach some photos numbered according to the order I removed the lower shroud.
photo 1 shows my blower shroud before I began removing it.
photo 2 shows the first trim I removed that runs from the floor next to the door up past the dash.
photo 3 & 3B shows the removal of the hand grip - this was so I would have enough play in the upper shroud to begin loosening the lower shroud.
photo 4 - sorry this is a poor photo but shows hidden screws behind the storage bin once the bin is removed (refer to photo 1 - shows the bin on the left side of the lower shroud). This was the hardest part of the job - getting in that little hole to remove several screws.
photo 5 shows the lower shroud removed and reveals the blower motor
photo 6 just shows the new motor ready to install.
On my 36GD the fan speed resistor is accessible through the front access panel for the generator and circuit breaker box. You'll find the resistor mounted to your left on the face of the blower box, approximately opposite the new fan that you just installed.
If the photos don't load - please contact me and I'll email them to you.
Dale
__________________
Dale C
2003 Winnebago Journey 36GD DL
Sometimes seen with a 1954 Nash Metropolitan toad
|
|
|
|
|
02-08-2023, 05:56 PM
|
#14
|
|
Winnebago Camper
Join Date: Dec 2005
Location: upstate S.C.
Posts: 19
|
Thanks All for your help, I have it apart and waiting on repair parts now. FYI for other folks, the blower motor is a Unimotor 030-00137, mine had a bad bearing causing the squeal. The resistor is a Motorcraft 4c2H-19a706AH, which crosses over to an Advance auto Carquest part RUC 1019.
|
|
|
|
|
02-11-2023, 11:00 AM
|
#15
|
|
Winnebago Camper
Join Date: Dec 2005
Location: upstate S.C.
Posts: 19
|
Further FYI. That resistor pack is in an awfully difficult one-handed access spot behind the Front cap. I got the 2 screws out and removed ok, but re-installing was rough. Here is a hack i ended up doing to get it in. i cut a 3/8" square out of an old greeting card and puched a hole in the center, put it on the inside of the resistor pack and turned screw in about 1/4". it held the screw in place so I could align the screw with the holes, then i used a small metal pole to hold resitor in place while I screwed them in.This might help others.
|
|
|
|
|
|
Currently Active Users Viewing This Thread: 1 (0 members and 1 guests)
|
|
|
| Thread Tools |
Search this Thread |
|
|
|
| Display Modes |
 Linear Mode Linear Mode
|
 Posting Rules
|
You may not post new threads
You may not post replies
You may not post attachments
You may not edit your posts
HTML code is Off
|
|
|
|
 » Recent Discussions
 |
|
|
|
|
|
|
|
|
|
|
|
|
|
|
|
|
|
|
|
|
|
|
|
|
|


