|
|
 11-07-2011, 11:26 PM
|
#1
|
|
Winnebago Master
Join Date: Dec 2009
Location: Out there, somewhere
Posts: 1,742
|
Conversion of 12V to 6V Deep cycle, done, nice!
Ladies and gents,
Without going into too much boring detail here, we had 3, 12V Interstate Deep Cycle Marine house batts when we purchased the rig about 6 months ago. Within a month after bringing it home, one of those went bad with a dead cell. Within three more months, another one went bad, again a dead cell. These batteries are barely 18 months old. And, we've not done very much camping yet.
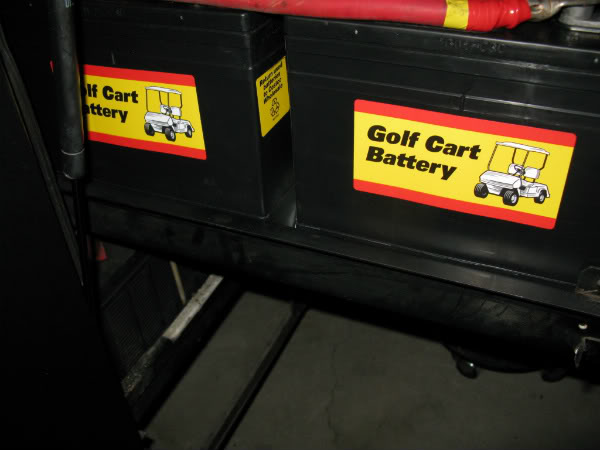
So, with that being said, we were off to Costco today to pick up 4, 6V Golf Cart batts and do a change over. To start off with, the tray was the exact width for the configuration in the pics. There's no side to side play at all. It's not tight but, it's not loose either. As far as length, I have about 2.5" of spare room. Now, it gets close as far as height it concerned.
Our rig is an '04 Itasca Horizon 36GD w/330 CAT. The height from the floor of the tray to the header of the compartment is 11.25". The Costco 6V batts are 10.75" tall, from the bottom of the battery to the top most protruding part, which is the handle brackets. The terminals are actually lower than the those. All I had to do was make sure the wiring was kept below the header as the tray was extended and retracted for battery service. So far, so good. I followed a wiring diagram I found on the net and it's actually "Series and Parallel".
When I hooked up the last wire/ground all was fine and the coach did not go up in flames, must have done it all right. All the new cables were of #1 gauge and sealed to the new copper lugs with self sealing shrink tube. Take a look at the pics and evaluate what you think.
Scott


__________________
2004 ITASCA HORIZON 36GD, 2011 GMC Sierra 1500 4x4 Toad '08 GL 1800 Gold Wing  Retired-29.5 yrs, SDFD, Ham - KI6OND
Me, Karla and the Sophie character, (mini Schnauzer)
Retired-29.5 yrs, SDFD, Ham - KI6OND
Me, Karla and the Sophie character, (mini Schnauzer)
|

|

|
|
11-07-2011, 11:48 PM
|
#2
|
|
Winnebago Owner
Join Date: Sep 2010
Location: Marquette, Michigan "Da UP"
Posts: 219
|
It looks like a clean installation, are you electing to forgo hold down clamps?<br>
__________________
John & Cathy R.
06 Pace Arrow 38L W24
08 Lincoln MKX AWD
See My RV Upgrades
|
|
|
|
|
11-08-2011, 09:29 AM
|
#3
|
|
Winnebago Master
Join Date: Dec 2009
Location: Out there, somewhere
Posts: 1,742
|
JohnRR,
Well Sir, here's my thought. In the present configuration of the batteries, there is zero side play. They can't move from side to side at all. As far as end play, the batteries are 3" shorter than the length of the tray so, Installed 1" thick, by 3" tall, by 6" long, HDPE Plastic blocks in between the ends of the tray and each battery and one in between the two sets of batteries. They now can't move in any direction what so ever.
Now, each of those batteries are close to 70 lbs each. I figure as long as I'm not doing about 100 mph off road with this rig, they should be fine and not come out of that tray. All sarcasm aside, I feel they're safe enough as they are. Thanks for the notice though.
Scott
__________________
2004 ITASCA HORIZON 36GD, 2011 GMC Sierra 1500 4x4 Toad '08 GL 1800 Gold Wing
Retired-29.5 yrs, SDFD, Ham - KI6OND
Me, Karla and the Sophie character, (mini Schnauzer)
|
|
|
|
|
11-08-2011, 09:37 AM
|
#4
|
|
Winnebago Owner
Join Date: Sep 2010
Location: Marquette, Michigan "Da UP"
Posts: 219
|
I was not questioning your thought process just your total plan. I do understand where you are coming from and do not disagree with in fact if my change over comes out the same as yours I'd do the same thing.
__________________
John & Cathy R.
06 Pace Arrow 38L W24
08 Lincoln MKX AWD
See My RV Upgrades
|
|
|
|
|
11-08-2011, 09:46 AM
|
#5
|
|
Winnebago Master
Join Date: Sep 2004
Location: Glen Allen, VA
Posts: 2,169
|
Very nice install. I'm planning to do same when my current three Delco Voyagers give up. I had measured the height of similar batteries at Sam's and was not sure they would fit without some cutting on the steel at the top of the battery compartment opening. We will see. I believe we will eventually end up with a residential fridge so I want the extra battery juice for the inverter.
Did you make up the cables yourself? If so, did you have to buy a crimping tool specifically for that?
__________________
'07 Country Coach Allure 470 Siskiyou Summit #31578, Cummins ISL 425; 2014 Ford F150 toad; Air Force One Toad Brake.
Glen Allen, VA; Smith Mountain Lake, VA.
|
|
|
|
|
11-08-2011, 12:53 PM
|
#6
|
|
Winnebago Owner
Join Date: Jun 2009
Posts: 149
|
Just a thought - While they may not bounce around from normal RV use, the question becomes what about in an accident? Do you really want to risk them getting jarred out of position and shorting out (mega amps) and possibly start a fire?
Dave
|
|
|
|
|
11-08-2011, 01:42 PM
|
#7
|
|
Winnie-Wise
Join Date: Jun 2010
Posts: 478
|
I tend to agree there is little chance of the batteries bouncing out but since the clearance is minimal you might want to add battery terminal covers to the positive posts. Something similar to these. 61 Battery Terminal - Cable Lug Covers & Protectors
Safe Travels
Bob
__________________
Bob, Sandi & Marmaduke the Big Pug
SW OREGON 2004 Journey 39K, 330 Cat
If towing: a 2006 Mini Cooper or 1995 Wrangler
|
|
|
|
|
11-08-2011, 01:52 PM
|
#8
|
|
Winnebago Owner
Join Date: Sep 2010
Location: Marquette, Michigan "Da UP"
Posts: 219
|
Great link too bad I did not know about it years ago 
__________________
John & Cathy R.
06 Pace Arrow 38L W24
08 Lincoln MKX AWD
See My RV Upgrades
|
|
|
|
|
11-08-2011, 10:18 PM
|
#9
|
|
Winnebago Master
Join Date: Dec 2009
Location: Out there, somewhere
Posts: 1,742
|
Quote:
Originally Posted by JohnRR

I was not questioning your thought process just your total plan. I do understand where you are coming from and do not disagree with in fact if my change over comes out the same as yours I'd do the same thing.
|
I appreciate your thoughts.
Quote:
Originally Posted by smlranger
Very nice install. I'm planning to do same when my current three Delco Voyagers give up. I had measured the height of similar batteries at Sam's and was not sure they would fit without some cutting on the steel at the top of the battery compartment opening. We will see. I believe we will eventually end up with a residential fridge so I want the extra battery juice for the inverter.
Did you make up the cables yourself? If so, did you have to buy a crimping tool specifically for that?
|
To you and anyone thinking of the 12v-6V change, measure everything at least twice. Length and width of the tray and or compartment and, the height from the bottom of the tray to the cross section of the header as it slides in to the battery compartment. On ours, that measurement is 11.25" and the batteries are 10.75 so, I had a half inch of clearance for things as needed. I kept almost all my wiring, terminal connections etc, lower than the highest part of the batteries.
And yes, I made up all my cables. Nope, I don't have any form of cable crimper. I should have bought one but, never got around to it. So, I simply put the copper lug into the vice with the cable end up. I heated it with my plumbing torch so the solder would melt. I put the solder down, picked up the cable, heated the ends of the wires, but not enough to burn them, and re-heated the molten solder, then jammed the wire/cable into the molten solder/lug. It makes the solder travel right up to the lip of the lug and almost touches the insulation of the cable. It instantly solidifies and that's the connection I made with all of the cables.
I would, every once in a while, put the end back in the vice and pull my guts out trying to dislodge the cable from the soldered lug, ain't happening. But, in the future, I think I'll either buy one of those hammer type crimpers or, a hand held, huge pliers type crimper, we'll see.
Quote:
Originally Posted by Dave78Chief
Just a thought - While they may not bounce around from normal RV use, the question becomes what about in an accident? Do you really want to risk them getting jarred out of position and shorting out (mega amps) and possibly start a fire?
Dave
|
Dave, no Sir, I'm not willing to risk a fire, but, like stated, they can't move. I might, at a later date, try and fab up some sort of hold downs, I can't use conventional ones because the clearance is too tight on the top side as the batteries pass by the header on the compartment. I'll come up with something later. Thanks for showing concern. Much appreciated.
Quote:
Originally Posted by 1ciderdog
I tend to agree there is little chance of the batteries bouncing out but since the clearance is minimal you might want to add battery terminal covers to the positive posts. Something similar to these. 61 Battery Terminal - Cable Lug Covers & Protectors
Safe Travels
Bob |
I'd have to see those terminal protectors in person because I did have some that were factory installed on the lead-in cables but, they almost rubbed right off the first time I attempted to close the battery tray with all the new batts in place. So, I removed them and the clearance is minimal but, none the less, is there. Like my answer to Dave, I'll come up with something. I too am not fond of the open ended positive side. But, it must be low profile. Thanks for the link.
__________________
2004 ITASCA HORIZON 36GD, 2011 GMC Sierra 1500 4x4 Toad '08 GL 1800 Gold Wing
Retired-29.5 yrs, SDFD, Ham - KI6OND
Me, Karla and the Sophie character, (mini Schnauzer)
|
|
|
|
|
11-09-2011, 07:45 AM
|
#10
|
|
Winnebago Camper
Join Date: Apr 2010
Location: Western Montana
Posts: 41
|
Looks like a nice clean install
A few questions
I see not voltage sense lines - your charger even a high end converter should be using voltage sense line to compensate for the line loss
What about a temperature probe in the battery compartment - where are you measuring the battery temperature?
__________________
Please do not toss your defective Converters / Inverters / etc. in the trash
|
|
|
|
|
11-09-2011, 07:54 AM
|
#11
|
|
Winnebago Watcher
Join Date: Aug 2011
Location: Johnstown, Colorado
Posts: 1
|
Just a thought. If the clerance is that tight how agout cutting and fitting a rubber mud flap to size and plac on top of the batteries filling the top gap. Any sort of thick rubber would be a good insulator and filler.
|
|
|
|
|
11-09-2011, 10:29 AM
|
#12
|
|
Winnebago Master
Join Date: Dec 2009
Location: Out there, somewhere
Posts: 1,742
|
Quote:
Originally Posted by KJINTF
Looks like a nice clean install
A few questions
I see not voltage sense lines - your charger even a high end converter should be using voltage sense line to compensate for the line loss
What about a temperature probe in the battery compartment - where are you measuring the battery temperature?
|
KJINTF,
Well Sir, there is the temp probe from the Dimensions 2000 watt inverter. It's positioned on the negative lug, on the right hand, inner battery. For the most part, you can't see it in the pictures. But, I assure you it's there. I've never heard of a "voltage sense line" but, that doesn't mean anything, it might be common on a lot of coaches but, I'm pretty sure it's not on mine. I did however, re-arrange a ton of parasitic wires that were all over the terminals on the chassis batteries. So, it's possible maybe it's in that rearrangement.
Quote:
Originally Posted by eccostar
Just a thought. If the clerance is that tight how agout cutting and fitting a rubber mud flap to size and plac on top of the batteries filling the top gap. Any sort of thick rubber would be a good insulator and filler.
|
eccostar,
Not a bad thought bud. I'll look into that. I kind of thought of something along those lines when I was doing the changeover but the thought just slipped away. The problem is, I have no way of securing it on the back side. I can't get my hand in and or around the back side of the batteries. Waaaaaaay too tight for my fat digits. But, I'll check into that idea. I appreciate your insight on this matter.
Scott
__________________
2004 ITASCA HORIZON 36GD, 2011 GMC Sierra 1500 4x4 Toad '08 GL 1800 Gold Wing
Retired-29.5 yrs, SDFD, Ham - KI6OND
Me, Karla and the Sophie character, (mini Schnauzer)
|
|
|
|
|
11-09-2011, 05:56 PM
|
#13
|
|
Winnebago Camper
Join Date: Dec 2010
Posts: 5
|
Quote:
Originally Posted by FIRE UP
I appreciate your thoughts.
And yes, I made up all my cables. Nope, I don't have any form of cable crimper. I should have bought one but, never got around to it. So, I simply put the copper lug into the vice with the cable end up. I heated it with my plumbing torch so the solder would melt. I put the solder down, picked up the cable, heated the ends of the wires, but not enough to burn them, and re-heated the molten solder, then jammed the wire/cable into the molten solder/lug. It makes the solder travel right up to the lip of the lug and almost touches the insulation of the cable. It instantly solidifies and that's the connection I made with all of the cables.
I would, every once in a while, put the end back in the vice and pull my guts out trying to dislodge the cable from the soldered lug, ain't happening. But, in the future, I think I'll either buy one of those hammer type crimpers or, a hand held, huge pliers type crimper, we'll see.
|
Hey FIRE UP, Thanks for the post, Looking to do the same soon..If I may add to you're comments.. never solder terminal ends ....always crimp! and use tin covered or zink coated cable ends...copper is ok but no2 on the galvanic corrosion scale....coat the metal ends and terminals with any thing...I prefer dialectric grease or vasoline..but liquid tape works also, something to keep the acid off them...Thanks again,
Richard
__________________
May the wind be at your back,The sun in your face
And your love by your side!!
USMC 68/74 RVN 69/70. Semper-Fi!
|
|
|
|
|
11-10-2011, 06:28 AM
|
#14
|
|
Registered User
Join Date: Oct 2009
Posts: 437
|
Thanks for the post; It's great; If only one in ten posts were this Imformative on this RV Site would be nice; No back and forth snickering.. Thanks for Shearing it; Life is good.
|
|
|
|
|
11-11-2011, 12:21 AM
|
#15
|
|
Winnebago Master
Join Date: Dec 2006
Location: Santa Clarita, CA.
Posts: 1,222
|
Quote:
Originally Posted by 1ciderdog
I tend to agree there is little chance of the batteries bouncing out but since the clearance is minimal you might want to add battery terminal covers to the positive posts. Something similar to these. 61 Battery Terminal - Cable Lug Covers & Protectors
Safe Travels
Bob |
Yeah, nice link.. As to battery clearence: Once you get through the door there is at least 4" to the "ceiling". I trimmed off about 1/2" of the entrance plate steel and repainted so there are no slide-in clearance issues at all.
__________________
_______________________________
Jeff - WA6EQU
'06 Itasca Meridian 34H, CAT C7/350
|
|
|
|
|
11-11-2011, 09:16 AM
|
#16
|
|
Winnebago Owner
Join Date: Sep 2010
Location: Somewhere, BC.
Posts: 109
|
Quote:
Originally Posted by Dave78Chief
Just a thought - While they may not bounce around from normal RV use, the question becomes what about in an accident? Do you really want to risk them getting jarred out of position and shorting out (mega amps) and possibly start a fire?
Dave
|
I would think if you got into an accident that would affect the batteries, you'd have a lot more damage to worry about than that. Besides, once an insurance claim, it covers the whole thing.
__________________
Les (RVM12), Bonnie, Morgan and 4 leggers Bella & Bruce
2010 Forest River Cardinal 3450RL 40' Full Body Paint- 2015 Ram 3500 Laramie 6.7 ltr Turbo Diesel, 68RFE Trans. 4x4 SRW SB Pullrite 2900 18K FMCA-420438 Good Sam
[SIGPIC][/SIGPIC]
|
|
|
|
|
11-11-2011, 03:20 PM
|
#17
|
|
Winnebago Master
Join Date: Dec 2006
Location: Santa Clarita, CA.
Posts: 1,222
|
Seriously....
I can't imagine what situation would cause 4ea. 65+lb batteries all tied together with 4/0 cable and on a tray 4" deep with zero play to jump out perfectly vertical without catastrophic damage elsewhere. And besides, where are they gonna go?
__________________
_______________________________
Jeff - WA6EQU
'06 Itasca Meridian 34H, CAT C7/350
|
|
|
|
|
11-12-2011, 07:49 AM
|
#18
|
|
Registered User
Join Date: Oct 2009
Posts: 437
|
There is one more aspect.. This is not ment to dissagree with any one;; However over the past years since 1976. (1975, 22' Shasta Was our first ) we have been Motorhoming. And snowmobiling in the winter time, ( IT's the most beutifull time of the year to motorhome) We would set in the hills Some times as cold as 37 Degrees below zero; in the shasta We had the Big N8 battery, Because the furnace draws Near 7 amps, It would last all night; However in the newer coaches that have 3 or 4 29 or 32 batteries we have never had a problem, I say never if used senceable. We run the genset 20 minutes in the morning and 20 minutes in the evening,, The wife uses the inverter For the Hair curlers. Microwave, any thing alse she might need, Watching a movie has little draw on the battery; I have changed batteries, Now looking back over the years , Would I do it again.. Heck NO, . To me it is like after I buy a Motorhome I take it into the shop and tell them make it go 200 Miles per hour. This is only My experiance, That 72 years has thought me. Life is good..
|
|
|
|
|
11-12-2011, 09:07 AM
|
#19
|
|
Winnebago Camper
Join Date: Dec 2007
Posts: 34
|
We have a 2007 Meridian 36ft.Three years ago I did the same as you did with the Costco 6 volt batteries.I used the same cables that came with the 12 volt batteries.I do not have "battery holder" installed on ours also.So far have never had a problem with them moving around and we do alot of dry camping in some very uneven roads.You will love 6 volt over the 12 volt.
|
|
|
|
|
11-12-2011, 11:16 AM
|
#20
|
|
Winnie-Wise
Join Date: Dec 2002
Location: Draper, UT
Posts: 309
|
Hi Ho: Good job. Soldering the connections is really the way to go. It's permanent and not as subject to corrosion as crimped wire.
I don't think the lack of hold-downs is an issue either. We did a similar installation about 8 years ago and have never had a problem.
I like the S shaped connections that provide strain relief. One small idea is that of providing approximately equal length for the two sets of batteries. With #1 or #2 AWG we assume that voltage drop along a two foot piece of wire is negligible. This is true for small currents, but currents of 100 amps or so are not uncommon for some charging conditions. What lots of folks do is to connect one wire (positive or negative) to each of the two sets of batteries. If the two sets of batteries are not at exactly the same potential current drainn will also be uneven.
One last idea is to spray the terminals with battery terminal spray paint. This tends to prevent the build-up of stuff on the terminals.
Anyway, good job. I hope the Costco batteries work well. We are just about the replace ours and that's what I have in mind.
Dirk
|
|
|
|
|
|
|
Currently Active Users Viewing This Thread: 1 (0 members and 1 guests)
|
|
|
| Thread Tools |
Search this Thread |
|
|
|
| Display Modes |
 Linear Mode Linear Mode
|
 Posting Rules
|
You may not post new threads
You may not post replies
You may not post attachments
You may not edit your posts
HTML code is Off
|
|
|
|
 » Recent Discussions
 |
|
|
|
|
|
|
|
|
|
|
|
|
|
|
|
|
|
|
|
|
|
|
|
|
|